• home
  • about me
  • latest
  • brooke beyond

  • destinations
    • WORLD MAP
    • Africa
      • Botswana
      • Morocco
      • Namibia
      • South Africa
      • Zambia
      • Zimbabwe
    • Asia
      • Cambodia
      • China
      • Indonesia
      • Laos
      • Thailand
      • Vietnam
    • Aus + NZ
      • Adelaide & South Australia
      • Brisbane & Queensland
      • Hobart & Tasmania
      • Melbourne & Victoria
      • Perth & Western Australia
      • Sydney & New South Wales
      • New Zealand
    • Europe
      • Austria
      • Czech Republic
      • France
      • Germany
      • Hungary
      • Iceland
      • Ireland
      • Italy
      • Netherlands
      • Poland
      • Slovenia
      • Spain
      • Switzerland
      • UK
    • Latin America
      • Mexico
        • all Mexico
        • Baja Peninsula
      • Argentina
      • Bolivia
      • Brazil
      • Chile
      • Colombia
      • Ecuador
      • Panama
      • Peru
    • USA
      • Arizona
      • California
      • Colorado
      • Hawaii
      • Idaho
      • Montana
      • Nevada
      • New Mexico
      • Oregon
      • Utah
      • Washington
      • Wyoming
  • hiking guides

brooke beyond

Climbing Mt Rainier Emmons Glacier Camp Schurman
USA / Washington

Climbing Mt Rainier via Camp Schurman & the Emmons Glacier

July 13, 2021

Growing up in the shadow of Mt Rainier, the most glaciated peak in the continental US, it seemed only fitting that this be my first major glacier climb— what I hadn’t anticipated was just how incredibly technical, physically exhausting, and mentally demanding it would be.

This week, I set out with dad (his third Rainier summit), Eileen (who would be coming to base camp and prepping us for the ascent), and my boyfriend Dan (who wanted to summit almost as badly as I did) for the expedition of a lifetime. There are hardly words to describe the rush I felt standing on the edge of the caldera at 14,411ft with the entirety of Washington state stretched beneath me, but I can say that I’m now fully afflicted with summit fever and I can hardly get crampons on fast enough for our next adventure.

Climbing Mt Rainier Emmons Glacier Camp Schurman
Mt Rainier from Sunrise

Day 1: Sunrise Visitor Centre to Burroughs 2 & back to Sunrise Camp (6.1mi, 1245ft gain)

After organising a slew of last-minute changes to our camping permits and checking in with the ranger to obtain our climbing permit at the White River Ranger Station, Dan and I left our van and drove with dad and Eileen up to the Sunrise Visitor Centre to begin our long approach to Mt Rainier.

Although it would have been far quicker to hike directly from White River to Glacier Basin and up to Camp Schurman (the standard approach), we opted for a long, scenic route that would grant us additional time to practice some snow and glacier skills, as well as afford incredible views of the mountain we’d soon be atop. Absolutely worth the additional time!

Climbing Mt Rainier Emmons Glacier Camp Schurman
The gang leaving Sunrise Visitor Centre for our expedition
Climbing Mt Rainier Emmons Glacier Camp Schurman
Me and Dan hiking to Sunrise Camp

We assembled some last minute gear, weighed our packs (46lbs for me, a hair heavier than anything I’ve carried before), and set out on the trail just before 11am, practically bursting with anticipation. 

The first leg of the hike was a mere 1.3mi downhill to Sunrise Camp, where we pitched tents and dropped some of our weight before continuing onwards another 2.4mi up and over 2nd Burroughs Mountain. 

Climbing Mt Rainier Emmons Glacier Camp Schurman
Burroughs 2 offers a pretty striking view of Mt Rainier & our route to the summit
Climbing Mt Rainier Emmons Glacier Camp Schurman
Adorable marmots scurrying about near Burroughs
Climbing Mt Rainier Emmons Glacier Camp Schurman
The summit of 2nd Burroughs Mountain

Thankfully, the trail was fairly gradual and, despite crossing over snow in a few steep sections, we reached the summit of Burroughs 2 about an hour later. With clear skies, unobstructed sun, and incredible mid-July weather, I’ve never seen Rainier look so beautiful.

I’ve also never appreciated Mt Rainier’s immense scale as much as I did in that moment— it felt genuinely hard to imagine we’d soon be on the summit, which looked hundreds of miles away and hardly climbable for all the steep ice covering its glaciated slopes. 

Climbing Mt Rainier Emmons Glacier Camp Schurman

I’d heard that the Emmons (our route up to the summit) is actually the largest glacier in the contiguous US, but seeing it (and visualising myself on it) was an entirely different kind of impressive. The pressure of my own desire to be on that summit nearly sucked the wind right out of me.

Climbing Mt Rainier Emmons Glacier Camp Schurman
Burroughs Mountain at golden hour
Climbing Mt Rainier Emmons Glacier Camp Schurman
Climbing back up to Burroughs Mountain from our practice snow slope

We spent the remainder of the afternoon practicing ice axe arrest, kicking steps, and other basic snow skills on a slope that, I can now confirm, really did not capture the difficulty of the mountain we’d soon be ascending (but was still 100% necessary and did a lot to get our team— me, dad, and Dan— prepped for the expedition).

As the most experienced mountaineer (not only in our group, but also that I’ve ever met), Dad headed up our training, assisted by Eileen, who’s spent the last 2 decades learning from him, and Dan, who’d previously gone through a mountaineering course with Skagit Alpine Club and climbed a number of lesser but still very impressive volcanos in the state. 

All that expertise combined was the ultimate crash course for me, an experienced hiker with some recent time on snow but no real glacier skills— without this careful attention, I simply wouldn’t have been ready for such a massive and technical undertaking. And to do it with my family… all the more special.

Climbing Mt Rainier Emmons Glacier Camp Schurman
2nd Burroughs Mountain looking up at Mt Rainier

Day 2: Sunrise Camp to Burroughs 2 and onwards to Glacier Basin, Inter Glacier & Camp Curtis (7.4mi, 4700ft gain)

The following morning, as we packed up our low camp at Sunrise and hustled back over Burroughs 2 with our full packs, our climbing gear attracted the attention of several hikers who stopped to ask what we were climbing. 

As we pointed up at Mt Rainier, there was a certain satisfaction in the way their jaws fell open and it really struck me that few people ever see the mountain any closer than from this (admittedly fantastic) viewpoint. They asked if it would be an easy climb and I don’t think even we knew the extent of it when we responded ‘not quite’.

Climbing Mt Rainier Emmons Glacier Camp Schurman
Me and Dan on Burroughs 2 with our full packs
Climbing Mt Rainier Emmons Glacier Camp Schurman

From Burroughs, we dropped over the steep slope and spent the next couple hours bushwalking along a rough game trail, losing and re-finding the faint path dozens of times as we searched the mountain for a safe way to cut above Glacier Basin and drop onto the Inter Glacier. 

The wildflowers were an explosion of colour as we trapsed across lush meadows and over gushing streams, admiring the backcountry feel of our route despite being only a few miles from one of the busier areas in the entire national park.

Climbing Mt Rainier Emmons Glacier Camp Schurman
Wildflowers in front of Little Tahoma
Climbing Mt Rainier Emmons Glacier Camp Schurman

In the end, it actually would have been quicker just to rejoin the established trail through Glacier Basin 2000ft below and climb up to the Inter Glacier along a formed path, but instead we fought through thickets of trees and picked our way across precarious scree and talus slopes for several miles— the Brisbine method. 

We were all incredibly tired, sore from the steep descent, and eager to sit down, so it was with great relief that we finally stepped off of the unstable rocks and onto the snow around 4pm— but the adventure was far from over!

Climbing Mt Rainier Emmons Glacier Camp Schurman
Roping up on the Inter Glacier
Climbing Mt Rainier Emmons Glacier Camp Schurman

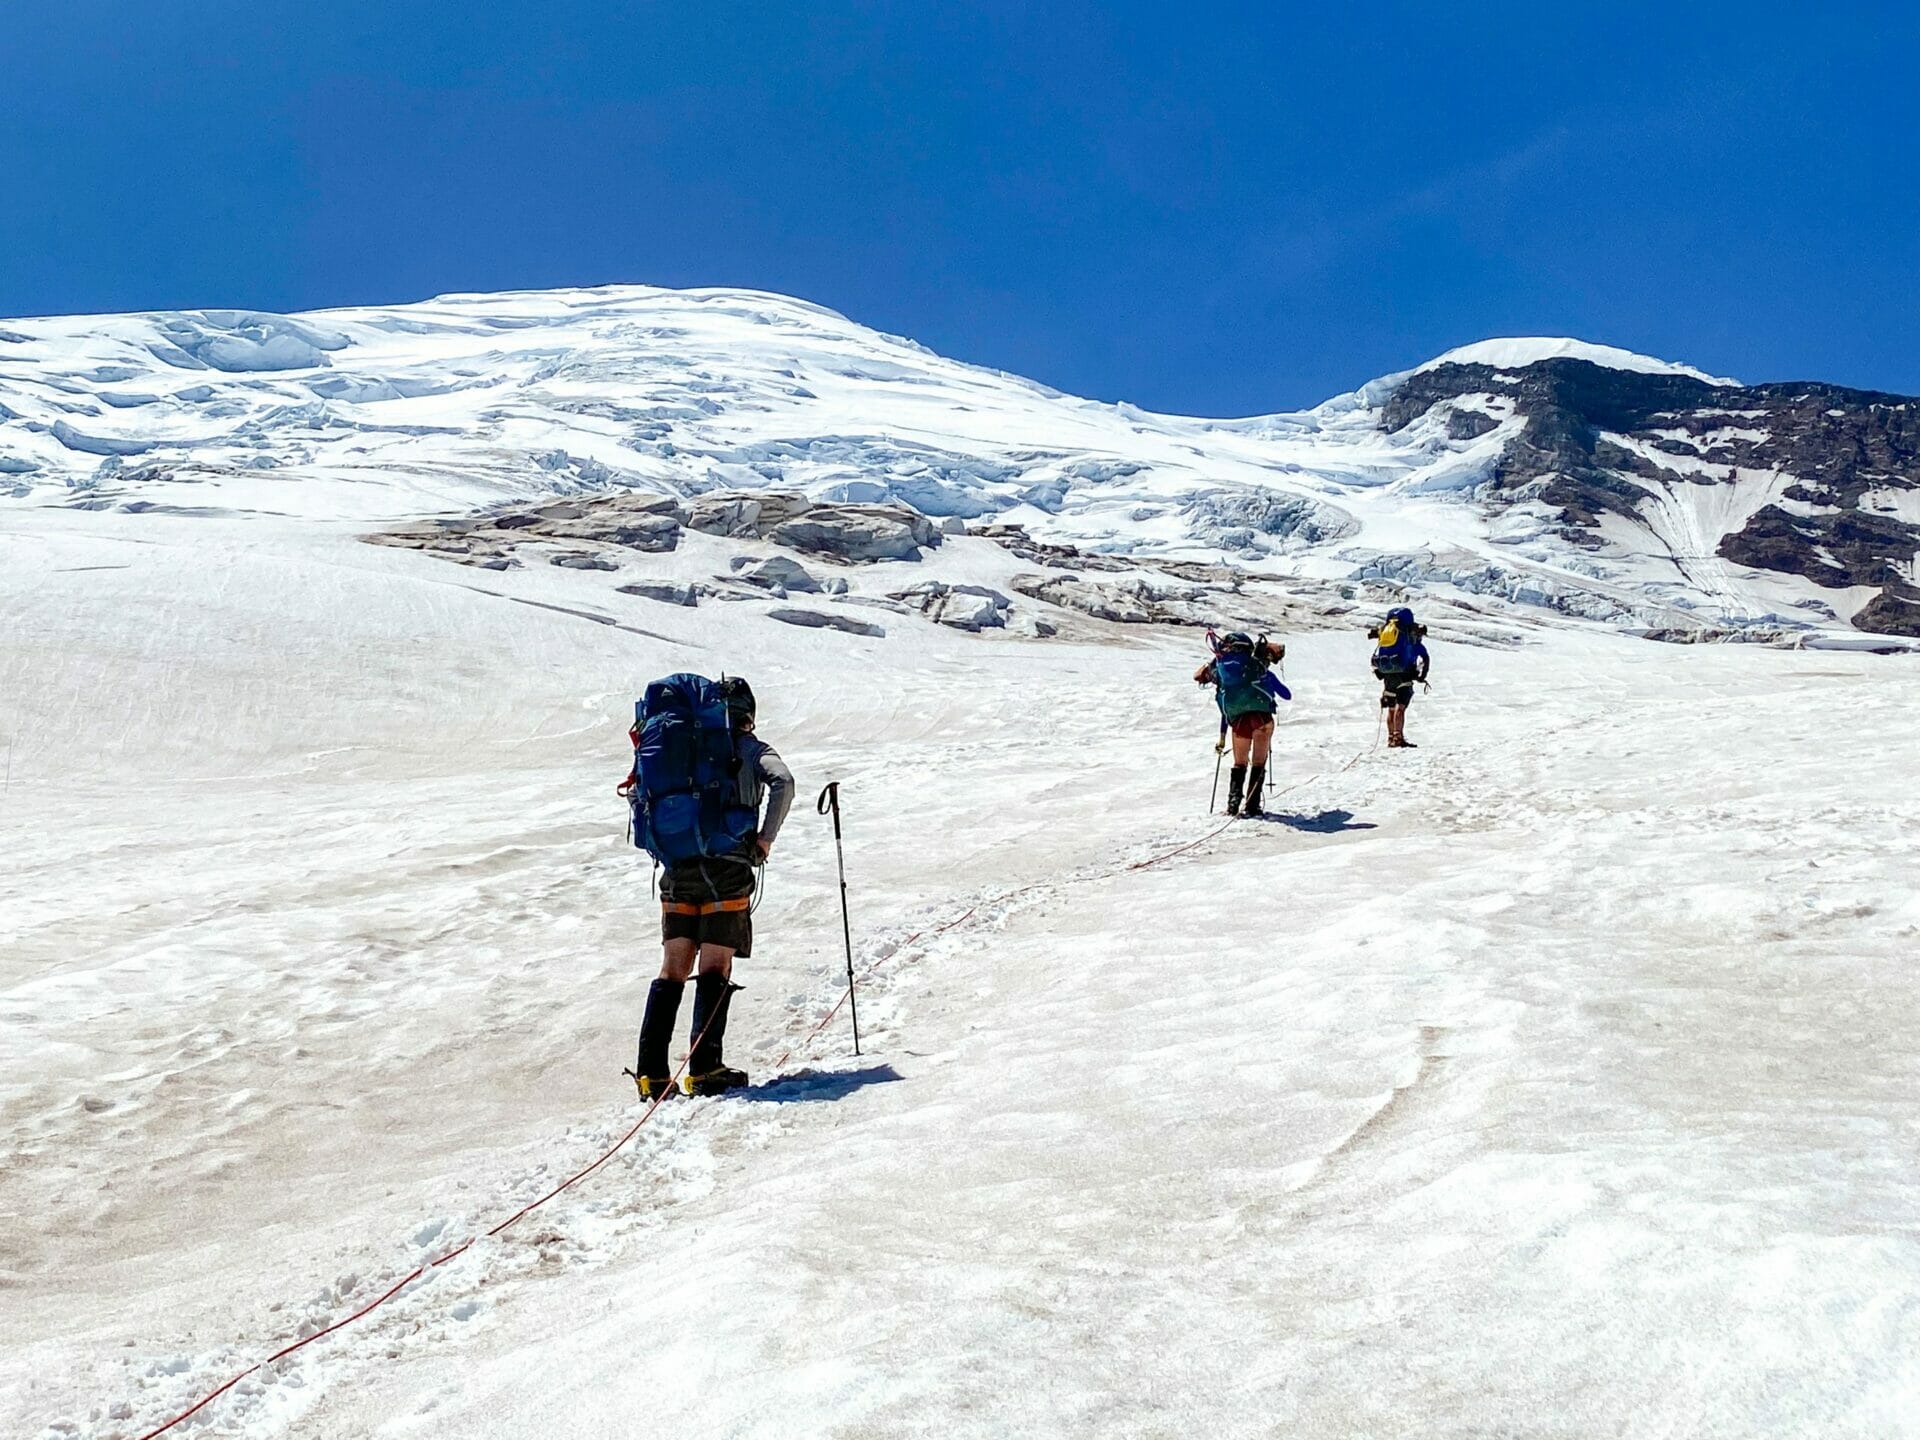
Here, we roped up for the first time, I attached the prussiks I’d been practicing with, and crammed my mountaineering boots into crampons for the 2,000ft ascent up the Inter Glacier. 

Plenty of teams make this trek without rope or even crampons, but I was infinitely thankful for the practice of moving together and handling my ice axes on the steep slopes, experience that ultimately made the following day’s summit attempt possible.

Climbing Mt Rainier Emmons Glacier Camp Schurman

Three hours later, we crested over the top of the Inter Glacier onto the loose ash and rock of Camp Curtis (8,685ft), hardly more than a few slanted patches of dirt along the ridgeline leading up to Steamboat Prow.

Exhausted and ready to crash, we set up our tents, wolfed down a quick dinner, and settled in for what would hopefully be a long sleep— finally, we were setting no alarm, the only goal for the next day to sleep in, reach nearby Camp Schurman, and then rest ahead of our midnight departure.

Climbing Mt Rainier Emmons Glacier Camp Schurman
Camp Curtis
Climbing Mt Rainier Emmons Glacier Camp Schurman
Sunset over Cowlitz Chimneys from Camp Curtis

We were the only party here at Camp Curtis for the night and the sunset put on a real show, the only reward I needed for another long day en route to Mt Rainier. 

From our position above the clouds, the entire state seemed to light up beneath us, Glacier and Baker towering above the horizon, Stuart’s distinctive summit visible in the distance, and even Puget Sound sparkling off to our left.

As much as Dan and I originally wished to be staying at Schurman both nights with no need to re-establish camp, there was an undeniable benefit to the quiet atmosphere (and surreal beauty) of Curtis, a stunning and very restful experience I wouldn’t actually have traded for any convenience. 

Climbing Mt Rainier Emmons Glacier Camp Schurman
Sunset at Camp Curtis

Day 3: Camp Curtis to Camp Schurman (1mi, 700ft gain)

With the plan to get as much rest today as possible, Dan and I slept until 9am in our tent, a difficult feat considering that we were practically being laser-beemed by the intense morning sun. 

Finally, we rolled out of bed, enjoyed a leisurely breakfast, and then roped up for the relatively short ascent (700ft vertical) to Camp Schurman, our true base camp for climbing up the Emmons Glacier to Rainier’s lofty summit at 14,411ft.

Climbing Mt Rainier Emmons Glacier Camp Schurman
Crevasses right out of Camp Curtis
Climbing Mt Rainier Emmons Glacier Camp Schurman
Climbing from Camp Curtis to Schurman

The most difficult part of the journey was just getting off the rock and onto the snow for our climb to Schurman, but the crevasse-laden route proved another worthwhile opportunity to practice our communication and rhythm on the rope. 

By the time we did reach Camp Schurman less than an hour later, we were already feeling like a well-oiled team capable of anticipating each others’ moves and shuffling along in perfect unison. Even though Eileen wouldn’t be summiting with us, she did a lot to facilitate that synergy. 

Climbing Mt Rainier Emmons Glacier Camp Schurman
Crevasses near Camp Schurman
Climbing Mt Rainier Emmons Glacier Camp Schurman
Climbing from Camp Curtis to Schurman
Climbing Mt Rainier Emmons Glacier Camp Schurman
The summit of Mt Rainier starting to look a bit closer!

It was with great concern, then, that we fielded a frantic request from a fellow climber to join our rope team before we’d even reached camp. His third party member was suffering from the altitude and he hoped that he and his second party member could rope to us for the ascent, a joining of forces that none of us (perhaps save for dad) was particularly comfortable with at this late hour. 

We deliberated over lunch, but ultimately decided that there were too many unknown variables— the pace of the other climbers, their experience, their risk tolerance… all could easily disrupt the careful rhythm we’d managed to cultivate, especially considering my own lack of experience. 

Climbing Mt Rainier Emmons Glacier Camp Schurman

I felt selfish for putting my own summit attempt above others’, but was reminded by both Dan and Eileen that you need to be able to trust your rope team with your LIFE and therefore that caution is never a bad thing on the mountain. 

In the end, the team ascended with their 3rd sick person at 9.30pm that night and, last we saw from Schurman, were still less than half-way back to camp at 6pm the following day— we hope they made it down safely, but also felt vindicated in not having joined forces with a team that proved slow, inexperienced, and somewhat reckless (the afternoon snow-melt was no joke!).

Climbing Mt Rainier Emmons Glacier Camp Schurman
Camp Schurman
Climbing Mt Rainier Emmons Glacier Camp Schurman
Base camp at Schurman
Climbing Mt Rainier Emmons Glacier Camp Schurman
Mt Rainier from Camp Schurman

Camp Schurman itself was quite something to behold, the small ranger station and toilet (!!) situated atop a rocky outcrop similar to Curtis and the tents pitched directly on the Winthrop Glacier, all in the immense shadow of Mt Rainier’s northeast flank. 

Steamboat Prow just above was a powerful reminder of just how far we’d come to base camp. From Burroughs, this triangular section of rock at the top of the Inter Glacier had appeared right at the base of Mt Rainier, almost close enough to reach out and touch, but in reality, the crevasse-studded glacier between the top of Steamboat Prow and Mt Rainier stretched for an eternity. The summit felt so close and still so far. 

We spent the remainder of the day readying our packs, relaxing in the sun, and then finally retreated into our tents at 6pm to try and get some rest. 

Climbing Mt Rainier Emmons Glacier Camp Schurman
Sunset at Camp Schurman [photo from Eileen]

Day 4: Camp Schurman to Mt Rainier Summit & back to camp, Inter Glacier, Glacier Basin & White River (5,011ft gain & 10,400ft loss)

Of course, nervous excitement (as well as constant chatter from returning climbers and large guided groups) prevented me from falling asleep before 9.30pm, so it was with about 1.5hrs of rest that Eileen jostled me and Dan awake at 11pm to announce that breakfast was served.

Through tired eyes and thick layers of clothing, Dan and I exchanged a quick glance in our tent that instantly conveyed all of the anticipation, euphoria, fear, and determination we were both feeling.

The night was so much colder than we’d imagined, the ground had formed into a giant sheet of ice, and we were acutely aware of how crucial every single calculated step would be in getting us safely up and down Rainier in these conditions. 

Climbing Mt Rainier Emmons Glacier Camp Schurman
Preparing to leave base camp at midnight

Since Eileen had been suffering from a migraine for the better part of 2 weeks and wasn’t ascending, she stepped eagerly into the role of ‘camp mother’, readying hot drinks for everyone, checking and rechecking our gear, and finally sending us on our way at 12.05am on Friday morning. 

We wouldn’t have been half as efficient without her, but soon enough we were on our own, ascending steadily up the icy slopes of the Winthrop Glacier and onto the Emmons by headlamp, only her final advice rattling through my mind— just keep moving. 

Climbing Mt Rainier Emmons Glacier Camp Schurman
Dan climbing by headlamp behind me

Perhaps the most exhausting part of the entire experience, and something I didn’t really appreciate until we took our first steps into the night, was the individual responsibility of mountaineering.

I’d already come to understand what an incredibly team-based, collaborative endeavour it is to climb a mountain. Being roped to your team means that you are responsible for arresting their falls and that you are entrusting them to slow your slips in the same way. Establishing a careful rhythm and seamless communication to the point that we could anticipate each other, even through the dark, was massive.

Climbing Mt Rainier Emmons Glacier Camp Schurman

At the same time, the entire team is only as strong as the weakest person, and I was keenly aware of being that person, never having summited anything in the same realm as Rainier. I was on high-alert with every step, kicking my crampons into the ice and driving my ice axe firmly into the snow, knowing that if I went down, I could very well take everyone with me. 

No amount of their experience could make up for a serious mistake on my end, and that responsibility weighed heavy on me. I channelled every ounce of focus into the climb, existing in the shallow glow of my headlamp somewhere 17m behind dad and 17m ahead of Dan, but watching and listening constantly for my cue to change directs or, more gravely, drop to the ice and brace to hold the team against a fall.

Climbing Mt Rainier Emmons Glacier Camp Schurman
Dad climbing over an imposing ice shelf

Something about climbing so rhythmically in the dark, only a 40 degree ice slope visible below me and the summit completely lost in the night, also played with my perception of time and it seemed only an hour had passed by the time Dan called out that the sun was starting to ignite the horizon in a blood-red glow.

In the last 4.5hrs, we’d travelled an immense distance up the mountain and encountered terrain that took all of us by surprise. 

Climbing Mt Rainier Emmons Glacier Camp Schurman
Climbing around an icicle-filled crevasse
Climbing Mt Rainier Emmons Glacier Camp Schurman
Dad navigating around crevasses on Mt Rainier

In the cold morning air, entire sections of the route had formed into sheer ice shelves, and I don’t think I’ve ever felt more determined than as I kicked crampons barely more than an inch into the unforgiving ice and punched the pick of my axe into the slope with such vigour that I bruised knuckles. 

These were not conditions any of us had expected, often reminiscent of a vertical ice climb, and so I left nothing on the table as I dug into the side of the mountain with every bit of strength I had, knowing that a fall at this stage would probably cost lives. 

Climbing Mt Rainier Emmons Glacier Camp Schurman

If I had worried about my ability to stay alert through the night with only 1.5hrs of sleep, I needn’t have— I don’t think I’ve ever felt so wired.

And still, what a curious sensation to be completely overcome by adrenaline as you move slowly and steadily up the ice, the calm monotony of dad’s pace at immediate odds with the excitement and nerves bubbling inside me. 

Climbing Mt Rainier Emmons Glacier Camp Schurman
Sun rising over the icy slopes of Mt Rainier as Dan climbs behind me

Finally, the sun had risen high enough to pull off our headlamps (but still no layers of clothing) and we continued upwards along icy slopes burning red under the ethereal glow of the 5am sun. 

In the light, the climb took on an entirely different feel, blue ice inside gaping crevasses now visible as a faint line of boot tracks skirted the edges and wound tightly up the mountain.

The summit looming overhead didn’t seem to be getting any closer and I almost wished for the blindness of the night, where I had no view of the summit and no concept of our progress, and instead all I could do was take slow and steady steps towards some invisible goal. 

Climbing Mt Rainier Emmons Glacier Camp Schurman
Climbing Mt Rainier as the sun rises [photo from dad]

When we stopped for a break, I could also recognise the enormous mental energy that our climb required of dad as he calculated every step, keenly aware of the team’s reliance on his judgement. 

Eileen later confided that dad had said he’d be getting us to the summit, end of story— that determination was written hard across his face as he silently munched trail mix and stared out at the kaleidoscope sunrise beneath us.

Climbing Mt Rainier Emmons Glacier Camp Schurman

The burden of experience is knowing what can go wrong (and exactly how much needs to go right), but for all Dan’s anxiety about the climb and our own preparedness, he too was silently determined when the time finally came. 

For my part, perhaps I never appreciated the true gravity of climbing Rainier enough to doubt our success— naivety, as it turns out, is a powerful kindling for desire. And I wanted this more than anything. 

Climbing Mt Rainier Emmons Glacier Camp Schurman
Mt Rainier’s icy caldera in the morning light
Climbing Mt Rainier Emmons Glacier Camp Schurman
From the summit of Mt Rainier

Seconds after 8am on Friday morning, almost exactly 8hrs after our dark departure from Camp Schurman, dad, Dan, and I crested over the final icy slope of Mt Rainier and onto the soft ash of the caldera.

We had made it to the summit. 

Climbing Mt Rainier Emmons Glacier Camp Schurman

It’s hard to say what each was feeling in that moment— certainly excitement and a swelling sense of accomplishment, but also a flood of relief. 

Dad and Dan agreed the conditions were monumentally more challenging than they’d expected, and although neither voiced them specifically, the release of the night’s doubts hung in the air as we smiled and allowed ourselves to finally bask in the warm glow of success. 

Climbing Mt Rainier Emmons Glacier Camp Schurman
Dad, me, and Dan on the summit of Mt Rainier
Climbing Mt Rainier Emmons Glacier Camp Schurman
Beaming on the summit of Mt Rainier

I felt almost nauseated by the wave of euphoria that crashed over me on the windy summit, the weight of what we’d done finally apparent as we wielded ice axes for a group photo and exchanged tight hugs. 

But swiftly on the back of that startling realisation— that I’d climbed something so much harder than I ever imagined— came the equally alarming realisation that we’d now have to descend. And if there was anything my previous summit experience did prepare me for, it was that the descent is almost always harder than the ascent. 

Climbing Mt Rainier Emmons Glacier Camp Schurman
Mt Rainier’s snowy caldera

There’s a popular saying among mountaineers that the summit is optional, the descent is not— and with that ringing in my ears, I considered for half a second that I’d bitten off more than I could chew. The ice, incredibly challenging on the way up, could prove overwhelmingly treacherous on the way back to camp. 

Had there been a parachute handy, I gladly would have leapt straight off the caldera just to save myself the stress. 

But alas, after 1.5hrs on the summit, I was forced to turn back the way we’d come and begin the nerve-racking downclimb, no doubt white-knuckled beneath my gloves and a little green around the gills. 

Climbing Mt Rainier Emmons Glacier Camp Schurman
Dad belaying Dan down a steep slope

The first section of our descent proved the worst, conditions still icy around the summit and our own boot tracks incredibly hard to see. When we did eventually spot them 30ft below, dad set up a belay so that Dan and I could front-point down the alarmingly steep slope, punching our pick in with every careful step. 

Thankfully, things got much more manageable once we were back on the tracks, and the farther we descended the mountain, the softer the snow became until we were finally able to comfortably plunge-step at a fast clip. 

With every foot we dropped, my anxiety unravelled and soon evaporated, now just enjoying the return journey to our ever-nearing tent. 

Climbing Mt Rainier Emmons Glacier Camp Schurman

We even managed to avoid the ice-climbing sections that all were dreading, arriving almost by fate to an alternate vertical wall of snow at the same moment as a solo skier was making his ascent. 

Through excited collaboration, Dan set a picket and dad belayed the skier up, who then belayed each of us down the sloppy slope to solid ground, and we were soon on our way back down the mountain via a verified shortcut route that Barrett (our skier friend) had just established. 

Climbing Mt Rainier Emmons Glacier Camp Schurman
Descending back to Camp Schurman [photo from Eileen]
Climbing Mt Rainier Emmons Glacier Camp Schurman
Descending Mt Rainier [photo from Eileen]
Climbing Mt Rainier Emmons Glacier Camp Schurman
Descending back to base camp [photo from Eileen]

At 2.30pm, exactly 5hrs after leaving the summit, we arrived back into Camp Schurman, greeted by a nervous but very excited Eileen who couldn’t wait to hear every tiny detail of our harrowing adventure. 

And yet, it was hardly over.

Climbing Mt Rainier Emmons Glacier Camp Schurman
A very tired but happy team back at base camp

We packed up tents in a flurry and tied back onto the rope around 4pm, winding our way back around to Camp Curtis, up onto the Inter Glacier, and all the way down to Glacier Basin, where Eileen poured a very exhausted dad into a flat campsite and ordered him to sit down— if the rest of us were exhausted, I could only imagine how dad felt from having led the entire expedition, but he’s never one to say it out loud. 

Strangely, even through our exhaustion, Dan and I were still riding the adrenaline high of the climb and I was determined to take advantage of the energy before our inevitable crash, after which point I seriously doubted whether I’d be able to move my knees enough to walk more than a few steps. 

And so, farewelling dad and Eileen in Glacier Basin, we continued another mile onto the trail and then 3mi back to White River (a whopping 10,000ft descent from the summit). It was the slowest, most aggravating 4mi of the entire trip, but the feeling of arriving back at our van— our home!— was worth the evening push. 

Climbing Mt Rainier Emmons Glacier Camp Schurman
Hiking out through Glacier Basin

We spent an hour shuffling cars to deliver dad and Eileen’s SUV back to White River for their morning drive home, and although we’d planned to drive back to Issaquah for a shower, we didn’t make it out of White River ourselves. 

By 11pm, 24hrs after our Camp Schurman wake-up and 36hrs since we’d slept more than 90min, Dan and I passed out face-down in our van right in the White River parking lot. I’m not sure I’ve ever felt more exhausted, or more content, than I did in that moment. 

Climbing Mt Rainier Emmons Glacier Camp Schurman
Dan and I celebrated the following day with Rainier gin & tonics
TAGS:mountaineering
9 Comments
Share
brooke brisbine

I've spent the last decade exploring the world— everything from solo trekking in the Andes to overlanding in Zambia, all while completing a PhD in Biomechanics, teaching at a university & securing permanent residency in Australia. In 2020, I finally fulfilled my dream of becoming a full-time nomad! Whether it’s vanlife in Mexico, scuba diving in the Galápagos, ticking off incredible US National Parks, or climbing in the Dolomites, I hope this blog will inspire your future adventures & help you find wonder in every corner of the globe. xx bb

Leave a Comment Cancel Comment

The Comments

  • Pete Clement
    October 5, 2021

    As to your question, conditions you filmed were very similar, and typical, of most of my climbs there and general July snowpack. It is normal for it to freeze overnight at above 10,000. And you you want that, as your Dad surely knows to stabilize the snow bridges and steeper sections. The maximum snow melt in July there occurs at about 3 PM, which is why you start so early, and get off the upper glacier so early.

    Reply
  • Pete Clement
    October 5, 2021

    Hi Brooke, July used to be the best month for summer climbing on Emmons. This summer’s heat wave here may have been an anomaly, or perhaps a trend, against that. Most guide services shut down way early this year because the routes became unstable and not safe for clients.
    We used Emmons for classes because less crowded than Muir route. I don’t know that there is any “easy” way to summit Rainier. Emmons is known to be very direct, in early season. Our fastest time from Camp Schurman to the rim was 4:30. We had some very fit students for that one.

    Reply
    • brooke brisbine
      Pete Clement
      October 26, 2021

      Hi Pete,

      I’m admittedly a novice when it comes to Rainier, but it was certainly my impression too that Emmons wasn’t much of an “easy route”– and the recent weather has only exaggerated those challenges, according to the climbing rangers!

      Based on your 4.5hr ascent, though, I can see why Emmons may once have been considered more direct, and therefore “easier” in terms of navigating and physical demand. We took 8hrs on the dot, but there were groups who had only barely left the summit by the time we returned to camp (24hrs return to Camp Schurman!), so I can’t complain too much. Difficult or not, it was an incredible experience and one that I can’t wait to repeat.

      Reply
  • Pete Clement
    October 3, 2021

    Excellent photo journal you’ve put together here! In younger days I climbed the Emmons route 13 times, summitting 7 of them, as an instructor for Pierce College in Lakewood. These are some of the best pics I’ve ever seen of the North side of Rainier, and this route. Your description is very well written, coming from the perspective of a first-timer. Brings back lots of memories. Thanks!

    Reply
    • brooke brisbine
      Pete Clement
      October 5, 2021

      Thanks so much for reading and for your comment, Pete!

      Incredibly impressed to hear that you’ve had so many summits via the Emmons– how do you think the conditions compared to our July climb? Apparently it was the unique combination of an early July heatwave and a cold snap that came through that very night which created such treacherous ice! It was hard to imagine that this is often considered the easiest route on the mountain…

      Reply
  • Bill and Schultheis
    August 6, 2021

    Thanks so much for all the detail and the pictures. My husband and climbed with 2 other couples back in the 70’s. A lot more snow then, but still all the work and amazement. Camp Shurman looks the same as when we were there and the outhouse was a bit Amazing hanging over a glacier and at least 500 to 1000 ft. below-Wow! Anyway, we enjoyed the pictures and the words to explain the feeling. No one would understand unless they’ve climbed it and still remains vivid even for the years gone by. Thanks

    Reply
    • brooke brisbine
      Bill and Schultheis
      October 5, 2021

      Thank you so much for the lovely comment! You’re absolutely right that it’s a feeling difficult to understand unless you’ve experienced it yourselves, and I’m sure that it’s one that will stick forever in my mind, as it has yours.

      Happy trails to you both!
      -Brooke

      Reply
  • Shari L Murphy
    July 14, 2021

    Spell-binding narrative of an adventure few will ever experience… Who better to capture this adrenaline rush than Brooke Brisbine? The exquisite photographs and stellar writing are a winning combination.

    Reply
    • brooke brisbine
      Shari L Murphy
      October 5, 2021

      Thank you so much, Shari!

      Reply

You May Also Like

October 16, 2017

The Valley Isle: top 10 ways to enjoy Maui

July 7, 2014

Rafting the Grand Canyon from Pipe Creek to Diamond Creek

September 25, 2021

Vanlife diaries #28: Eagle Cap Wilderness

hi, I’m brooke!

I've spent the last decade exploring the world— everything from solo trekking in the Andes to overlanding in Zambia, all while completing a PhD in Biomechanics. In 2020, I finally fulfilled my dream of becoming a full-time nomad! Whether it’s vanlife in Mexico, scuba diving in the Galápagos, ticking off incredible US National Parks, or climbing in the Dolomites, I hope this blog will inspire your future adventures & help you find wonder in every corner of the globe. xx bb

read my story
currently exploring

currently exploring

mexico

img

travel resources

flights ✈️ Skyscanner

hotels 🏨 booking.com

adventure gear 🥾 REI

travel essentials 📸 Amazon

travel guides

hiking guides

vanlife resources

moving to australia

trip itineraries

recent posts

  • Alta Via 4 Italian Dolomites hiking via ferrata guide

    Alta Via 4 (day 0): San Candido to Rifugio Tre Scarperi

    December 28, 2022
  • Alta Via 2 Italian Dolomites hiking via ferrata guide

    Alta Via 2 (day 13): Rifugio Boz to Croce d’Aune

    October 11, 2022
  • Alta Via 2 Italian Dolomites hiking via ferrata guide

    Alta Via 2 (day 12): Passo Cereda to Rifugio Boz

    October 11, 2022
  • Alta Via 2 Italian Dolomites hiking via ferrata guide

    Alta Via 2 (day 11): Rifugio Treviso to Passo Cereda + Via Ferrata Canalone

    October 11, 2022
  • Alta Via 2 Italian Dolomites hiking via ferrata guide

    Alta Via 2 (day 10): Rifugio Pradidali to Rifugio Treviso + Via Ferrata Porton & Nico Gusella

    October 3, 2022

@brookebeyond_
BB ON INSTAGRAM

@brookebeyond_

  • jumping into the underworld like 🤙🏼

📍 cenote calavera, quintana roo 🇲🇽 
.
.
.
.
.
.
.
.
#mexico #travelmexico #vivamexico #exploremexico #mexicoroadtrip #mexicomagico #mexicolindo #yucatanpeninsula #allaboutadventures #girlsgoneglobal #girlslovetravel #sheisnotlost #wearetravelgirls #quintanaroo #quintanaroomexico #cenote #cenotes #cenotecalavera #tulum #tulummexico
  • One of the most unique cenotes experiences you can have anywhere— kayaking in a cave, around a small circular island, surrounded by fish & turtles.
  • A GUIDE TO RUTA PUUC (UXMAL & BEYOND) 🛕🗿✨

Just 80km (1hr) from Mérida, the Puuc Route is a string of 5 impeccably preserved & staggeringly ornate archaeological sites that are among my favourite in all of Mexico! The best part: you’re likely to be the only one at some of these off-the-beaten-path ruins. 

{note: all of these photos were taken in areas open to the public; ALWAYS respect culturally significant sites by obeying local regulations & only walking in permitted areas}

⚡️ Dive into 1500+ years of history on Ruta Puuc ↯

UXMAL
✨ highlights: the rounded Pirámide del Adivino (Pyramid of the Sorcerer) dominates as you enter the site, but the extravagantly adorned Governor’s Palace is equally impressive, as is the well-preserved Mayan Ball Court
⌛️ recommended time: 2hrs
💸 entrance fee: 499p (409 + 90 INAH)

KABÁH
✨ highlights: the impossibly striking Palacio de los Máscaras is decorated with 300 masks of the Mayan rain god, Chaac
⌛️ recommended time: 45min
💸 entrance fee: 75p

SAYIL
✨highlights: El Gran Palacio (also called the North Palace) is a breathtaking spectacle of columns & Puuc-style bas-reliefs 
⌛️ recommended time: 1hr
💸 entrance fee: 70p

XLAPAK
✨highlights: beautifully decorated El Palacio (though admittedly the least exciting of all the stops)
⌛️ recommended time: 30min
💸 entrance fee: 70p

LABNÁ
✨highlights: El Arco, a lavishly decorative arch in flawless condition & surrounded by jungle
⌛️ recommended time: 45min
💸 entrance fee: 70p

⚠️ OTHER TIPS FOR RUTA PUUC
- aim to arrive to Uxmal near opening at 8am for a super quiet experience (& to beat the afternoon heat as you continue to other sites!)
- allow ~9hrs from Mérida to drive the entire route, visit all 5 archaeological sites & then return to Mérida (+2hrs if you want to stop at a cenote on the way back, which I’d recommend!)
- it’s about 20min from Uxmal to Kabah, but the subsequent ruins get closer & closer together until you’re driving <5min from Xlapak to Labná
- there is extremely limited Telcel service once you’re at the ruins, so it’s not a bad idea to download offline Google Maps on your phone
  • If it can’t be the mountains, then it better be the ocean! Where do you feel the most free? 🤩

🚁: @cal_field 
.
.
.
.
.
.
.
.
.
#mexico #travelmexico #vivamexico #exploremexico #mexicoroadtrip #mexicomagico #mexicolindo #roamtheplanet #roadtrip #yucatanpeninsula #allaboutadventures #adventureculture #travelblog #adventurebabes #girlsgoneglobal #girlslovetravel #sheisnotlost #wearetravelgirls #beachbum #quintanaroo #quintanaroomexico #holbox #islaholbox #holbox mexico #foryou #fyp #travelreel
  • FAVOURITE CENOTES NEAR VALLADOLID [PART 2] 🌈🇲🇽✨

💎 Cenote Sac Aua 💎
incredibly unique semi-open cenote with a small, tree-covered island surrounded by a vividly blue ring of water (look out for the resident turtle!). Entry is 150p entry; for an additional 100p, hire a kayak for 35min. Only locals here when we visited on a Saturday afternoon!
~ best for: kayaking in a unique cenote

💎 Cenote Chukum 💎
my favourite cave cenote in Yucatán, this is a built-up yet blissfully uncrowded adventure park 18m below the ground with jump platforms, a tandem flying fox & spectacular light beams. Entry is 200p entry; life jacket is mandatory and included in cost. There’s also a restaurant onsite. 
~ best for: adventure activities in a beautiful setting 

💎 Cenote Toh 💎 
seemingly located in someone’s backyard, this cenote was recommended by a local & indeed we were the only ones there (1-3pm on a Friday during busy season). A long spiral staircase descends into a massive cave illuminated by a single light hanging from the ceiling. Entry is 150p; I’d recommend bringing your own floatie, some beers, and a speaker! 
~ best for: complete solitude 

💎 Cenote Xcanche 💎 
located just 2km from El Balam, either drive your own car, walk, or catch a tuk tuk. Entry is 170p & includes access to jump platforms & a rope swing; additional 150p for rappelling into the cenote, 150p to zipline, or 100p for the flying fox. Busy because of proximity to the ruins, but worth the visit!
~ best for: cooling off after Ek Balam

💎 Cenote Lol-Ha 💎
after visiting Chichén Itza, skip crowded Ik-Kil & instead venture 30min south to this beautiful open cenote— you can expect to be the only ones here! Entry is 100p & there are no amenities, but it’s worth it for the solitude.
~ best for: a quiet dip after Chichén Itzá
  • FAVOURITE CENOTES NEAR VALLADOLID [PART 1] 🌈🇲🇽✨

💎 Cenote Oxmán 💎
beautiful open cenote beneath towering limestone walls covered in verdant foliage. Entry is 150p or 300p for entry plus a 250p-coupon to spend at the pool-front restaurant! Life jackets required. 
~ best for: swimming & then grabbing lunch

💎 Cenote Suytun 💎
this instafamous cenote features a stunning stone walkway into the middle of the cave and is absolutely crawling with people, BUT if you stay in the cabañas on-site for 900p, you’ll get the 200p/person entry for free AND easily be the first ones inside when it opens at 9am. 
~ best for: photography 

💎 Cenote Secretó Maya 💎
incredible open cenote dripping in vines and ringed by agave, with a whopping 54m depth. Several jump platforms & an epic rope swing, plus an on-site restaurant, cabañas for rent & even massages. Entry is 200p or 300p with a cave tour; life jacket available but not required. 
~ best for: off-the-beaten-path adventures

💎 Cenote Palomitas 💎
quiet & lesser visited cave cenote with amazing stalactites. Entry is 170p with optional life jacket/tube or 270p with delicious lunch buffet (great value!).
~ best for: amazing stalactites 

💎 Cenote Agua Dulce 💎
in the same complex as Palomitas but with a separate entrance fee (170p), this is another amazing cave cenote with a floating dock and few people. 
~ best for: a quiet cave cenote
  • VALLADOLID TRAVEL GUIDE 🌈🇲🇽✨

From its colonial streets & sparkling central park to the centuries-old Mayan ruins & otherworldly cenotes that surround it, this colourful pueblo mágico in central Yucatán is not to be missed!

WHAT TO DO
🌴 Parque Principal Francisco Cantón Rosado: this bustling central plaza is the lifeblood of Valladolid, hosting vendors, live music & beautiful views of Templo de San Servacio
🌈 La Calzada de los Frailes: this colourful street is my favourite spot for a stroll past artisan boutiques & trendy restaurants
🥃 Mayapán Agave Distillery: it’s only “tequila” if it’s made in Tequila, Jalisco & a few surrounding municipalities, but this distillery in Valladolid produces the only blue agave spirit in Yucatán & it’s pretty delicious! (100p for 15min tour & 5 samples)
💎 Cenotes: some of Mexico’s best cenotes are located within easy driving distance of Valladolid [stay tuned for a future post with specific recommendations]
🛕 Chichén Itzá: one of the 7 Wonders of the World, this Mayan archaeological site is just 1hr from Valladolid (576p entry)
🗿 Ek Balam: 1500-year-old+ Mayan archaeological site with one of the few pyramids you can still climb (499p entry)

WHERE TO EAT
🥩 Conato: phenomenal restaurant offering a modern interpretation of traditional Yucatecan food and full-to-the-brim mezcal cocktails 
🐖 Taquería Rosario: fantastic cochinito pibil (15p tacos, 30p tortas)
🌮 El Tigrillo: roadside taco stand bustling with locals, serving up excellent cochinita pibil (20p tacos)
🥞 Marquesitas Los 3 Reyes: you might not imagine gouda, nutella & a cream cheese to be a good crepe combo, but you’d be wrong. Try delicious marquesitas (traditional Yucateca dessert) from 4-9pm daily in Parque Principal, just in front of the church (30-40p)
🐆 Ix Cat Ik Tradicional Mayan Comida: touristy restaurant with prices to match, but excellent food and a great atmosphere for trying traditional Mayan fare
  • EK BALAM: THE BLACK JAGUAR 🐆 

One of the most impressive archaeological sites in Yucatán is Ek Balam, whose name means “the black jaguar”— a representation of bravery & power, a symbol of the fearless warrior. In Mayan mythology, the jaguar was also one of the rulers of Xibalbá, the underworld, and therefore a symbol of the night sun & darkness 🌙 

Built in 100BCE & still inhabited when the Spanish invaded in the 1500s, Ek Balam was the centre of a flourishing Mayan kingdom. Only a fraction of the city was excavated in the 90s, but it’s a fascinating look into the history of this storied region that absolutely should not be missed!

Here’s what you need to know ↯

🚗 GETTING HERE
Ek Balam is just 30km (30min) north of Valladolid & can be accessed by car, bus, or organised tour. Driving will give you the most flexibility & it’s a very straightforward journey!

💸 COST
Entry is steep at 499p, but it’s one of the few ruins where you are still permitted to climb the pyramids! You can also hire a guide at the entrance for an additional 600p. 

⌛️ RECOMMENDED TIME
Allow at least 2hrs to explore the sprawling complex of Ek Balam, read all the informational plaques, and climb the Acropolis & other nearby structures. 

🤩 DON’T MISS
The incredible carved reliefs on display at the top of the Acropolis are among the best preserved examples of ancient art in all of Mesoamérica!

💎 NEARBY
Visit Cenote Xcanché for a refreshing dip after a hot afternoon at Ek Balam— it’s located 2km from the ruins, so either drive your car, walk, or hop in a tuk tuk. Entry is 170p. 

Have you been to Ek Balam?
  • IZAMAL TRAVEL GUIDE 💛🍋✨

Painted entirely in bright yellow & overflowing with small-town charm, this sunny pueblo mágico between Valladolid & Mérida is an enchanting stop on any Yucatán road trip! Here’s what you need to know about Mexico’s “Yellow Town” ↯

WHAT TO DO
🍋 Wander through the colourful streets: perhaps the best thing to do in Izamal is simply wander through the cobbled streets & admire the bright yellow buildings
✝️ Convento de San Antonio de Padua: striking 16th century convent in the middle of town, don’t miss the chance to wander through the grounds!
🛕Pirámide Kinich Kakmó: dedicated to a Mayan god who descended each day as a fire macaw to collect sacrifices, this ancient pyramid is located right in the middle of town & you can climb to the top for beautiful views (free!)
💎 Anillo de Cenotes: within a 60-90min drive, explore the “Ring of Cenotes”, formed by the same asteroid that wiped out the dinosaurs 66mil years ago [stay tuned for specific cenote recommendations!]

WHERE TO EAT
🐖 Kinich: rated one of Mexico’s best restaurants, this beautifully decorated patio space serves up local Mayan delicacies like poc chuc, cochinita pibil, sikil pak & empanadas de chaya
🌱 La Casona de Izamal: trendy cafe located behind a boutique, offering a mix of Mayan & Mexican cuisine
🌮 taco stands surrounding the main plaza 

WHERE TO STAY
@hotelquintaizamal
follow @brookebeyond_

travel beyond the ordinary

Explore my travel guides, custom itineraries & blog posts with an interactive world map ✨

all destinations

  • jumping into the underworld like 🤙🏼

📍 cenote calavera, quintana roo 🇲🇽 
.
.
.
.
.
.
.
.
#mexico #travelmexico #vivamexico #exploremexico #mexicoroadtrip #mexicomagico #mexicolindo #yucatanpeninsula #allaboutadventures #girlsgoneglobal #girlslovetravel #sheisnotlost #wearetravelgirls #quintanaroo #quintanaroomexico #cenote #cenotes #cenotecalavera #tulum #tulummexico
  • One of the most unique cenotes experiences you can have anywhere— kayaking in a cave, around a small circular island, surrounded by fish & turtles.
  • A GUIDE TO RUTA PUUC (UXMAL & BEYOND) 🛕🗿✨

Just 80km (1hr) from Mérida, the Puuc Route is a string of 5 impeccably preserved & staggeringly ornate archaeological sites that are among my favourite in all of Mexico! The best part: you’re likely to be the only one at some of these off-the-beaten-path ruins. 

{note: all of these photos were taken in areas open to the public; ALWAYS respect culturally significant sites by obeying local regulations & only walking in permitted areas}

⚡️ Dive into 1500+ years of history on Ruta Puuc ↯

UXMAL
✨ highlights: the rounded Pirámide del Adivino (Pyramid of the Sorcerer) dominates as you enter the site, but the extravagantly adorned Governor’s Palace is equally impressive, as is the well-preserved Mayan Ball Court
⌛️ recommended time: 2hrs
💸 entrance fee: 499p (409 + 90 INAH)

KABÁH
✨ highlights: the impossibly striking Palacio de los Máscaras is decorated with 300 masks of the Mayan rain god, Chaac
⌛️ recommended time: 45min
💸 entrance fee: 75p

SAYIL
✨highlights: El Gran Palacio (also called the North Palace) is a breathtaking spectacle of columns & Puuc-style bas-reliefs 
⌛️ recommended time: 1hr
💸 entrance fee: 70p

XLAPAK
✨highlights: beautifully decorated El Palacio (though admittedly the least exciting of all the stops)
⌛️ recommended time: 30min
💸 entrance fee: 70p

LABNÁ
✨highlights: El Arco, a lavishly decorative arch in flawless condition & surrounded by jungle
⌛️ recommended time: 45min
💸 entrance fee: 70p

⚠️ OTHER TIPS FOR RUTA PUUC
- aim to arrive to Uxmal near opening at 8am for a super quiet experience (& to beat the afternoon heat as you continue to other sites!)
- allow ~9hrs from Mérida to drive the entire route, visit all 5 archaeological sites & then return to Mérida (+2hrs if you want to stop at a cenote on the way back, which I’d recommend!)
- it’s about 20min from Uxmal to Kabah, but the subsequent ruins get closer & closer together until you’re driving <5min from Xlapak to Labná
- there is extremely limited Telcel service once you’re at the ruins, so it’s not a bad idea to download offline Google Maps on your phone
  • If it can’t be the mountains, then it better be the ocean! Where do you feel the most free? 🤩

🚁: @cal_field 
.
.
.
.
.
.
.
.
.
#mexico #travelmexico #vivamexico #exploremexico #mexicoroadtrip #mexicomagico #mexicolindo #roamtheplanet #roadtrip #yucatanpeninsula #allaboutadventures #adventureculture #travelblog #adventurebabes #girlsgoneglobal #girlslovetravel #sheisnotlost #wearetravelgirls #beachbum #quintanaroo #quintanaroomexico #holbox #islaholbox #holbox mexico #foryou #fyp #travelreel
  • FAVOURITE CENOTES NEAR VALLADOLID [PART 2] 🌈🇲🇽✨

💎 Cenote Sac Aua 💎
incredibly unique semi-open cenote with a small, tree-covered island surrounded by a vividly blue ring of water (look out for the resident turtle!). Entry is 150p entry; for an additional 100p, hire a kayak for 35min. Only locals here when we visited on a Saturday afternoon!
~ best for: kayaking in a unique cenote

💎 Cenote Chukum 💎
my favourite cave cenote in Yucatán, this is a built-up yet blissfully uncrowded adventure park 18m below the ground with jump platforms, a tandem flying fox & spectacular light beams. Entry is 200p entry; life jacket is mandatory and included in cost. There’s also a restaurant onsite. 
~ best for: adventure activities in a beautiful setting 

💎 Cenote Toh 💎 
seemingly located in someone’s backyard, this cenote was recommended by a local & indeed we were the only ones there (1-3pm on a Friday during busy season). A long spiral staircase descends into a massive cave illuminated by a single light hanging from the ceiling. Entry is 150p; I’d recommend bringing your own floatie, some beers, and a speaker! 
~ best for: complete solitude 

💎 Cenote Xcanche 💎 
located just 2km from El Balam, either drive your own car, walk, or catch a tuk tuk. Entry is 170p & includes access to jump platforms & a rope swing; additional 150p for rappelling into the cenote, 150p to zipline, or 100p for the flying fox. Busy because of proximity to the ruins, but worth the visit!
~ best for: cooling off after Ek Balam

💎 Cenote Lol-Ha 💎
after visiting Chichén Itza, skip crowded Ik-Kil & instead venture 30min south to this beautiful open cenote— you can expect to be the only ones here! Entry is 100p & there are no amenities, but it’s worth it for the solitude.
~ best for: a quiet dip after Chichén Itzá
@brookebeyond_
@brookebeyond_
•
Follow
jumping into the underworld like 🤙🏼 📍 cenote calavera, quintana roo 🇲🇽 . . . . . . . . #mexico #travelmexico #vivamexico #exploremexico #mexicoroadtrip #mexicomagico #mexicolindo #yucatanpeninsula #allaboutadventures #girlsgoneglobal #girlslovetravel #sheisnotlost #wearetravelgirls #quintanaroo #quintanaroomexico #cenote #cenotes #cenotecalavera #tulum #tulummexico
1 day ago
View on Instagram |
1/5
One of the most unique cenotes experiences you can have anywhere— kayaking in a cave, around a small circular island, surrounded by fish & turtles.
@brookebeyond_
@brookebeyond_
•
Follow
One of the most unique cenotes experiences you can have anywhere— kayaking in a cave, around a small circular island, surrounded by fish & turtles.
5 days ago
View on Instagram |
2/5
A GUIDE TO RUTA PUUC (UXMAL & BEYOND) 🛕🗿✨

Just 80km (1hr) from Mérida, the Puuc Route is a string of 5 impeccably preserved & staggeringly ornate archaeological sites that are among my favourite in all of Mexico! The best part: you’re likely to be the only one at some of these off-the-beaten-path ruins. 

{note: all of these photos were taken in areas open to the public; ALWAYS respect culturally significant sites by obeying local regulations & only walking in permitted areas}

⚡️ Dive into 1500+ years of history on Ruta Puuc ↯

UXMAL
✨ highlights: the rounded Pirámide del Adivino (Pyramid of the Sorcerer) dominates as you enter the site, but the extravagantly adorned Governor’s Palace is equally impressive, as is the well-preserved Mayan Ball Court
⌛️ recommended time: 2hrs
💸 entrance fee: 499p (409 + 90 INAH)

KABÁH
✨ highlights: the impossibly striking Palacio de los Máscaras is decorated with 300 masks of the Mayan rain god, Chaac
⌛️ recommended time: 45min
💸 entrance fee: 75p

SAYIL
✨highlights: El Gran Palacio (also called the North Palace) is a breathtaking spectacle of columns & Puuc-style bas-reliefs 
⌛️ recommended time: 1hr
💸 entrance fee: 70p

XLAPAK
✨highlights: beautifully decorated El Palacio (though admittedly the least exciting of all the stops)
⌛️ recommended time: 30min
💸 entrance fee: 70p

LABNÁ
✨highlights: El Arco, a lavishly decorative arch in flawless condition & surrounded by jungle
⌛️ recommended time: 45min
💸 entrance fee: 70p

⚠️ OTHER TIPS FOR RUTA PUUC
- aim to arrive to Uxmal near opening at 8am for a super quiet experience (& to beat the afternoon heat as you continue to other sites!)
- allow ~9hrs from Mérida to drive the entire route, visit all 5 archaeological sites & then return to Mérida (+2hrs if you want to stop at a cenote on the way back, which I’d recommend!)
- it’s about 20min from Uxmal to Kabah, but the subsequent ruins get closer & closer together until you’re driving <5min from Xlapak to Labná
- there is extremely limited Telcel service once you’re at the ruins, so it’s not a bad idea to download offline Google Maps on your phone
@brookebeyond_
@brookebeyond_
•
Follow
A GUIDE TO RUTA PUUC (UXMAL & BEYOND) 🛕🗿✨ Just 80km (1hr) from Mérida, the Puuc Route is a string of 5 impeccably preserved & staggeringly ornate archaeological sites that are among my favourite in all of Mexico! The best part: you’re likely to be the only one at some of these off-the-beaten-path ruins. {note: all of these photos were taken in areas open to the public; ALWAYS respect culturally significant sites by obeying local regulations & only walking in permitted areas} ⚡️ Dive into 1500+ years of history on Ruta Puuc ↯ UXMAL ✨ highlights: the rounded Pirámide del Adivino (Pyramid of the Sorcerer) dominates as you enter the site, but the extravagantly adorned Governor’s Palace is equally impressive, as is the well-preserved Mayan Ball Court ⌛️ recommended time: 2hrs 💸 entrance fee: 499p (409 + 90 INAH) KABÁH ✨ highlights: the impossibly striking Palacio de los Máscaras is decorated with 300 masks of the Mayan rain god, Chaac ⌛️ recommended time: 45min 💸 entrance fee: 75p SAYIL ✨highlights: El Gran Palacio (also called the North Palace) is a breathtaking spectacle of columns & Puuc-style bas-reliefs ⌛️ recommended time: 1hr 💸 entrance fee: 70p XLAPAK ✨highlights: beautifully decorated El Palacio (though admittedly the least exciting of all the stops) ⌛️ recommended time: 30min 💸 entrance fee: 70p LABNÁ ✨highlights: El Arco, a lavishly decorative arch in flawless condition & surrounded by jungle ⌛️ recommended time: 45min 💸 entrance fee: 70p ⚠️ OTHER TIPS FOR RUTA PUUC - aim to arrive to Uxmal near opening at 8am for a super quiet experience (& to beat the afternoon heat as you continue to other sites!) - allow ~9hrs from Mérida to drive the entire route, visit all 5 archaeological sites & then return to Mérida (+2hrs if you want to stop at a cenote on the way back, which I’d recommend!) - it’s about 20min from Uxmal to Kabah, but the subsequent ruins get closer & closer together until you’re driving <5min from Xlapak to Labná - there is extremely limited Telcel service once you’re at the ruins, so it’s not a bad idea to download offline Google Maps on your phone
1 week ago
View on Instagram |
3/5
@brookebeyond_
@brookebeyond_
•
Follow
If it can’t be the mountains, then it better be the ocean! Where do you feel the most free? 🤩 🚁: @cal_field . . . . . . . . . #mexico #travelmexico #vivamexico #exploremexico #mexicoroadtrip #mexicomagico #mexicolindo #roamtheplanet #roadtrip #yucatanpeninsula #allaboutadventures #adventureculture #travelblog #adventurebabes #girlsgoneglobal #girlslovetravel #sheisnotlost #wearetravelgirls #beachbum #quintanaroo #quintanaroomexico #holbox #islaholbox #holbox mexico #foryou #fyp #travelreel
1 week ago
View on Instagram |
4/5
FAVOURITE CENOTES NEAR VALLADOLID [PART 2] 🌈🇲🇽✨

💎 Cenote Sac Aua 💎
incredibly unique semi-open cenote with a small, tree-covered island surrounded by a vividly blue ring of water (look out for the resident turtle!). Entry is 150p entry; for an additional 100p, hire a kayak for 35min. Only locals here when we visited on a Saturday afternoon!
~ best for: kayaking in a unique cenote

💎 Cenote Chukum 💎
my favourite cave cenote in Yucatán, this is a built-up yet blissfully uncrowded adventure park 18m below the ground with jump platforms, a tandem flying fox & spectacular light beams. Entry is 200p entry; life jacket is mandatory and included in cost. There’s also a restaurant onsite. 
~ best for: adventure activities in a beautiful setting 

💎 Cenote Toh 💎 
seemingly located in someone’s backyard, this cenote was recommended by a local & indeed we were the only ones there (1-3pm on a Friday during busy season). A long spiral staircase descends into a massive cave illuminated by a single light hanging from the ceiling. Entry is 150p; I’d recommend bringing your own floatie, some beers, and a speaker! 
~ best for: complete solitude 

💎 Cenote Xcanche 💎 
located just 2km from El Balam, either drive your own car, walk, or catch a tuk tuk. Entry is 170p & includes access to jump platforms & a rope swing; additional 150p for rappelling into the cenote, 150p to zipline, or 100p for the flying fox. Busy because of proximity to the ruins, but worth the visit!
~ best for: cooling off after Ek Balam

💎 Cenote Lol-Ha 💎
after visiting Chichén Itza, skip crowded Ik-Kil & instead venture 30min south to this beautiful open cenote— you can expect to be the only ones here! Entry is 100p & there are no amenities, but it’s worth it for the solitude.
~ best for: a quiet dip after Chichén Itzá
@brookebeyond_
@brookebeyond_
•
Follow
FAVOURITE CENOTES NEAR VALLADOLID [PART 2] 🌈🇲🇽✨ 💎 Cenote Sac Aua 💎 incredibly unique semi-open cenote with a small, tree-covered island surrounded by a vividly blue ring of water (look out for the resident turtle!). Entry is 150p entry; for an additional 100p, hire a kayak for 35min. Only locals here when we visited on a Saturday afternoon! ~ best for: kayaking in a unique cenote 💎 Cenote Chukum 💎 my favourite cave cenote in Yucatán, this is a built-up yet blissfully uncrowded adventure park 18m below the ground with jump platforms, a tandem flying fox & spectacular light beams. Entry is 200p entry; life jacket is mandatory and included in cost. There’s also a restaurant onsite. ~ best for: adventure activities in a beautiful setting 💎 Cenote Toh 💎 seemingly located in someone’s backyard, this cenote was recommended by a local & indeed we were the only ones there (1-3pm on a Friday during busy season). A long spiral staircase descends into a massive cave illuminated by a single light hanging from the ceiling. Entry is 150p; I’d recommend bringing your own floatie, some beers, and a speaker! ~ best for: complete solitude 💎 Cenote Xcanche 💎 located just 2km from El Balam, either drive your own car, walk, or catch a tuk tuk. Entry is 170p & includes access to jump platforms & a rope swing; additional 150p for rappelling into the cenote, 150p to zipline, or 100p for the flying fox. Busy because of proximity to the ruins, but worth the visit! ~ best for: cooling off after Ek Balam 💎 Cenote Lol-Ha 💎 after visiting Chichén Itza, skip crowded Ik-Kil & instead venture 30min south to this beautiful open cenote— you can expect to be the only ones here! Entry is 100p & there are no amenities, but it’s worth it for the solitude. ~ best for: a quiet dip after Chichén Itzá
1 week ago
View on Instagram |
5/5

  • home
  • about me
  • latest
  • destinations
  • hiking guides
  • moving to Australia
  • vanlife resources
  • contact

COPYRIGHT © 2022 BROOKE BEYOND. TRAVEL BEYOND THE ORDINARY. Site Powered by Pix & Hue.