• start here
  • about
  • group trips
  • brooke beyond

  • hiking guides
  • outdoor gear
    • hiking boots
    • hiking backpacks
    • cold-weather layers
    • backpacking tent
    • outdoor sleep system
    • backcountry food
    • day-hike packing list
    • hut-to-hut packing list
    • via ferrata packing list
    • backpacking packing list
    • mountaineering packing list

brooke beyond

Alta Via 4 Italian Dolomites hiking via ferrata guide
Europe / Italy / outdoor gear

Introduction to via ferrata + complete via ferrata gear list

27 November 2023

Last Updated on 11 May 2025

If you’ve always dreamed of climbing but don’t have heaps of technical mountain experience or you’re a solo climber looking for adventure without a partner, this classic form of protected climbing needs to be on your radar!

Once unique to the Italian and Austrian Alps (and still closely associated with the Dolomites, which is home to hundreds of routes!), via ferrata has gained worldwide popularity in recent years as an outdoor sport that is every bit as accessible as it is exhilarating, with new routes appearing across Colorado, Peru, Slovenia, and even Argentinian Patagonia.

This post is the perfect introduction to climbing via ferrata around the world, including recommendations on preparing for your first climb, an explanation of the grading system, what to expect on a via ferrata route, and all the essential gear you’ll need to set off on your own adventure!

*This guide is not intended to replace appropriate training/experience, nor is it designed to be an exhaustive via ferrata resource; please remember that you are responsible for your OWN safety in the mountains! 

What's in this guide

Toggle
  • What is via ferrata?
  • Where to find via ferrata routes?
  • Via ferrata difficulty
    • Understanding the grading system
    • How hard is via ferrata?
    • Do I need past via ferrata experience?
    • Do I need climbing experience?
    • Can I climb via ferrata solo?
  • How to approach your first via ferrata
  • *Via ferrata gear list
    • Connecting your via ferrata lanyard to your harness
  • How to climb via ferrata
    • 1. the approach
    • 2. the cable
    • 3. clipping between cable segments
    • 4. types of climbing fixtures
    • 5. navigating the via ferrata
    • 6. climb on!

VIA FERRATA GEAR LIST SUMMARY

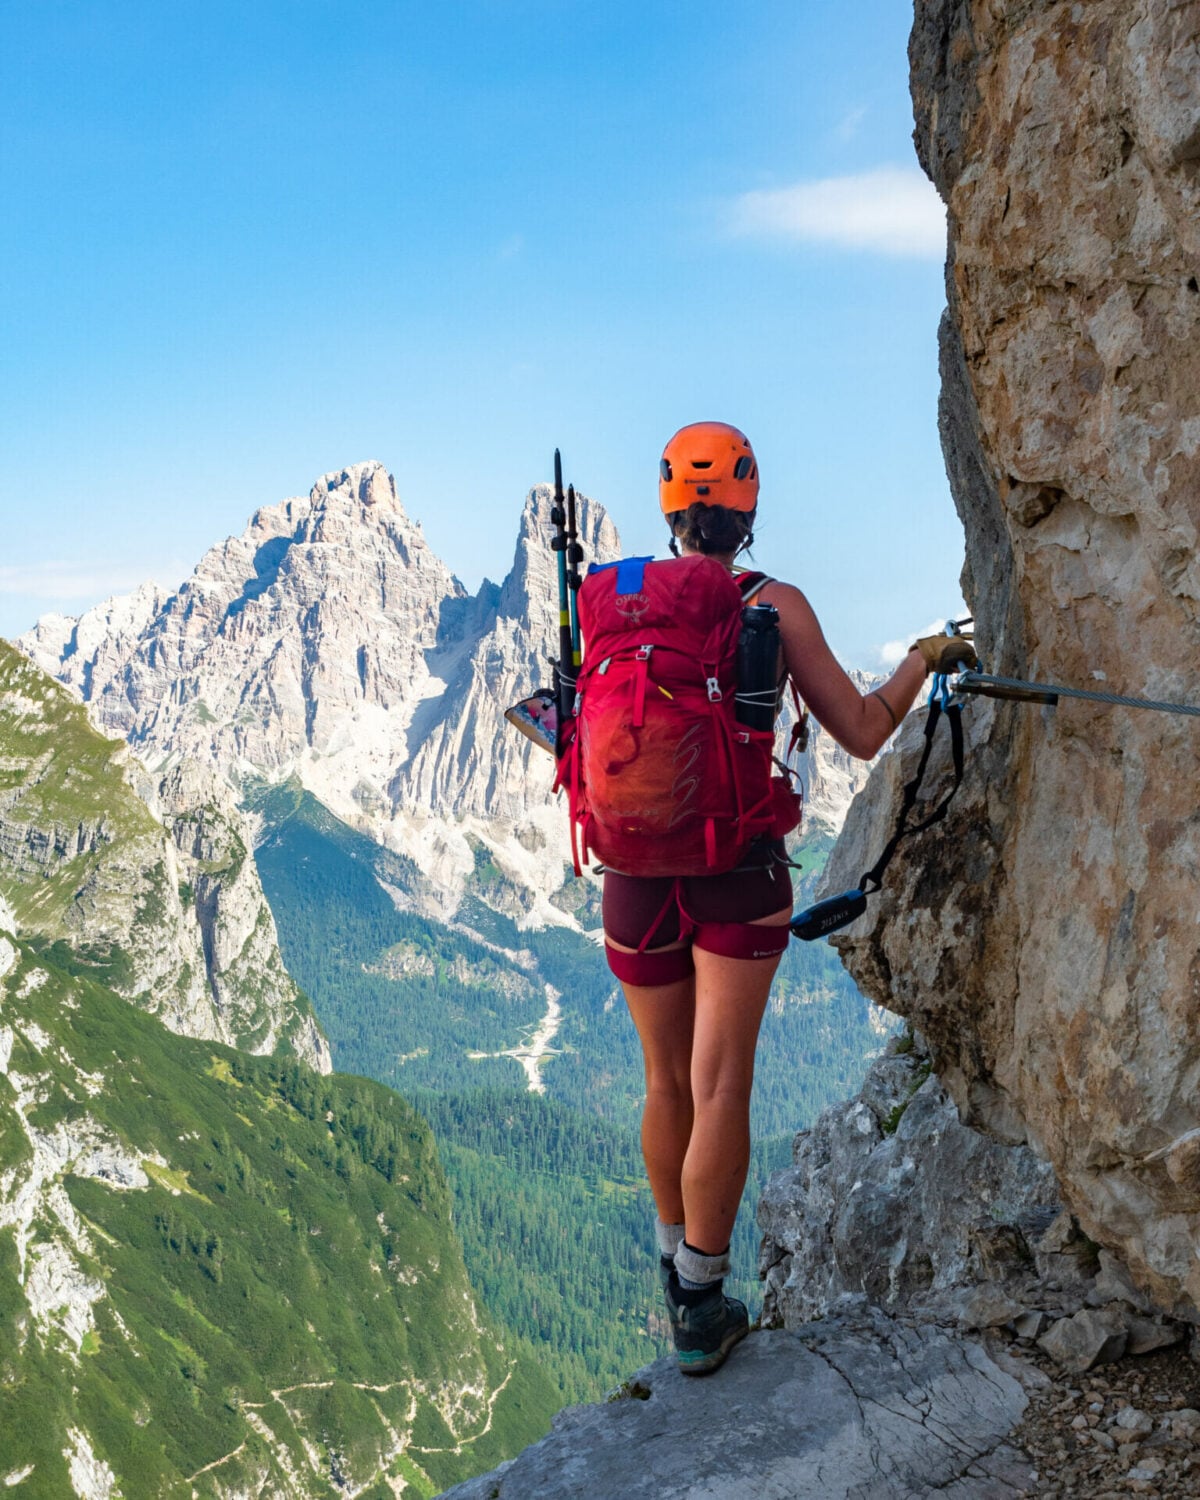
⭐️ daypack (25-35L): Osprey Tempest 30 (women’s) / Osprey Talon 33 (men’s)
⭐️ helmet: Black Diamond Half Dome Helmet (women’s) / (men’s)
⭐️ harness: Black Diamond Momentum (women’s) / (men’s)
⭐️ via ferrata lanyard: Petzel Scorpio Vertigo Lanyard
⭐️ climbing gloves: Metolius Half Finger Climbing Gloves
⭐️ mountaineering boots: La Sportiva Trango Tech GTX (women’s) / (men’s)
⭐️ PLB/SOS: Garmin InReach Mini 2

Check out all my outdoor packing lists for:

day-hiking
hut-to-hut hikes
via ferrata
backpacking
multi-day mountaineering
Via ferrata in the Dolomites beginner guide
Alta Via 4 Italian Dolomites hiking via ferrata guide

What is via ferrata?

Translating to “iron route” in Italian, via ferrata is a form of protected climbing that was invented in the Alps during WWI as a means of getting soldiers up and over challenging peaks with minimal technical experience or equipment. Today, it’s an amazing form of recreation best described as a cross between scrambling and sport climbing.

“Via ferrata” is the international term used by nearly every country to describe this form of protected climbing— except for German-speakers, who use the word Klettersteig, meaning “climbing path”.

Via ferrata routes feature different types of fixed protection, and you’ll climb on a combination of ladders, stemples, rungs, pegs, bridges, and even the rock itself, all while clipped into a steel cable that is bolted directly into the mountain. It is safer than most forms of climbing, requires very little gear, and can be done completely solo (since there’s no need for a belayer)!

Via ferrata beginner guide

It’s also important to note that the goal of via ferrata is to keep one hand on the cable or a steel rung at all times and NOT fall. Unlike other forms of recreational climbing where falls are common and expected, you are only protected by a via ferrata lanyard that provides a minimal degree of shock absorption— it is designed to save your life, not to give you a soft catch. After a single fall, this lanyard needs to be replaced!

Climbing Mt Triglav via ferrata Slovenia
Ascending Mt Triglav via ferrata

Where to find via ferrata routes?

The greatest concentration of via ferrata routes is in the Italian Dolomites, but hundreds of routes cover the Austrian and Swiss Alps, and even Slovenia’s underrated Julian Alps. Worldwide, more via ferrata are appearing every year, from Colorado, USA to Argentinian Patagonia!

Notably, many of the routes outside of Europe are privately owned and you’ll have to join a guided tour to climb, regardless of how much experience you have. These can often be pricey, but perhaps a great way to get started with via ferrata in a comfortable environment.

A few of the most notable international via ferrata routes:

  • Sacred Valley via ferrata with Natura Vive in Cusco, Peru (read my trip report)
  • Mt Triglav, Slovenia (read my trip report)
  • Ruta Vertigo in Monterrey, Mexico
  • Mount Evans via ferrata in Idaho, USA
  • Vía Ferrata del Cañadón in El Chaltén, Argentina
  • Via Ferrata Caminito del Rey, Spain
  • Granite via ferrata in Colorado, USA
  • Ouray via ferrata in Colorado, USA
Via ferrata climbing in Peru’s Sacred Valley

Via ferrata difficulty

Understanding the grading system

Although the exact terminology varies slightly between the Austrian, French, German, and Italian scales, you can simply think of via ferrata as having 5 or 6 levels of difficulty, and these may be denoted from A to E in Austria, facile (easy) to extrêmement difficile/estremamente difficile (extremely difficult) in French & Italian, or K1-K6 in German— but the overall levels themselves are fairly consistent.

https://theuiaa.org/documents/sport/Via-Ferrata-Brief-History-and-Difficulties.pdf

How hard is via ferrata?

The difficulty of via ferrata as a whole is very subjective (heavily influenced by your own experience, risk tolerance, and comfort with exposure), but there are plenty of beginner-appropriate routes spread across the Alps and further afield, as well as challenging routes when you’re ready. 

Here’s a look at what each difficulty rating actually feels like ↯

Via Ferrata Sass d'Putia

1 or F (easy): tends to feel like an exposed hike, not higher than Class 2; this is mostly just walking on uneven terrain and you may not even need to clip on these after you get comfortable on the rock

*this is a great place to start as a beginner!

Via Ferrata Piz da Cir

2 or PD (moderate): transitions to Class 3 scrambling, involving more use of hands & feet and increased exposure

Alta Via 4 Italian Dolomites hiking via ferrata guide

3 or D (difficult): consistent use of hands that is more comparable to Class 4 scrambling, typically a good deal of exposure and often with long, sustained vertical sections

Via Ferrata delle Trincee

4 or TD (very difficult): tends to involve very sustained vertical ascents with massive amounts of exposure; this feels more similar to low Class 5 multi-pitch climbing (with the benefit of a cable and fixed pegs).

*beginners should not attempt 4+ unsupervised!

Alta Via 4 Italian Dolomites hiking via ferrata guide

5/6 or ED (extremely difficult): even after tackling via ferrata all over Europe, including to alpine summits, I’ve never seen any route rated this high, but 5/6 is likely to involve overhanging sections, lots of upper-body engagement & more frequent use of the rock

*technical climbing experience is required

Alta Via 2 Italian Dolomites hiking via ferrata guide
Via Ferrata Porton

Do I need past via ferrata experience?

I’d only ever done a single via ferrata in Peru before I went to Europe and climbed several dozen routes from 1-4 in difficulty, many of them completely solo. You don’t necessarily need specific via ferrata experience to have a great (and safe) time, but general climbing or scrambling experience is a huge asset!

If you’ve only ever hiked on a trail, even for long distances, you will need to approach via ferrata as a complete beginner. Although backpacking experience will aid you on rougher terrain and in carrying a pack up the ladders, there’s a lot more to via ferrata than just physical condition, stamina, and outdoor competence.

A great way to start is with an experienced guide; Explore-Share lists certified via ferrata guides who can introduce you to the sport safely and help you build confidence on the rock.

Do I need climbing experience?

Climbing experience is a major asset for via ferrata, but you don’t need to be a high-level climber to enjoy challenging via ferrata routes— I’m only an intermediate sport climber (5.8-5.9) and I found 4s to be super fun. The whole beauty of via ferrata is that you are able to ascend otherwise challenging vertical walls without the need for rope handling, a belay partner, or 5.11 proficiency!

That being said, climbers (and those with outdoor scrambling experience) will find challenging via ferrata much more accessible than those starting from scratch! I’d say a good head for heights, careful footwork & general fitness are a MUST; a realistic appraisal of your ability is perhaps even more important.

Alta Via 1 2 4 Packing List- Italian Dolomites

Can I climb via ferrata solo?

Yet another one of the fantastic things about via ferrata is that, unlike sport climbing, it can be done entirely solo and is not necessarily any more dangerous without a partner, as long as you know what you’re doing. If you’re just getting started or want to explore challenging routes, Explore-Share allows you to find expert guides for both beginner-friendly and advanced via ferrata tours across the world.

However, those with prior climbing or via ferrata experience will definitely be able to tackle routes solo, which is great for those among us who often hike alone and still want to see some summits!

Climbing Mt Triglav via ferrata Slovenia
Climbing Mt Triglav in Slovenia

How to approach your first via ferrata

I always give the same advice to those starting out with via ferrata for the first time and trying to decide whether they need a guide or can just start out on their own ↯

  • If you have climbing experience: you are probably ok to start on an easy route without a guide— some of the easy routes (1/F) are like a steep hike & it’s a great way to practice using your gear in the real-world. Once you’re comfortable, try a 2, then work yourself up to the 3s & 4s, etc
  • If you don’t have climbing experience: it may be prudent to hire a guide for your first day or go with a more experienced friend. Be mindful of super busy routes (you’re more likely to have an accident if you feel rushed on the cable), but likewise avoid super remote routes in case you do need help.

Many of via ferrata outside of Europe are privately owned, meaning you’ll have no option BUT to go with a guide, regardless of whether it’s your first or 50th via ferrata. If you’re interested in travelling to the Dolomites and tackling heaps of challenging via ferrata solo, joining a tour on one of these private routes can be excellent prep! Alternatively, you can find a local guide very easily in Europe for any of the “unguided” routes if you decide you need one. Compared qualified via ferrata guides on Explore-Share.

Alta Via 4 Italian Dolomites hiking via ferrata guide
Climbing above Rifugio Fonda Savio on Via Ferrata Merlone

*Via ferrata gear list

In addition to limited technical requirements, the gear needed for via ferrata is fairly minimal, very compact, and not terribly expensive, which again makes this a fantastically accessible outdoor pursuit!

👉🏼 For a more detailed Dolomites packing list, read: Complete Alta Via packing list: what to pack for hut-to-hut hikes in the Dolomites


Alta Via 1 2 4 Packing List- Italian Dolomites

daypack (25-35L): Osprey Tempest 30 (women’s) / Osprey Talon 33 (men’s)

Depending on the length of the via ferrata route you’re tackling, I’d recommend something in the 25-35L range with sturdy hip belts, a good suspension system, and some back venting. I love my 33L Osprey Talon for via ferrata, as it’s lightweight and easy to climb with, yet still very comfortable for long approaches!


helmet: Black Diamond Half Dome Helmet (women’s) / (men’s)

For via ferrata routes, a light climbing helmet is essential to protect against rockfall, which might come from other climbers above or even unstable areas of the mountain. And for routes that wind through dark tunnels, it can also be handy for protecting your head against bumps!


climbing harness: Black Diamond Momentum (women’s) / (men’s)

To connect your via ferrata lanyard safely to your person, you’ll need a harness; I love the fit and comfort of this crag climbing harness for long days on the trail!


via ferrata lanyard: Petzel Scorpio Vertigo Lanyard

The one piece of gear that is entirely unique to via ferrata is a lanyard, which consists of 2 auto-locking carabiners and an energy absorber connected in a Y-configuration. One end of the webbing is girth-hitched to your harness, while the other two ends are clipped into the cable during your climb.

Although you’ll see plenty of older European climbers using DIY systems that are nearly identical to tethers used in crag or alpine climbing, it’s still recommended to use a dedicated lanyard with in-built force absorption mechanisms— falls are rare on via ferrata, but could be massively damaging to your spine on a short static line.


climbing gloves: Metolius Half Finger Climbing Gloves

Although not a safety requirement for via ferrata, you’ll be infinitely more comfortable with a pair of leather climbing gloves, particularly when quickly descending down the cable. Personally, I prefer the dexterity of fingerless gloves, which allow for easy clipping while still protecting your hands from nasty blisters.


Alta Via 1 2 4 Packing List- Italian Dolomites

mountaineering boots: La Sportiva Trango Tech Leather GTX Boots (women’s) / (men’s)

While you can absolutely climb via ferrata in any boot or athletic shoe that’s comfortable for you, I love the stiff soles of my lightweight mountaineering boots for climbing metal ladders and traversing rough terrain/scree.


Alta Via 1 2 4 Packing List- Italian Dolomites

PLB/SOS: Garmin InReach Mini 2

Never, EVER head out on an adventure without a satellite communicator— whether you’re sending messages back home, checking the weather, or communicating with emergency services, this small device can literally save your life.

👉🏼 For a more detailed Dolomites packing list, read: Complete Alta Via packing list: what to pack for hut-to-hut hikes in the Dolomites


Two different styles of Via ferrata lanyard

Connecting your via ferrata lanyard to your harness

The proper use of a helmet or gloves requires no explanation, but for those with absolutely no prior climbing experience, you may be wondering how to attach your via ferrata lanyard to your climbing harness: the loop of your lanyard should be attached using a simple girth hitch through the tie-in points on your harness, as per the handy diagram below, OR the belay loop, as in the photo above.

How to climb via ferrata

1. the approach

Most via ferrata routes begin with an approach on trail, and this initial hike might be anywhere from a few minutes to several hours depending on the route and whether you’re starting from a carpark, trailhead, or a high mountain hut.

Alta Via 2 Italian Dolomites hiking via ferrata guide
approaching through a dirty gully
Climbing Mt Triglav via ferrata Slovenia
Approaching Mt Triglav on the Čez Prag Route

2. the cable

Once you reach the start of the via ferrata, typically marked by a sign or at the very least a painted symbol, clip into the steel cable and begin the route! You should have a hand on the cable (pushing your carabiners along) or on a steel rung at all times.

Remember, the goal is to NOT fall! You are only protected by a via ferrata lanyard that provides a minimal degree of shock absorption— it is designed to save your life, not to give you a soft catch.

clip into the line of Steel cable

3. clipping between cable segments

Although it is largely self-explanatory, there is still a best-practice method for clipping into the cable that should be used by beginners:

  • Attach both carabiners to the first stretch of cable (best practice is to clip in opposing directions, but the chance of 2 auto-lockers failing simultaneously is basically nil, so you’ll rarely see people actually climbing like this)
  • When you reach a bolt, you’ll need to move your carabiners to the next stretch of cable one at a time, ensuring that you always have ONE carabiner clipped to the cable
Alta Via 2 Italian Dolomites hiking via ferrata guide
Clipped into the cable
Climbing via ferrata in Peru Sacred Valley
Ascending metal rungs in the Sacred Valley

4. types of climbing fixtures

Once clipped into the cable, ascend the route using a variety of fixed protection or climbing fixtures bolted directly into the rock. These may include:

Alta Via 4 Italian Dolomites hiking via ferrata guide
Ladders
Alta Via 4 Italian Dolomites hiking via ferrata guide
flat pegs
Alta Via 2 Italian Dolomites hiking via ferrata guide
The cable itself
Alta Via 4 Italian Dolomites hiking via ferrata guide
simple pegs
Alta Via 4 Italian Dolomites hiking via ferrata guide
Bridges
Alta Via 2 Italian Dolomites hiking via ferrata guide
Suspension bridges!
Via ferrata in the Dolomites beginner guide
Stemples
Juliana Bike Trail Slovenia
& still more pegs

5. navigating the via ferrata

Thanks to the continuous cable bolted into the rock, navigating through a via ferrata is typically very easy— simply slide your carabiners along the cable!

When connecting two routes or tackling long circuits, however, you will usually need to do some navigation between sections of cable, which is aided by frequent flags and markers on the rock.

Alta Via 2 Italian Dolomites hiking via ferrata guide
Beginning of Via Ferrata Porton
Alta Via 4 Italian Dolomites hiking via ferrata guide
Trail markers on Via Ferrata delle Forcelle

6. climb on!

Much to the delight of climbers and scramblers everywhere, via ferrata still presents plenty of opportunity to get your hands and feet on the actual rock— it’s not all about the fixtures! When rock quality is good and handholds are plentiful, you’ll find yourself leaning a lot more towards actual climbing (but with the added protection of a cable).

Still, you should have a hand on the cable or a steel rung at all times while ascending or descending via ferrata. Unlike other forms of recreational climbing where falls are common and expected, you are only protected by a via ferrata lanyard that provides a minimal degree of shock absorption— it is designed to save your life, but a fall is NOT comfortable and might still result in serious injury.

Via Ferrata Porton
Via Ferrata Porton

I hope you’ve enjoyed this crash-course on via ferrata! If you’re specifically interested in the Italian Dolomites, be sure to check out this dedicated post with more specific information, including mountain insurance, ratings, and recommended routes in Italy.

Read more about via ferrata

Climbing Mt Triglav: Čez Prag, Tominšek & Mali Triglav via ferrata in Slovenia’s Julian Alps

Via ferrata climbing & ziplining in the Sacred Valley: an adrenaline-filled day trip from Cusco

10 best via ferrata routes in the Italian Dolomites

Via ferrata in the Italian Dolomites: the ultimate beginner’s guide

Alta Via 2: complete hiking + via ferrata route guide

Alta Via 4: complete hiking + via ferrata route guide

TAGS:general packing listsoutdoor packing listsvia ferrata
0 Comments
Share
brooke beyond

Hey, I'm Brooke and I'm obsessed with getting off the beaten path, exploring backcountry gems & travelling beyond the ordinary! I left Australia 5 years ago after finishing a PhD in Biomechanics & have been travelling the world full-time ever since (joined by my life/climbing partner, James). Whether it’s road-tripping through Mexico, climbing alpine peaks in the Andes, scuba diving in the Red Sea, or tackling epic via ferrata in the Dolomites, I hope this blog will inspire your future adventures & help you find wonder in every corner of the globe. xx bb

Leave a Comment Cancel Comment

You May Also Like

10 July 2017

Tour du Mont Blanc Day 1: Les Houches – Les Contamines

2 December 2016

Iceland Roadtrip Days 1 & 2: Skógafoss, Sólheimasandur & Vík

18 July 2017

Tour du Mont Blanc Day 8: Tré-Le-Champ – Lac Blanc – La Flegere – Chamonix

hi, I’m brooke!

I'm obsessed with getting off the beaten path, exploring backcountry gems & travelling beyond the ordinary! I left Australia 5 years ago after finishing a PhD in Biomechanics & have been travelling the world full-time ever since (now joined by my life/climbing partner, James). I hope this blog will inspire your future adventures & help you find wonder in every corner of the globe. xx bb

read my story
currently exploring

currently exploring

mexico

read our gear guides

🥾 hiking boots

🎒 hiking backpacks

🌨️ cold-weather layers

⛺️ backpacking & alpine tents

🛌 sleeping bag & pads

🍪 backcountry food

📸 travel camera gear

✈️ travel clothing

trail guides

summit guides

itineraries

outdoor gear

GPS maps

recent posts

  • Climbing Iztaccíhuatl volcano

    2-week Mexico volcanoes itinerary: climbing Pico de Orizaba, Izta, Malinche & Toluca

    3 June 2025
  • Mexico City: the perfect 5-day itinerary for CDMX

    31 May 2025
  • Climbing Iztaccíhuatl volcano

    Driving in Mexico: essential road trip guide for foreigners

    28 May 2025
  • 10-day Rwanda road trip itinerary: gorillas, volcanoes & Lake Kivu

    25 May 2025
  • 2-week Patagonia itinerary: best of Torres del Paine & Los Glaciares/El Chaltén

    22 May 2025

@brookebeyond_
brooke ✨travel & mountain gal

@brookebeyond_

  • We took our own engagement photos in the Swiss Alps this summer and here’s how it went 👉🏼

(#8 might just be my personal fave 😂)

ALSO this post is for anyone who’s gotten the (woefully mistaken) impression that I am “naturally photogenic”
  • absolutely one of the most amazing little hikes we did in Switzerlnad this summer (& the competition was stiff) 🤩🏔️🌞🌸

📍Saxer Lücke

GETTING THERE: catch the Frümsen gondola to Staubernkanzel

HIKE: 1hr (2.5km, 250m gain) to this amazing viewpoint

WHEN TO GO: the best lighting is in the afternoon, these photos were taken around 4pm and it just kept getting better!
.
.
.
.
.
#swissalps #switzerland #saxerlücke #swisssummer #alpstein
  • the BEST easy hike in Zermatt 🏔️🥾✨

For spectacular views of the Matterhorn, the enormous Monte Rosa massif, and the Gorner Glacier (as well as 29 peaks over 4,000m!), there’s no better EASY hike than Riffelberg to Gornergrat, accessible via the Gornergrat Railway in Zermatt. 

The hike only takes about 2hrs at a leisurely pace (I did it 7 weeks after knee surgery!), so it’s suitable for families and non-hikers with even a basic level of fitness 🏃🏻‍♀️

🇨🇭 START FROM ZERMATT
- purchase tickets (day-of is fine) from Gornergrat Railway, right across from Zermatt train station

🚞 GORNERGRAT RAILWAY
- tickets from Zermatt to Riffelberg cost 42CHF ($50USD)— there’s no discount for return, so keep it flexible by purchasing one-way
- the train takes the about 25min, sit on the right side for best views!
- when you finish the hike at Gornergrat, buy a one-way ticket back to Zermatt for 66CHF ($80USD)
- save 50% on tickets with the Swiss Half Fare Card— the pass costs 120CHF ($150USD) and lasts for a whole month, it’s almost always worth it!) 

🥾 HIKE DETAILS: RIFFELSEE TO GORNERGRAT
- the route is 5km with 560m elevation gain (entirely uphill)
- the best views of the Matterhorn are around Riffelsee, where several small lakes offer perfect reflections
- near Rotenboden (the train station in between Riffelberg & Gornergrat), there are excellent rocky viewpoints of both Matterhorn and Monta Rosa— it’s easy to find quiet views if you hike around a bit!
- as you get closer to Gornergrat, Monte Rosa and the Gorner Glacier are right in your face
- almost everyone does this hike in reverse (Gornergrat to Riffelberg), I just personally hate hiking downhill— but you can swap if you’d rather descend the entire way!
  • 2 months after knee surgery and barely a week after I stopped walking with a knee brace and cane, I was honestly so proud to be able to do this (objectively very easy) 5km hike with 250m gain— it may not seem like much, but for me, this was a HUGE step forward 🥹

📍 Saxer Lücke, Switzerland 

it’s been an extremely challenging recovery, both physically and mentally… but the milestone moments always fill me with hope that things are indeed getting better ❤️‍🩹

special shoutout to my fiancé/hiking partner/personal cheering squad @slatojc for slowing down with me on the trail and always offering a hand down slippery rocks before I even have to ask
  • it’s another “if it wasn’t so stupid beautiful, I’d never set foot in this country again because it’s bleeding me dry” kinda summer 🇨🇭🌸☀️🏔️🦋✨

(hands up if you feel personally victimised by Swiss prices but you can’t stay away because MOUNTAINS 😭😭)
  • magical summer sunsets in Switzerland ✨
.
.
.
.
#swissalps #stoosridge #swisssummer #sunset
  • BEST EASY HIKES IN SWITZERLAND 🇨🇭❤️‍🩹

just 2 months after knee surgery, I found myself travelling through Switzerland— in search of easy hikes that were actually accessible post-op 🩼 

luckily, there’s hardly a better place in the world for easy hiking than the Swiss Alps!!

so whether you’re recovering from an injury, hiking with older parents/young children, or just a non-hiker who loves an epic view, this short list of HIGH VALUE viewpoints & hikes offer the most spectacular mountain scenery with minimal challenge

💸 BUDGET TIP: buy the Swiss Half Fare Card to save 50% all these gondolas and trains, which can seriously add up!!

- Stoos Ridge: take the Stoosbahn to the little village of Stoos + walk about 15min to the chairlift that can take you all the way up to Fronalpstock— you can walk as little or as much as you want up here, the views are amazing right away
- Riffelsee: take the Gornergrat Railway from Zermatt to Riffelsee + hike 20min to the 2 beautiful alpine lakes (then either hike 1hr up to Gornergrat or catch the train)
- Saxer Lücke: catch a gondola + hike 1hr (2.5km, 250m gain) to this amazing viewpoint— hardest on this list and not suitable for those with extremely limited mobility 
- Kleine Scheidegg: take the train or the gondola from Grindelwald + hike about 20min uphill to the lake
- Jungfraujoch: from Kleine Scheidegg, take the gondola to Jungfraujoch + walk around the viewing platforms
- Trockener Steg: take the gondola from Zermatt + walk 10min from the top of the cable car to the lake for incredible Matterhorn views
- Oeschinensee: 20min walk from the top of the Kandersteg cable car to the lake (bus also available), then you can walk as little or as much as you want around the lake or on the famous Panorama Trail
.
.
.
.
.
#easyhikes #swissalps #matterhorn #jungfraujoch #oeschinensee #stoos #switzerland
  • This is my 2nd summer back in Zermatt to climb the Matterhorn— and my 2nd summer NOT climbing the Matterhorn 😑

In 2023, a wicked snow storm blew through the night before my planned ascent and grounded all climbing parties… and then I had knee surgery less than 2 months before our repeat trip to Zermatt this year. I won’t lie, it’s been extremely disappointing to spend nearly 2 weeks in one of the most expensive places in the world, and STILL not do the thing I came here to do 😅

But alas, here we are in Zermatt again! (and apparently not for the last time)

Even though we are slowly going bankrupt, it’s a gorgeous place to be in the summer with no shortage of amazing trails!

Can’t wait to share some of what we’ve been up to— my first little hikes since surgery 🤩
  • we’ve spent the last several weeks in Switzerland and, in many ways, I couldn’t have chosen a better destination for post-knee-surgery recovery— where else in the world can you get views like THIS with 1hr of easy hiking?!

I’m not sure I’ll ever truly prefer the accessibility of the Alps to true backcountry… but there’s no denying that I couldn’t be outside any other way right now and it’s given me a whole new appreciation for the hundreds of gondolas, funiculars, and trains that connect non-hikers or mobility-impaired enthusiasts like myself to otherwise unreachable heights!

I’m enormously grateful for the opportunity to rehab my knee under legendary peaks rather than fluorescent indoor lights, so THANK YOU Switzerland 😍
follow @brookebeyond_

travel beyond the ordinary

Explore my travel guides, custom itineraries & blog posts with an interactive world map ✨

all destinations

  • We took our own engagement photos in the Swiss Alps this summer and here’s how it went 👉🏼

(#8 might just be my personal fave 😂)

ALSO this post is for anyone who’s gotten the (woefully mistaken) impression that I am “naturally photogenic”
  • absolutely one of the most amazing little hikes we did in Switzerlnad this summer (& the competition was stiff) 🤩🏔️🌞🌸

📍Saxer Lücke

GETTING THERE: catch the Frümsen gondola to Staubernkanzel

HIKE: 1hr (2.5km, 250m gain) to this amazing viewpoint

WHEN TO GO: the best lighting is in the afternoon, these photos were taken around 4pm and it just kept getting better!
.
.
.
.
.
#swissalps #switzerland #saxerlücke #swisssummer #alpstein
  • the BEST easy hike in Zermatt 🏔️🥾✨

For spectacular views of the Matterhorn, the enormous Monte Rosa massif, and the Gorner Glacier (as well as 29 peaks over 4,000m!), there’s no better EASY hike than Riffelberg to Gornergrat, accessible via the Gornergrat Railway in Zermatt. 

The hike only takes about 2hrs at a leisurely pace (I did it 7 weeks after knee surgery!), so it’s suitable for families and non-hikers with even a basic level of fitness 🏃🏻‍♀️

🇨🇭 START FROM ZERMATT
- purchase tickets (day-of is fine) from Gornergrat Railway, right across from Zermatt train station

🚞 GORNERGRAT RAILWAY
- tickets from Zermatt to Riffelberg cost 42CHF ($50USD)— there’s no discount for return, so keep it flexible by purchasing one-way
- the train takes the about 25min, sit on the right side for best views!
- when you finish the hike at Gornergrat, buy a one-way ticket back to Zermatt for 66CHF ($80USD)
- save 50% on tickets with the Swiss Half Fare Card— the pass costs 120CHF ($150USD) and lasts for a whole month, it’s almost always worth it!) 

🥾 HIKE DETAILS: RIFFELSEE TO GORNERGRAT
- the route is 5km with 560m elevation gain (entirely uphill)
- the best views of the Matterhorn are around Riffelsee, where several small lakes offer perfect reflections
- near Rotenboden (the train station in between Riffelberg & Gornergrat), there are excellent rocky viewpoints of both Matterhorn and Monta Rosa— it’s easy to find quiet views if you hike around a bit!
- as you get closer to Gornergrat, Monte Rosa and the Gorner Glacier are right in your face
- almost everyone does this hike in reverse (Gornergrat to Riffelberg), I just personally hate hiking downhill— but you can swap if you’d rather descend the entire way!
  • 2 months after knee surgery and barely a week after I stopped walking with a knee brace and cane, I was honestly so proud to be able to do this (objectively very easy) 5km hike with 250m gain— it may not seem like much, but for me, this was a HUGE step forward 🥹

📍 Saxer Lücke, Switzerland 

it’s been an extremely challenging recovery, both physically and mentally… but the milestone moments always fill me with hope that things are indeed getting better ❤️‍🩹

special shoutout to my fiancé/hiking partner/personal cheering squad @slatojc for slowing down with me on the trail and always offering a hand down slippery rocks before I even have to ask
  • it’s another “if it wasn’t so stupid beautiful, I’d never set foot in this country again because it’s bleeding me dry” kinda summer 🇨🇭🌸☀️🏔️🦋✨

(hands up if you feel personally victimised by Swiss prices but you can’t stay away because MOUNTAINS 😭😭)
We took our own engagement photos in the Swiss Alps this summer and here’s how it went 👉🏼

(#8 might just be my personal fave 😂)

ALSO this post is for anyone who’s gotten the (woefully mistaken) impression that I am “naturally photogenic”
We took our own engagement photos in the Swiss Alps this summer and here’s how it went 👉🏼

(#8 might just be my personal fave 😂)

ALSO this post is for anyone who’s gotten the (woefully mistaken) impression that I am “naturally photogenic”
We took our own engagement photos in the Swiss Alps this summer and here’s how it went 👉🏼

(#8 might just be my personal fave 😂)

ALSO this post is for anyone who’s gotten the (woefully mistaken) impression that I am “naturally photogenic”
We took our own engagement photos in the Swiss Alps this summer and here’s how it went 👉🏼

(#8 might just be my personal fave 😂)

ALSO this post is for anyone who’s gotten the (woefully mistaken) impression that I am “naturally photogenic”
We took our own engagement photos in the Swiss Alps this summer and here’s how it went 👉🏼

(#8 might just be my personal fave 😂)

ALSO this post is for anyone who’s gotten the (woefully mistaken) impression that I am “naturally photogenic”
We took our own engagement photos in the Swiss Alps this summer and here’s how it went 👉🏼

(#8 might just be my personal fave 😂)

ALSO this post is for anyone who’s gotten the (woefully mistaken) impression that I am “naturally photogenic”
We took our own engagement photos in the Swiss Alps this summer and here’s how it went 👉🏼

(#8 might just be my personal fave 😂)

ALSO this post is for anyone who’s gotten the (woefully mistaken) impression that I am “naturally photogenic”
We took our own engagement photos in the Swiss Alps this summer and here’s how it went 👉🏼

(#8 might just be my personal fave 😂)

ALSO this post is for anyone who’s gotten the (woefully mistaken) impression that I am “naturally photogenic”
We took our own engagement photos in the Swiss Alps this summer and here’s how it went 👉🏼

(#8 might just be my personal fave 😂)

ALSO this post is for anyone who’s gotten the (woefully mistaken) impression that I am “naturally photogenic”
We took our own engagement photos in the Swiss Alps this summer and here’s how it went 👉🏼

(#8 might just be my personal fave 😂)

ALSO this post is for anyone who’s gotten the (woefully mistaken) impression that I am “naturally photogenic”
@brookebeyond_
@brookebeyond_
•
Follow
We took our own engagement photos in the Swiss Alps this summer and here’s how it went 👉🏼 (#8 might just be my personal fave 😂) ALSO this post is for anyone who’s gotten the (woefully mistaken) impression that I am “naturally photogenic”
2 days ago
View on Instagram |
1/5
@brookebeyond_
@brookebeyond_
•
Follow
absolutely one of the most amazing little hikes we did in Switzerlnad this summer (& the competition was stiff) 🤩🏔️🌞🌸 📍Saxer Lücke GETTING THERE: catch the Frümsen gondola to Staubernkanzel HIKE: 1hr (2.5km, 250m gain) to this amazing viewpoint WHEN TO GO: the best lighting is in the afternoon, these photos were taken around 4pm and it just kept getting better! . . . . . #swissalps #switzerland #saxerlücke #swisssummer #alpstein
3 days ago
View on Instagram |
2/5
the BEST easy hike in Zermatt 🏔️🥾✨

For spectacular views of the Matterhorn, the enormous Monte Rosa massif, and the Gorner Glacier (as well as 29 peaks over 4,000m!), there’s no better EASY hike than Riffelberg to Gornergrat, accessible via the Gornergrat Railway in Zermatt. 

The hike only takes about 2hrs at a leisurely pace (I did it 7 weeks after knee surgery!), so it’s suitable for families and non-hikers with even a basic level of fitness 🏃🏻‍♀️

🇨🇭 START FROM ZERMATT
- purchase tickets (day-of is fine) from Gornergrat Railway, right across from Zermatt train station

🚞 GORNERGRAT RAILWAY
- tickets from Zermatt to Riffelberg cost 42CHF ($50USD)— there’s no discount for return, so keep it flexible by purchasing one-way
- the train takes the about 25min, sit on the right side for best views!
- when you finish the hike at Gornergrat, buy a one-way ticket back to Zermatt for 66CHF ($80USD)
- save 50% on tickets with the Swiss Half Fare Card— the pass costs 120CHF ($150USD) and lasts for a whole month, it’s almost always worth it!) 

🥾 HIKE DETAILS: RIFFELSEE TO GORNERGRAT
- the route is 5km with 560m elevation gain (entirely uphill)
- the best views of the Matterhorn are around Riffelsee, where several small lakes offer perfect reflections
- near Rotenboden (the train station in between Riffelberg & Gornergrat), there are excellent rocky viewpoints of both Matterhorn and Monta Rosa— it’s easy to find quiet views if you hike around a bit!
- as you get closer to Gornergrat, Monte Rosa and the Gorner Glacier are right in your face
- almost everyone does this hike in reverse (Gornergrat to Riffelberg), I just personally hate hiking downhill— but you can swap if you’d rather descend the entire way!
@brookebeyond_
@brookebeyond_
•
Follow
the BEST easy hike in Zermatt 🏔️🥾✨ For spectacular views of the Matterhorn, the enormous Monte Rosa massif, and the Gorner Glacier (as well as 29 peaks over 4,000m!), there’s no better EASY hike than Riffelberg to Gornergrat, accessible via the Gornergrat Railway in Zermatt. The hike only takes about 2hrs at a leisurely pace (I did it 7 weeks after knee surgery!), so it’s suitable for families and non-hikers with even a basic level of fitness 🏃🏻‍♀️ 🇨🇭 START FROM ZERMATT - purchase tickets (day-of is fine) from Gornergrat Railway, right across from Zermatt train station 🚞 GORNERGRAT RAILWAY - tickets from Zermatt to Riffelberg cost 42CHF ($50USD)— there’s no discount for return, so keep it flexible by purchasing one-way - the train takes the about 25min, sit on the right side for best views! - when you finish the hike at Gornergrat, buy a one-way ticket back to Zermatt for 66CHF ($80USD) - save 50% on tickets with the Swiss Half Fare Card— the pass costs 120CHF ($150USD) and lasts for a whole month, it’s almost always worth it!) 🥾 HIKE DETAILS: RIFFELSEE TO GORNERGRAT - the route is 5km with 560m elevation gain (entirely uphill) - the best views of the Matterhorn are around Riffelsee, where several small lakes offer perfect reflections - near Rotenboden (the train station in between Riffelberg & Gornergrat), there are excellent rocky viewpoints of both Matterhorn and Monta Rosa— it’s easy to find quiet views if you hike around a bit! - as you get closer to Gornergrat, Monte Rosa and the Gorner Glacier are right in your face - almost everyone does this hike in reverse (Gornergrat to Riffelberg), I just personally hate hiking downhill— but you can swap if you’d rather descend the entire way!
1 week ago
View on Instagram |
3/5
2 months after knee surgery and barely a week after I stopped walking with a knee brace and cane, I was honestly so proud to be able to do this (objectively very easy) 5km hike with 250m gain— it may not seem like much, but for me, this was a HUGE step forward 🥹

📍 Saxer Lücke, Switzerland 

it’s been an extremely challenging recovery, both physically and mentally… but the milestone moments always fill me with hope that things are indeed getting better ❤️‍🩹

special shoutout to my fiancé/hiking partner/personal cheering squad @slatojc for slowing down with me on the trail and always offering a hand down slippery rocks before I even have to ask
@brookebeyond_
@brookebeyond_
•
Follow
2 months after knee surgery and barely a week after I stopped walking with a knee brace and cane, I was honestly so proud to be able to do this (objectively very easy) 5km hike with 250m gain— it may not seem like much, but for me, this was a HUGE step forward 🥹 📍 Saxer Lücke, Switzerland it’s been an extremely challenging recovery, both physically and mentally… but the milestone moments always fill me with hope that things are indeed getting better ❤️‍🩹 special shoutout to my fiancé/hiking partner/personal cheering squad @slatojc for slowing down with me on the trail and always offering a hand down slippery rocks before I even have to ask
3 weeks ago
View on Instagram |
4/5
@brookebeyond_
@brookebeyond_
•
Follow
it’s another “if it wasn’t so stupid beautiful, I’d never set foot in this country again because it’s bleeding me dry” kinda summer 🇨🇭🌸☀️🏔️🦋✨ (hands up if you feel personally victimised by Swiss prices but you can’t stay away because MOUNTAINS 😭😭)
3 weeks ago
View on Instagram |
5/5

  • start here
  • about
  • group trips
  • destinations
  • hiking guides
  • outdoor gear
  • custom GPS maps
  • privacy
  • contact

COPYRIGHT © 2025 BROOKE BEYOND. TRAVEL BEYOND THE ORDINARY. Site Powered by Pix & Hue.


Loading Comments...