
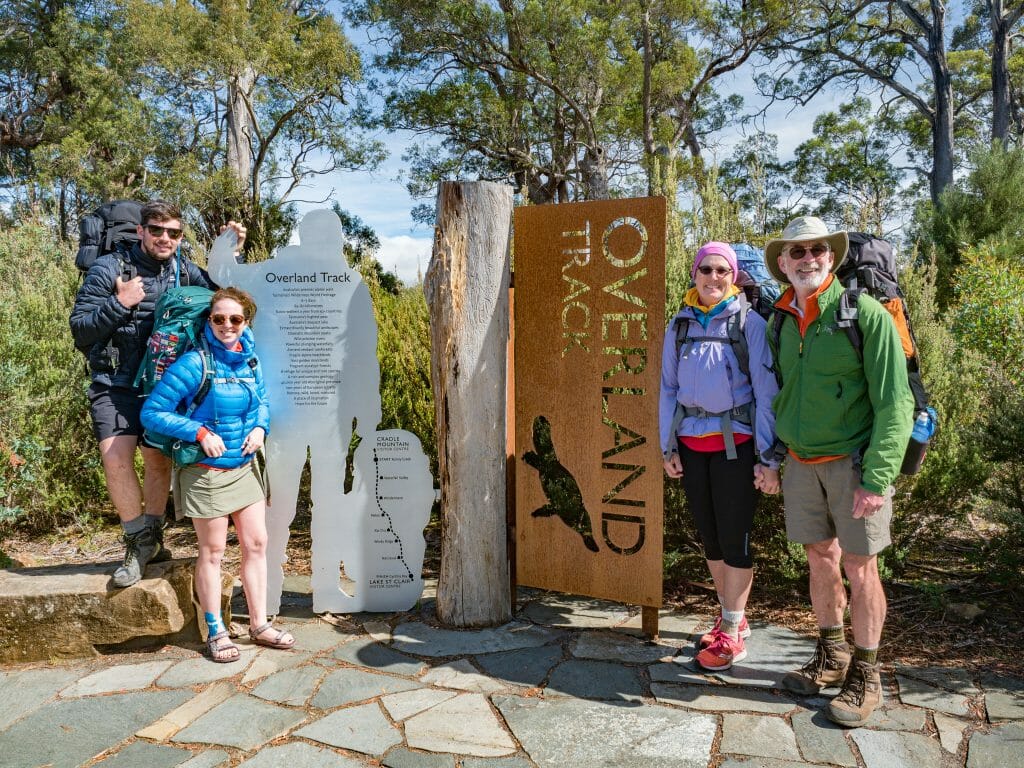
The Overland Track: a guide to Tasmania’s most iconic multi-day hike
Last Updated on 22 April 2026
Tasmania’s legendary Overland Track is Australian bushwalking at its very finest, incorporating dramatic dolerite peaks, wind-whipped alpine tundra, lush valleys dominated by vibrant wildflowers, and sparkling waterfalls all into one incredible hike.
It’s possible to join an expensive tour group that will lead you along the Overland Track, but I think that’s totally unnecessary— this is an undemanding and extremely rewarding walk that, with the help of this comprehensive guide, you’ll have absolutely no trouble enjoying on your own. This post covers all aspects of organising and walking the Overland Track without a guide, including booking Park Passes, organising transport, a daily hiking itinerary, packing list, and more!
About the Overland Track
Each year, more than 8,000 Taswegians, Australian mainlanders, and international visitors flock to Cradle Mountain-Lake St Clair National Park to walk this iconic trail from Ronny Creek to Cynthia Bay. And I imagine every single one of these people has been blown away by the beauty of the Overland Track!


More than just the incredible scenery, the Overland Track is incredible in its accessibility for people of all experience levels. Each day, you’ll walk just 3-6hrs, which makes this a great introductory walk for those just getting into hiking or a more relaxed adventure for veteran outdoor enthusiasts!
Every stage of the walk also brings you by potable water, there are huts available for every night of the journey at no extra cost, the track is well-maintained and well-marked, and there’s nearly always someone nearby to help in case of an emergency. With adequate preparation, this is a gorgeous and extremely approachable multi-day bush walk!
>>> Read my complete Overland Track packing list to make sure you have everything you need
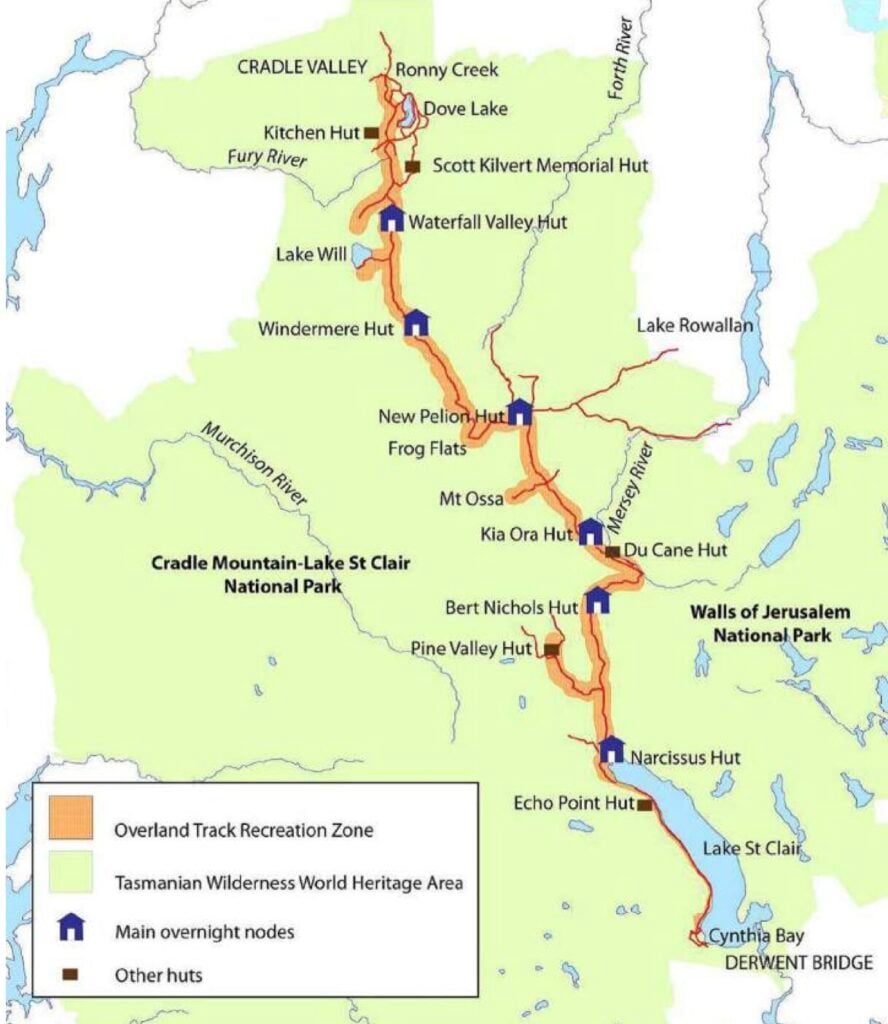
Overland Track route overview
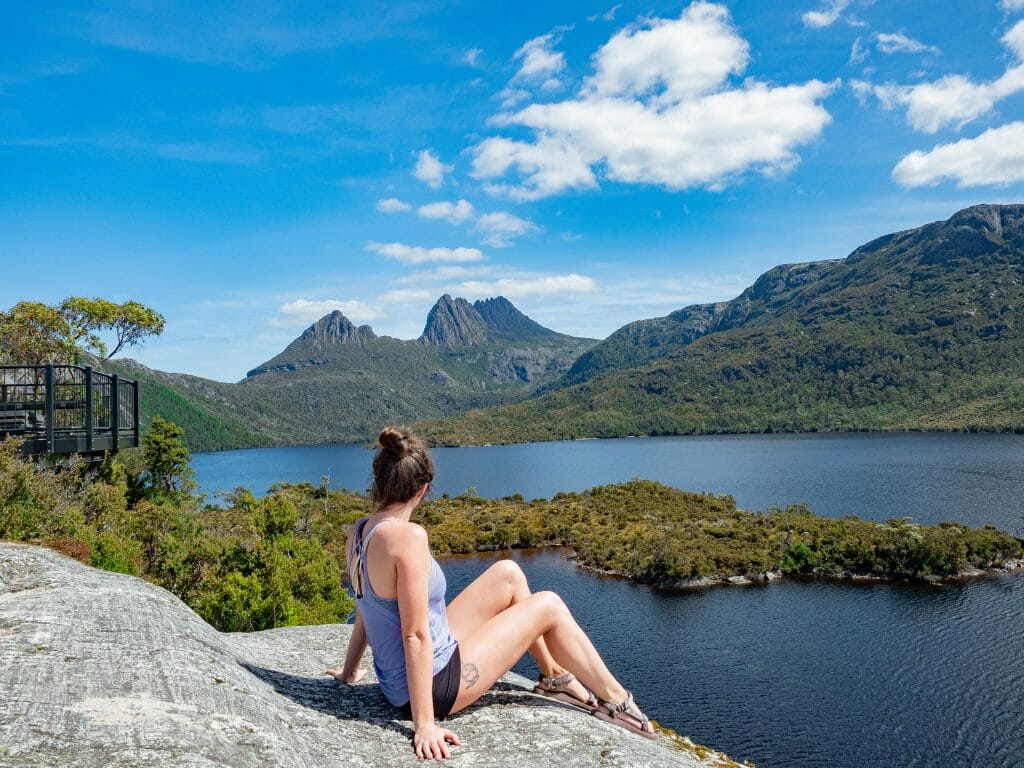
Beginning in the north of the park at Cradle Valley, the first day of the Overland Track carries you from Ronny Creek to Marions Lookout for sweeping views of Cradle Mountain (the ascent of which is an excellent first day excursion), and down into Waterfall Valley.
From here, the walk undulates for several days past towering dolerite mountains, offering you the opportunity to summit Tasmania’s tallest peak on Day 4, and through fields of colour as you approach the beautiful waterfalls and forest scenery of the Narcissus River. The daily route (and best side-trips) are all described in further detail below!

Booking the Overland Track
How to reserve an Overland Track pass
During the booking season (1 October to 31 May), you are required to purchase a pass for the Overland Track prior to setting out on the trail. Only 34 spots are available to independent hikers on each day, so it’s definitely advisable to reserve this as early as possible, particularly if you’re hoping to hike in the summer months.
Bookings open for the season on 1 July and I was on the site at 9am to secure our first choice of dates, which we were lucky to get! The process is really simple— just head to the booking site, select your dates, enter details for each hiker in your group, and then pay the $300AUD Overland Track fee.
>>> Note that it is not possible to reserve huts for the Overland Track! More about the campsites and huts under “What to expect on the trail”.
❄️ WINTER ON THE OVERLAND TRACK
Outside the booking season, you don’t need to purchase the Overland Track pass (but you do need to register your walk and purchase a National Parks Pass, as below). I met several hikers who’d done the walk previously in winter and said it was beautiful, peaceful, and a totally different experience!
If attempting the trail in winter, be aware that the weather is wildly unpredictable (even more than it already is in summer), so you need to be prepared for all four seasons in a day, including snow.
Purchasing your National Parks Pass
Before entering Cradle Mountain-Lake St Clair National Park for your Overland Track walk (or any other trips, like a canyoning tour or the short walk around Dove Lake), you’ll need to purchase a National Parks Pass online or at the Cradle Mountain Visitor Centre. This is in addition to the Overland Track Pass that you would have booked in the last step!
A shuttle bus ticket is included with the purchase of your Parks Pass, which you’ll need to use to get to the trailhead of the Overland Track. See the shuttle map under Getting to and from the trailhead.
The cheapest option that covers a 6-day stay inside of Cradle Mountain National Park is the 2-month Holiday Pass. As of 2026, these are the current Parks Pass prices (in AUD):

Checking in at the Visitor Centre
Either the day before you’re scheduled to depart for the Overland Trek (from 3-4pm) or the morning of (from 8am onwards), you need to check in at the Cradle Mountain Visitor Centre.
This check-in process is completed at the back desk, where a ranger will sight your National Parks Pass, shuttle bus ticket, and ask you to complete a Walker Safety checklist (basically just confirming that you have a tent, sleeping bag, rain jacket, warm clothing, and sturdy boots).
** EVEN if you are planning to stay in the huts every single night of your walk, you are still required to carry a tent! Read my complete Overland Track packing list.
Checking in at each hut
The ranger will also give everyone in your party Overland Track tags to be worn on the outside of your packs so that you are easily identified as Overland Track hikers. Something that wasn’t explained to us during the check in process, but that is still super important, is the need to sign in at each hut you pass through.
When you arrive at Ronny Creek, one person in your party needs to enter information into a registry, such as your intended hike length, your intended stop for the night, etc, and this information needs to be updated in the book at each hut.
This helps the rangers keep an eye on your party’s movements in case of emergency, so it’s recommended that you try to stick to your written plans as closely as possible to avoid any unnecessary rescues being sent out in your honour.
Getting to and from the trailhead
Getting to Cradle Mountain Visitor Centre
Driving your own vehicle or a hire car is definitely the easiest way to start the Overland Track from Cradle Mountain Visitor Centre, although it’s also possible to take a bus here from one of Tassie’s main cities.
Driving times to Cradle Mountain Visitor Centre
- 1.5hrs from Devonport (where the Spirit of Tasmania ferry from Melbourne disembarks and there is a tiny airport, only offering Melbourne flights)
- 2.5hrs from Launceston (where there is a small domestic airport, mainly servicing Sydney and Melbourne)
- 4hrs from Hobart (where there is a small “international” airport, but still primarily servicing Sydney and Melbourne)
Taking a bus to Cradle Mountain Visitor Centre
If you aren’t travelling with a car, there are a number of bus companies that can get you from Devonport, Launceston, and Hobart to the start of the Overland Track at Cradle Mountain Visitor Centre. Most of these companies also provide transport back to the city from Lake St Clair at the end of the Overland Track.
- Overland Track Transport // 0474 172 012
- Cradle Mountain Coaches // 0448 800 599
- Tassie Link // 1300 300 520
- McDermotts Coaches // 0363 303 717
- Outdoor Recreational Transport // 0408 918 249
- Wilderness Expeditions // 0418 144 518
- Tasmanian Wilderness Experiences // 1300 882 293
- Tassie Road Trips // 0455 227 536
Option 2: Leaving your car at Lake St Clair Visitor Centre
Instead of leaving your car at Cradle Mountain Visitor Centre (or taking a bus), the other option is to drive your car to the end of the Overland Track at Lake St Clair Visitor Centre and then shuttle back to Cradle Mountain to begin the walk. Even though we didn’t organise our own transport this way, I can certainly see the appeal in finishing the track and already being at your car, no hassling with long buses or shuttles!
Driving times to Lake St Clair Visitor Centre
- 2.5hrs from Devonport
- 2.5hrs from Launceston
- 2.5hrs from Hobart
The options for getting from Lake St Clair to Cradle Mountain are the same as those listed below (private shuttle or Uber). If you wanted to, you could even bus out to Launceston and then to Cradle Mountain the day before, staying in the Discovery Holiday Park that is literally right across from the Visitor Centre on the night before your walk, but this is, again, more time consuming.

Getting to the trailhead at Ronny Creek
Regardless of whether you’ve driven or taken a bus to Cradle Mountain Visitor Centre (or even if you’ve left your car at Lake St Clair), once you’ve checked in and collected your Overland Track Pass at Cradle Mountain, you need to get to the trailhead at Ronny Creek, about 7km away.
The best way to do this is simply by taking the shuttle bus operated by the NP (tickets included with your National Parks Pass), which departs from the Visitor Centre every 10 minutes from 8.15am to 7pm. It’s definitely recommended to start the trek earlier rather than later as it really heats up as the day goes on.. that Tassie sun is fierce!
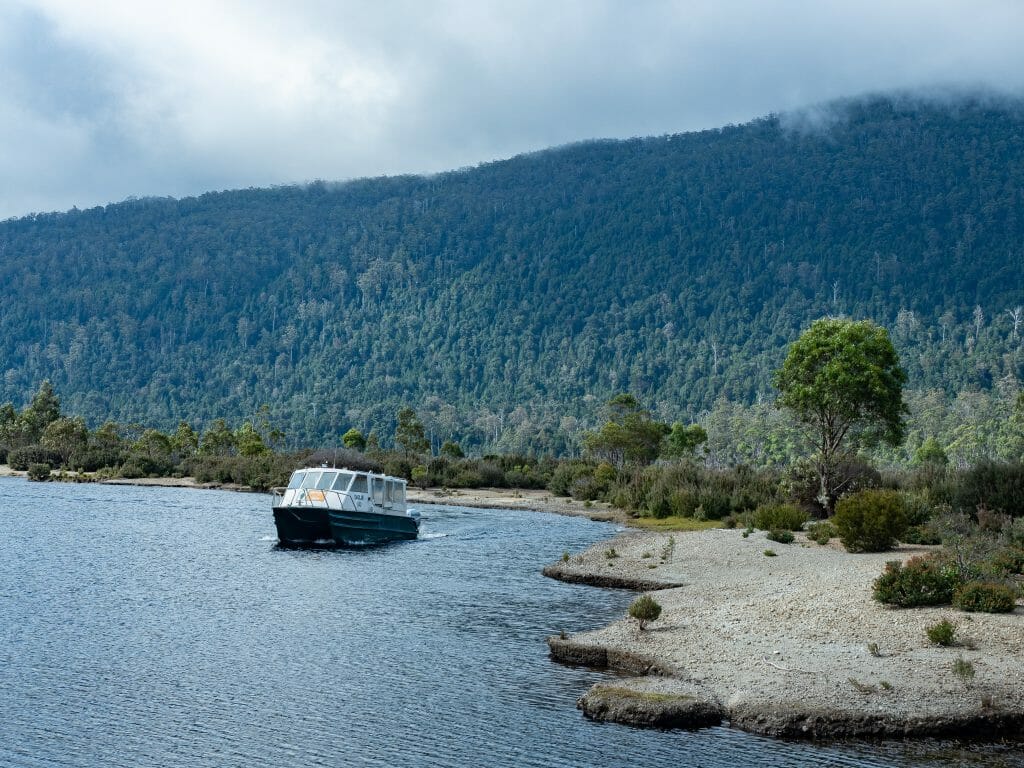
Lake St Clair ferry
The classic Overland Track finishes at Narcissus, which necessitates a ferry trip across Lake St Clair to reach the Visitor Centre at Cynthia Bay. Of course, it is also possible to walk the 17km yourself as a 7th day, but very rarely do people seem to do this.
If you want to take the ferry, reserve your spot in advance to avoid disappointment, as there are only two sailings each day at 9.45am or 3.45pm (according to the website, there is also a departure at 1.15pm, but this wasn’t running when we were there, so best to check).
We met several people at Narcissus Hut who had arrived the previous afternoon and tried to get on the ferry, only to find out that it was full and they would have to wait until morning. Make a booking by calling the office at 03 62 891 137 or emailing sceniccruises@lakestclairlodge.com.au.
When you arrive at Narcissus Hut, use the radio in the kitchen (which connects straight to the ferry people) to confirm your spot on the boat. This may also be useful to book a last-minute spot if you arrive a few hours before the next departure.
Getting from Lake St Clair to Cradle Mountain
When you complete the Overland Track, you will need to get from Lake St Clair to Cradle Mountain Visitor Centre to retrieve your vehicle, which is distinctly more challenging than it should be. There are amazingly no buses that operate this route (without travelling via Devonport, Launceston, or Hobart, which would take 1-2 days depending on the bus schedule), but I am aware of two options:
Hire a private shuttle
We booked a private shuttle through McDermotts Coaches (sales@mcdermotts.com.au or (03) 6330 3717), which met us at Lake St Clair after our walk and drove us directly back to our car at Cradle Mountain.
This was $900 for 4 people, which sounds like heaps, but it’s only about twice as much as taking the bus to Launceston and another bus to Cradle Mountain, and significantly more efficient. There was a bit of a miscommunication regarding our shuttle time, but the company went above and beyond to resolve the issue and rectify their mistake, so I wouldn’t hesitate to recommend them as a good option.
Take an Uber
We met a group in Freycinet NP who had just hiked the Overland Track using an Uber to get from the trail to their car. They were able to find a ride for about $300.
It’s worth noting that this is definitely a less reliable means of transport, as there certainly aren’t Ubers just waiting around to take you to the other side of the National Park. I believe they were able to reserve their car in advance, so this is definitely worth investigating as a cheaper option!
*Overland Track Itinerary
The 70km Overland Track is walked in 6 days, winding and weaving from Ronny Creek in the north to Cynthia Bay in the south across sub-alpine meadows, through lush eucalypt forests, and up towering dolerite peaks.
During the booking season, you must hike in this direction and spend a maximum of 6 nights on the trail, so the overall itinerary is fairly predictable— but there are still some excellent side-trips worth adding to your trip! Below are detailed trails stats and general walking notes for each day of the Overland Track.
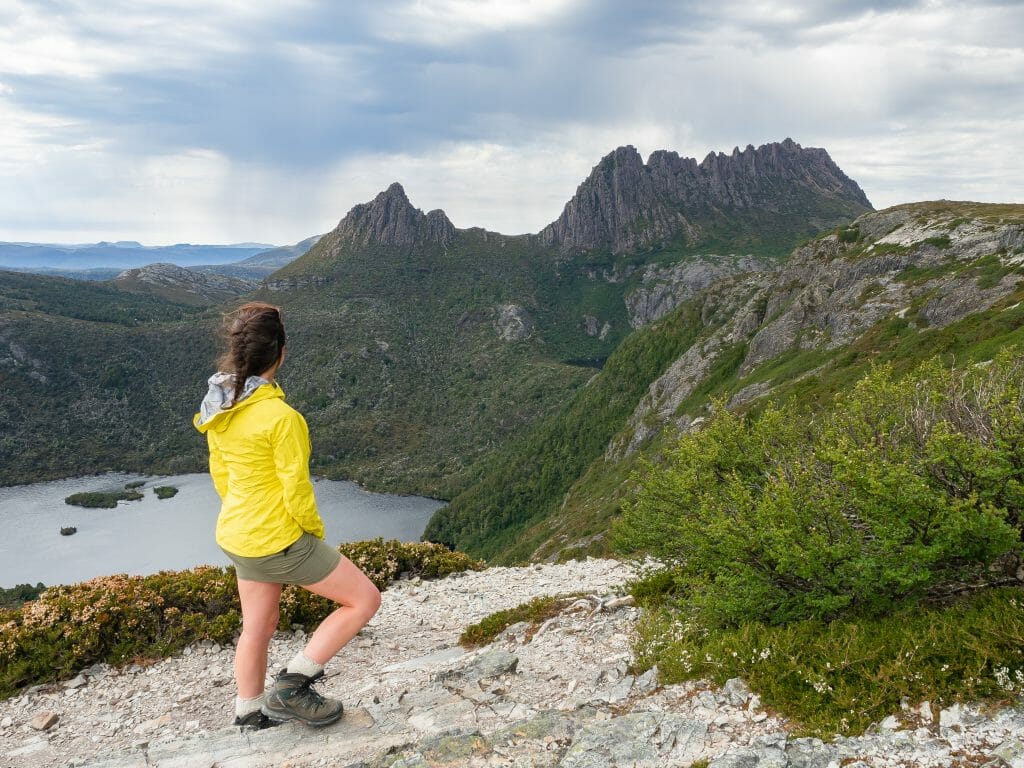
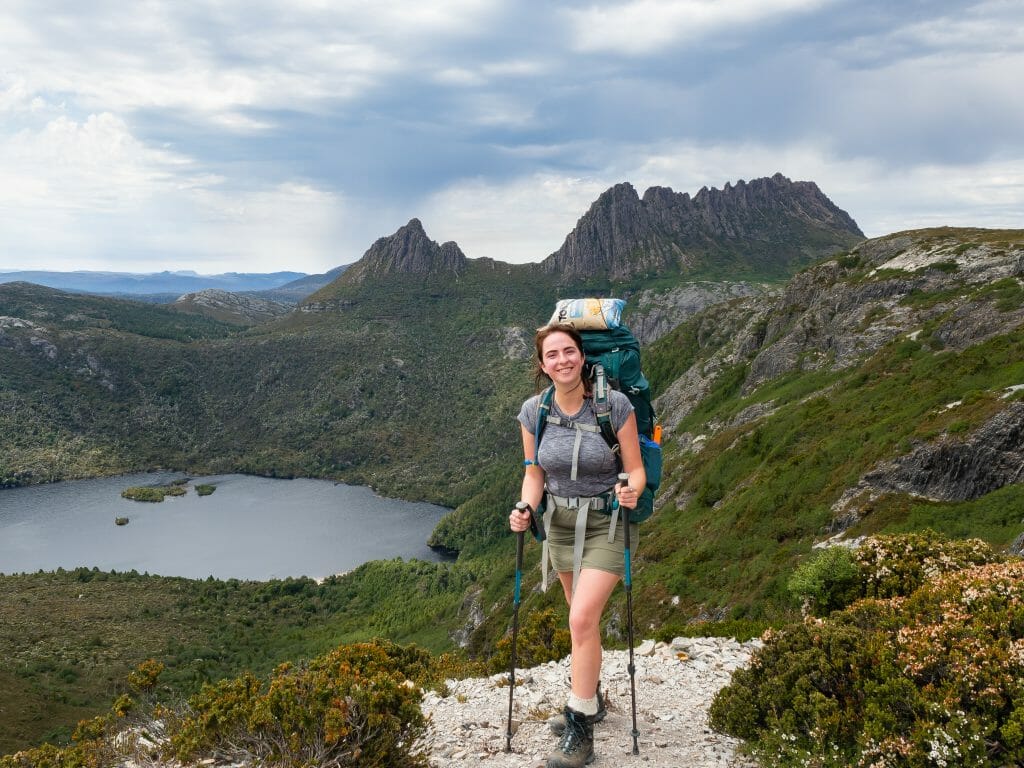
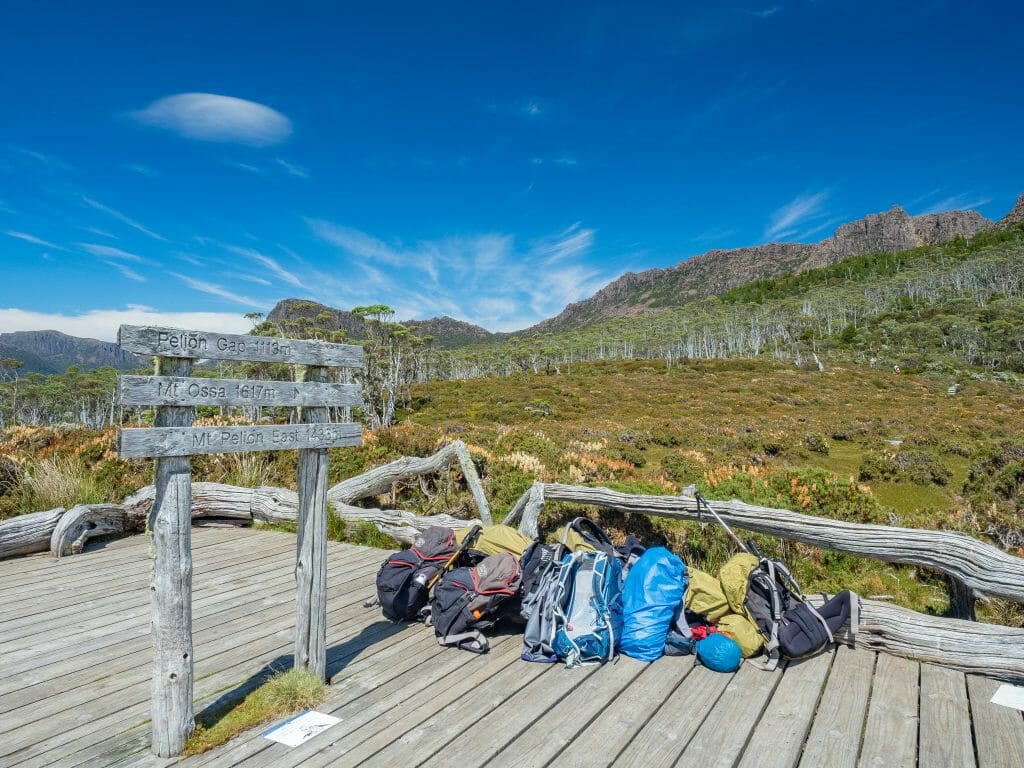
Day 1: Ronny Creek to Cradle Mountain
- Distance: 10.7km + 2km return ascent of Cradle Mountain
- Trail hours: 3.5hrs + 2hrs return ascent of Cradle Mountain
- Campsite: Waterfall Valley Hut (24 people in hut, others on tent sites)
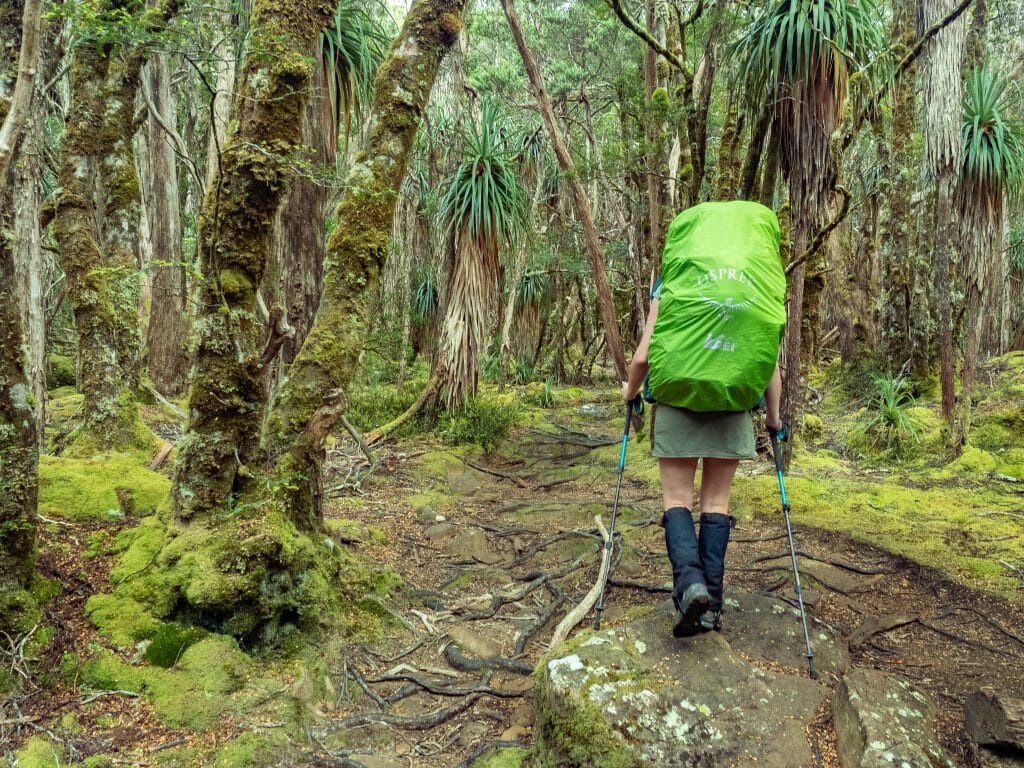
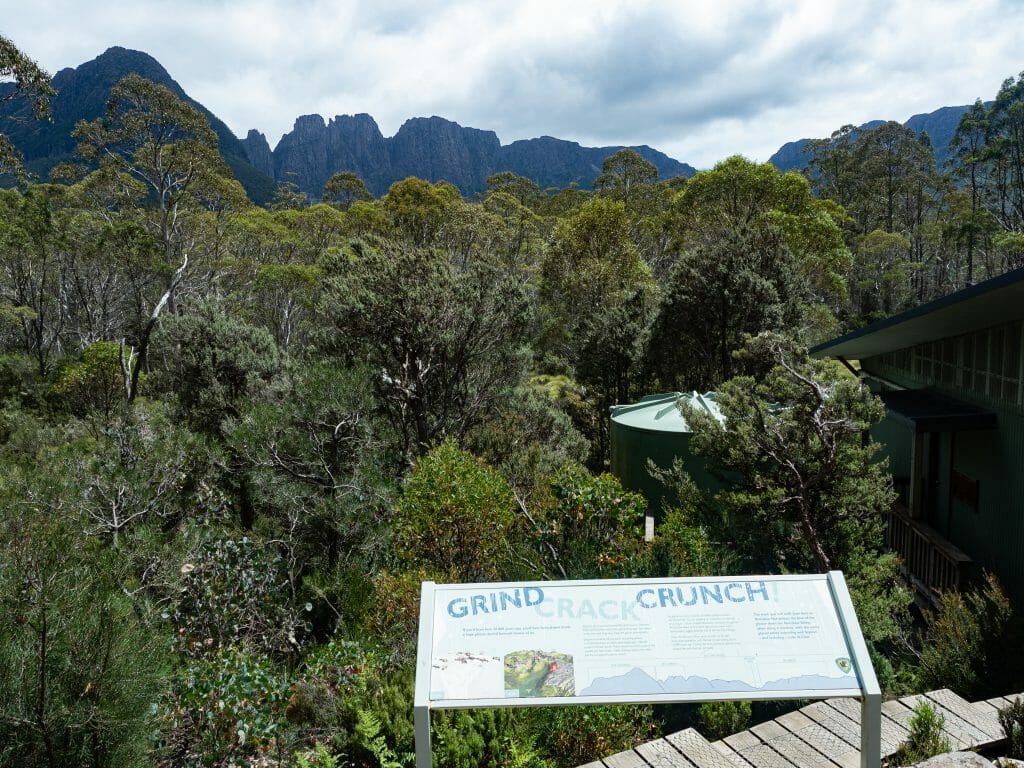
After a short shuttle from the Visitor Centre, the Overland Track officially begins at Ronny Creek, winding gently across buttongrass plains on duckboard before transitioning into lush forest and alpine terrain. It doesn’t take long for the scenery to deliver waterfalls, mossy woodland, and the first glimpses of Tasmania’s rugged high country.
The track skirts around the edge of Crater Lake, where the landscape becomes increasingly dramatic as you approach the climb to Marions Lookout at 1,250m. This is the steepest ascent on the standard Overland Track route, rising on stone steps and occasional chain-assisted sections above glossy alpine tarns and Cradle Country’s signature orange and yellow shrubs.
From the top, enjoy iconic views over Cradle Mountain, Crater Lake, and Dove Lake, easily some of the best views of the entire hike!


Beyond the lookout, the trail traverses an exposed alpine plateau towards Kitchen Hut, where you can drop your pack for the optional summit of Cradle Mountain (1,545m)— the highest and most challenging objective of the day. The route begins on a steep, uneven path before transitioning into a boulder field that requires light scrambling to reach the summit.
From the top, enjoy panoramic views of Barn Bluff, scattered alpine lakes, and Tasmania’s rugged highland landscape. Allow around 2hrs return from Kitchen Hut.
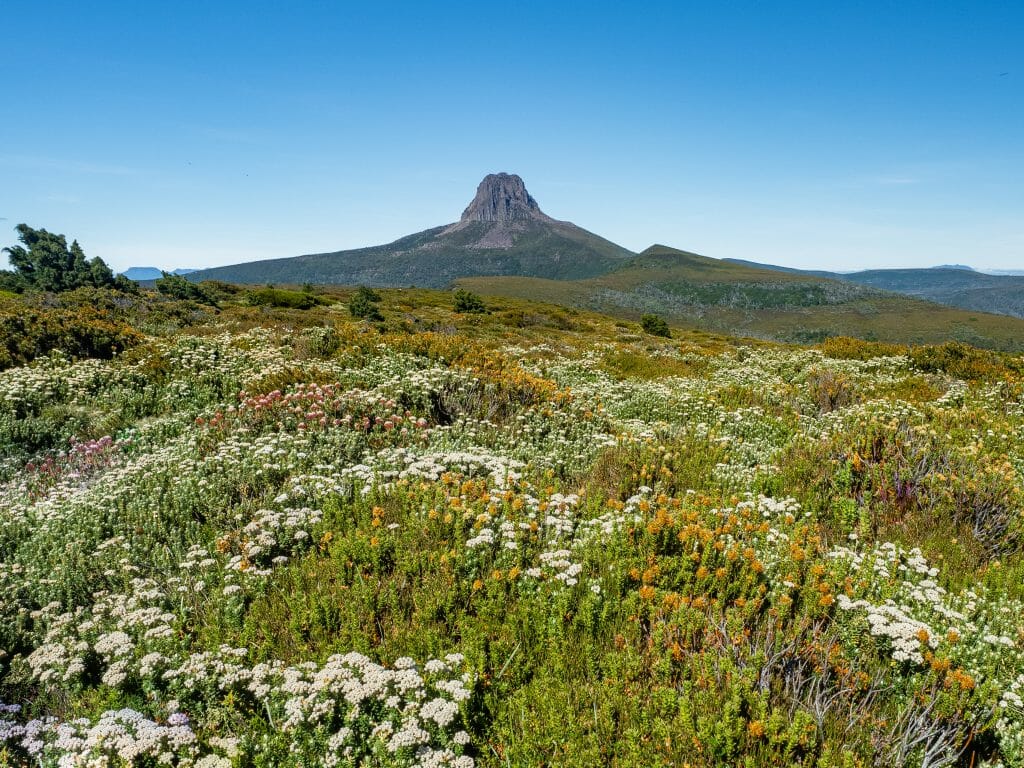
Back on the main track, the final stretch descends into Waterfall Valley, where the terrain softens into grassy plains and sheltered camping beneath Barn Bluff. It’s a demanding first day, but also one of the most spectacular, setting the tone for the incredible diversity of landscapes along the Overland Track.
Day 2: Cradle Mountain to Windermere
- Distance: 7.8km + 3km return to Lake Will
- Trail hours: 2.5hrs + 1hr return to Lake Will
- Campsite: Windermere Hut (16 people in hut, others on tent platforms)
After the intensity of Day 1, the second day of the Overland Track offers a far more relaxed and enjoyable walk, trading steep climbs for gentle undulations across open alpine terrain. Departing Waterfall Valley, the trail quickly settles into a steady rhythm through buttongrass plains and heathland, with Barn Bluff dominating the skyline for much of the day.


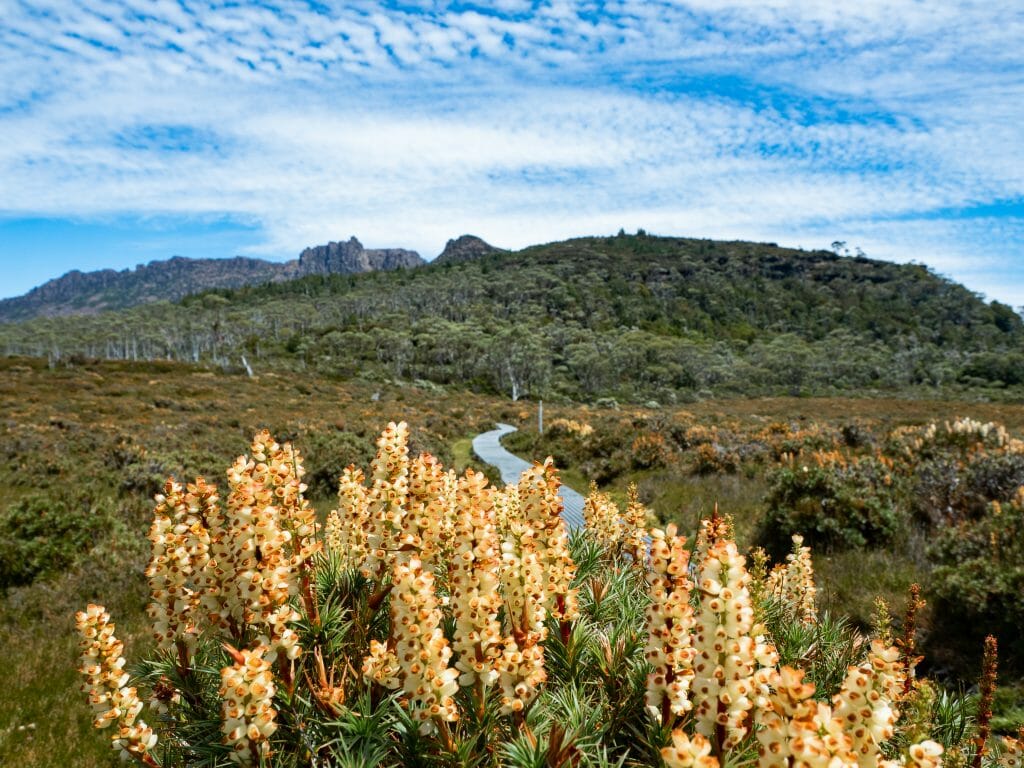
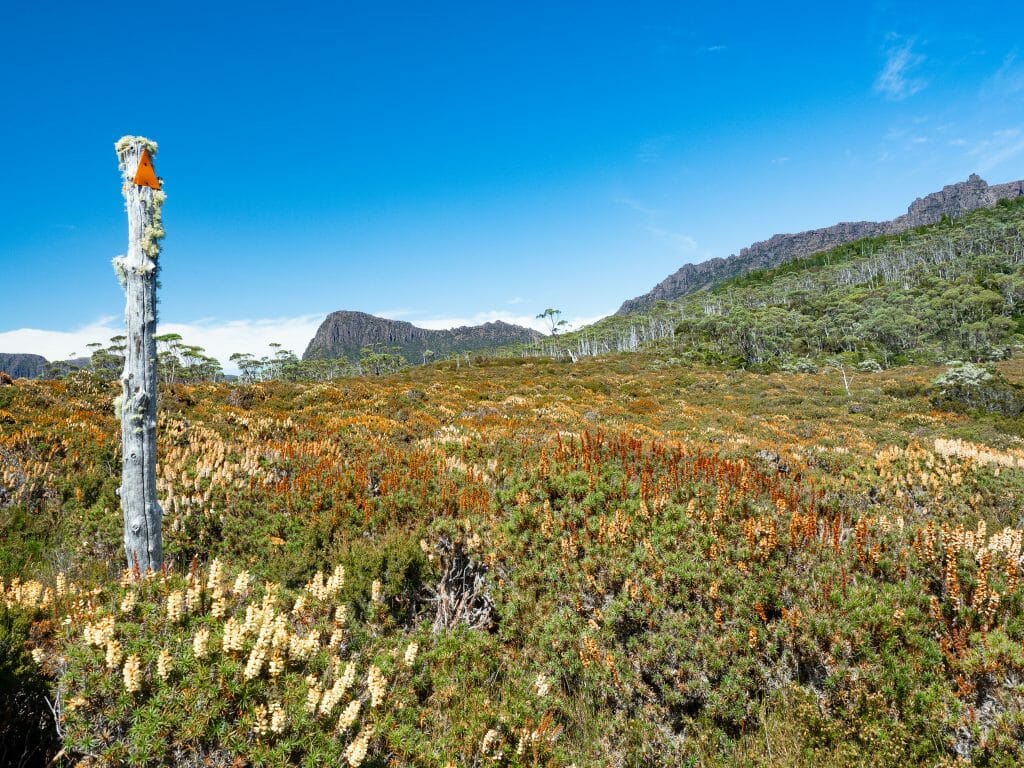
The track remains relatively exposed as it winds through a landscape dotted with tarns and small alpine lakes, including Lakes Holmes and Will. This section feels full of texture, with vibrant seasonal wildflowers adding colour to the thick Tasmanian brush.
There’s an optional side trip to Lake Will (around 1hr return), a peaceful alpine lake that makes an excellent lunch stop beneath the looming presence of Barn Bluff. Otherwise, continue along the main track as it gradually descends towards Windermere, where the hut is tucked just back from the lake in a sheltered patch of forest.
Day 3: Windermere to Pelion
- Distance: 16.8km
- Trail hours: 4.5hrs
- Campsite: Pelion Hut (36 people in hut, others on tent platforms or tent sites)
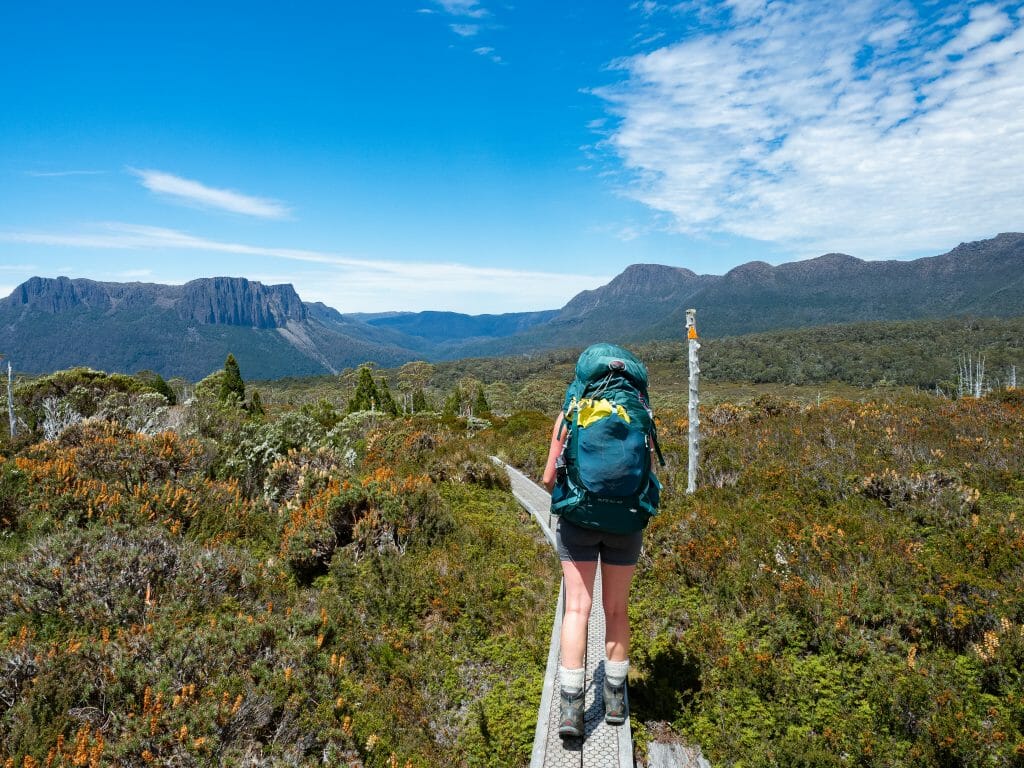
Day 3 is the longest day on the Overland Track in terms of distance, but also one of the most varied, transitioning through a constantly changing landscape that keeps things interesting from start to finish.
The first 4km of the morning are spent on a gradual ascent towards Forth Valley Lookout, rising gently above gums and distant peaks often eerily framed by low-lying cloud. Much of this section follows boardwalk, and even where it gives way to natural trail, the terrain remains smooth and easy underfoot, making for a relaxed start to the day.
Beyond the lookout, the track continues across open buttongrass moorlands before settling into a long, mostly flat stretch towards Pelion Creek. This is one of the most peaceful sections of the day, with minimal elevation change and a steady rhythm through quiet bushland. Just beyond a series of small tarns, Pelion Creek provides a lush, shaded spot that’s perfect for a break.
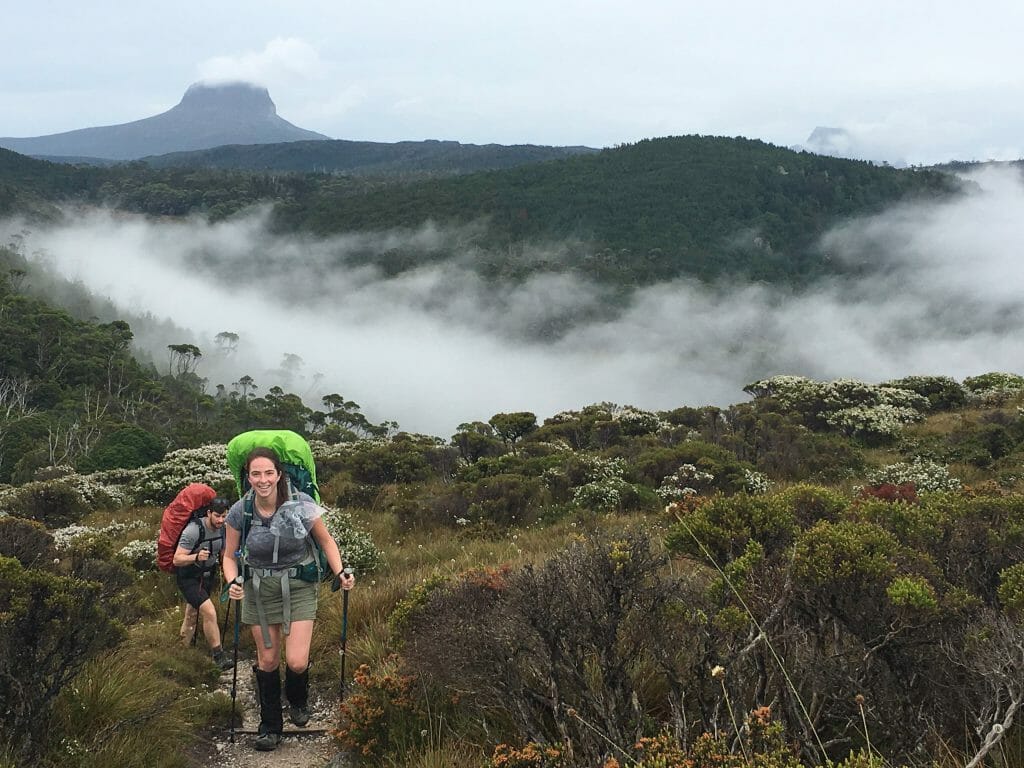
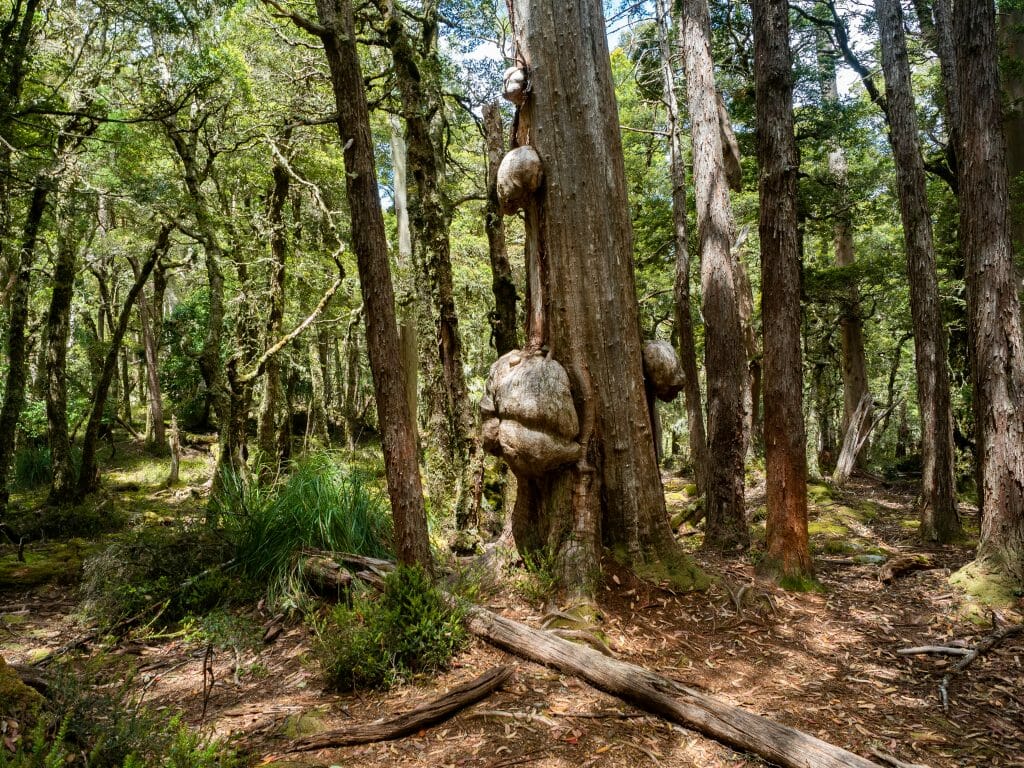
Eventually descend into the dense myrtle-beech rainforest of Frog Flats, the lowest point on the Overland Track. This area feels completely different to the alpine terrain of previous days, with thick greenery, damp ground, and a more enclosed, almost jungle-like atmosphere.
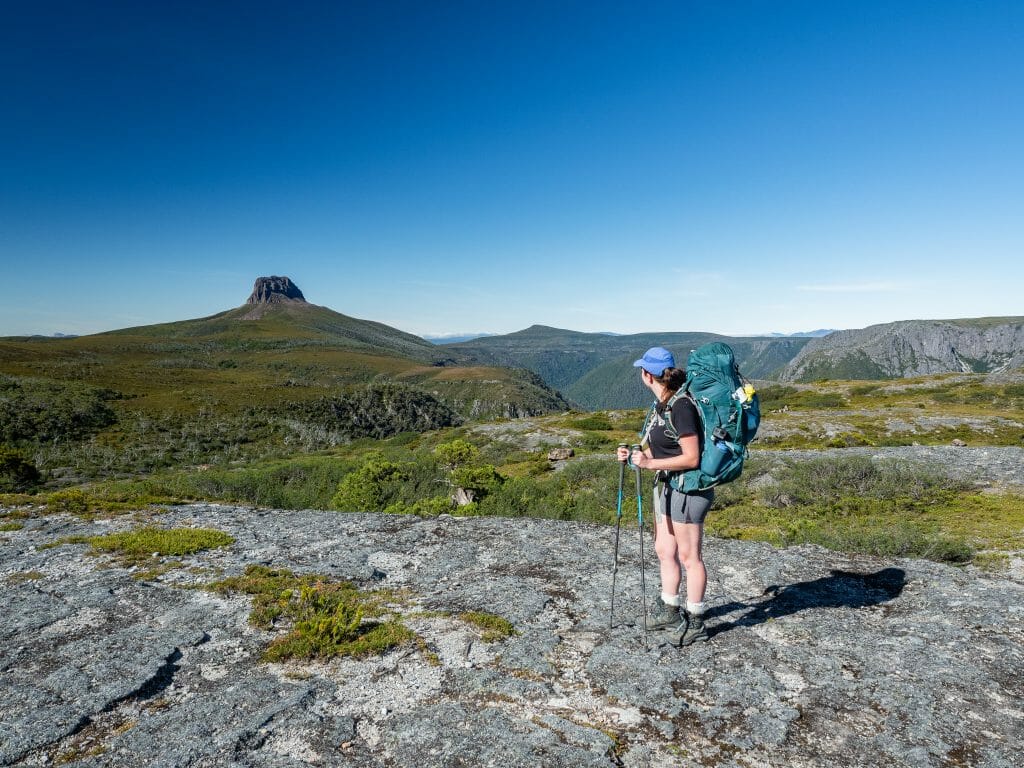
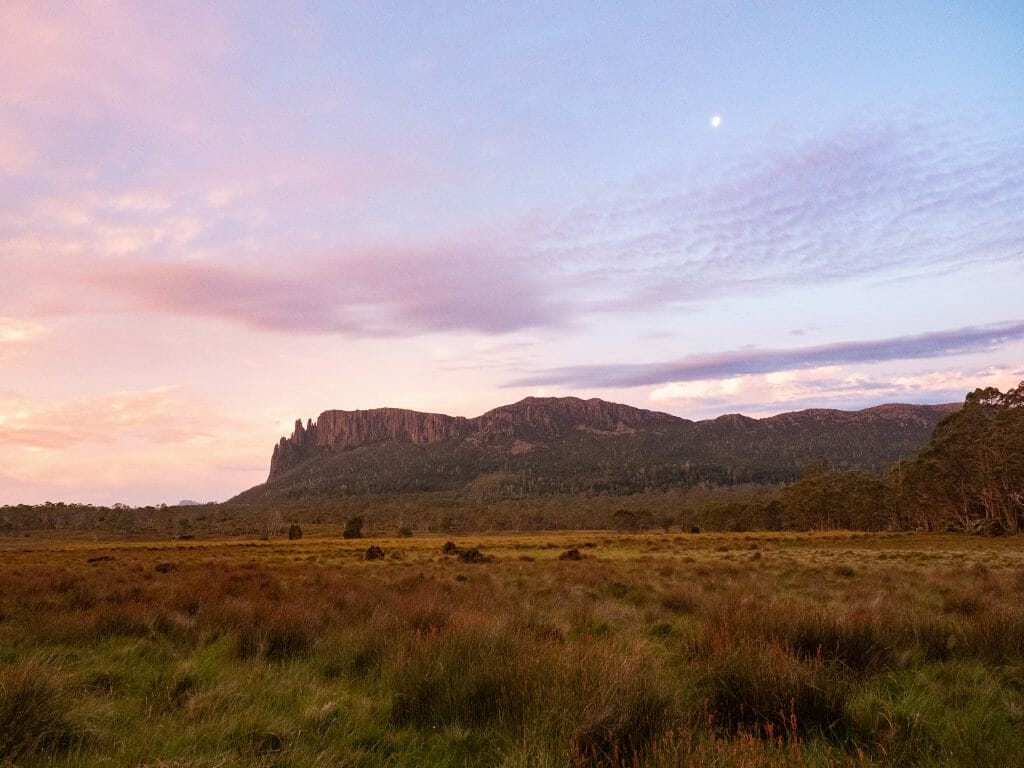
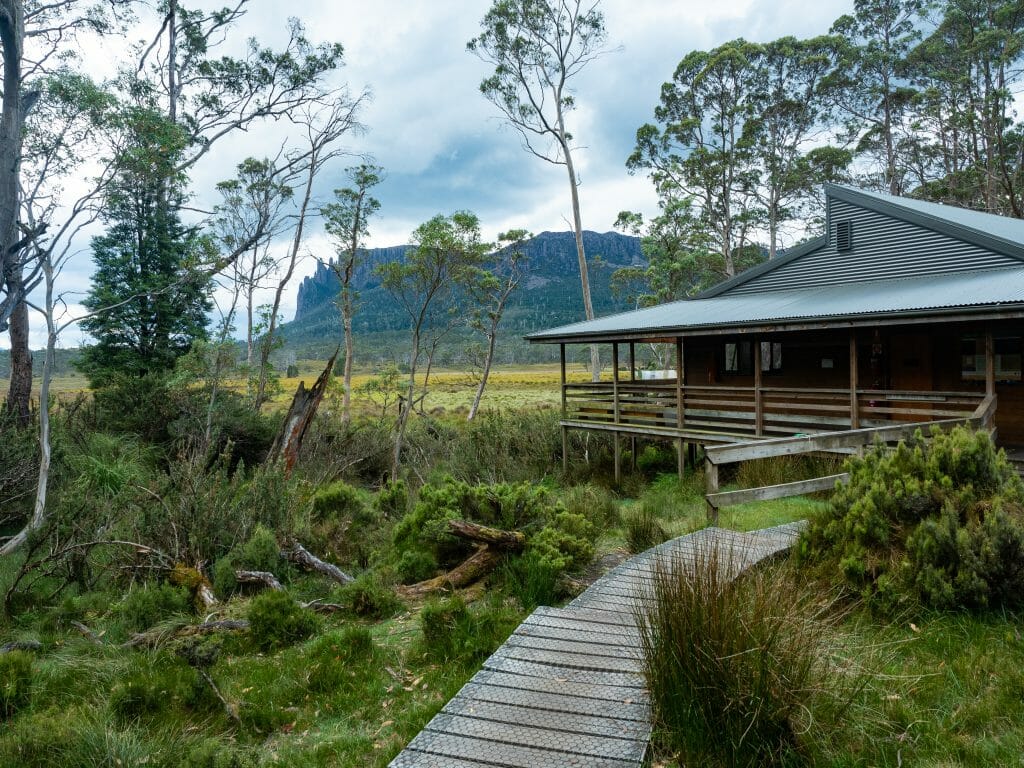
Crossing the Forth River, the final stretch climbs gradually out of the valley and returns to more open terrain, with the dolerite spires of Mt Oakleigh rising dramatically above Pelion Hut.
Day 4: Pelion to Kia Ora
- Distance: 8.6km + 5.2km return ascent of Mt Ossa
- Trail hours: 3hrs + 3.5hrs return ascent of Mt Ossa
- Campsite: Kia Ora Hut (20 people in hut, others on tent platforms)
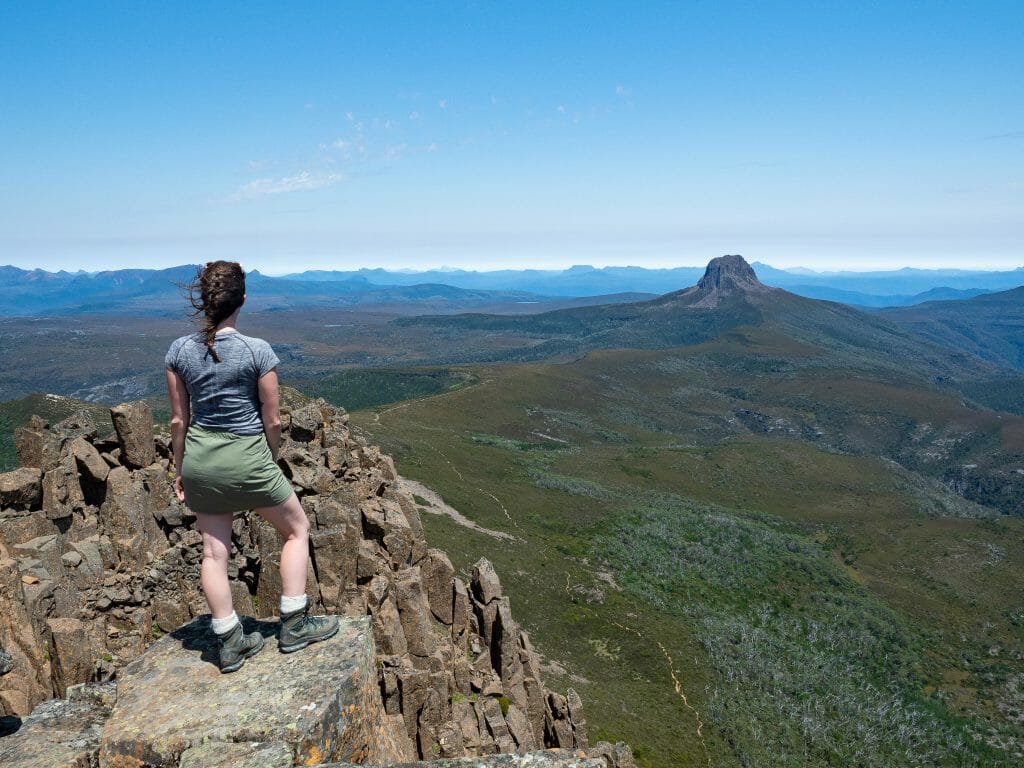
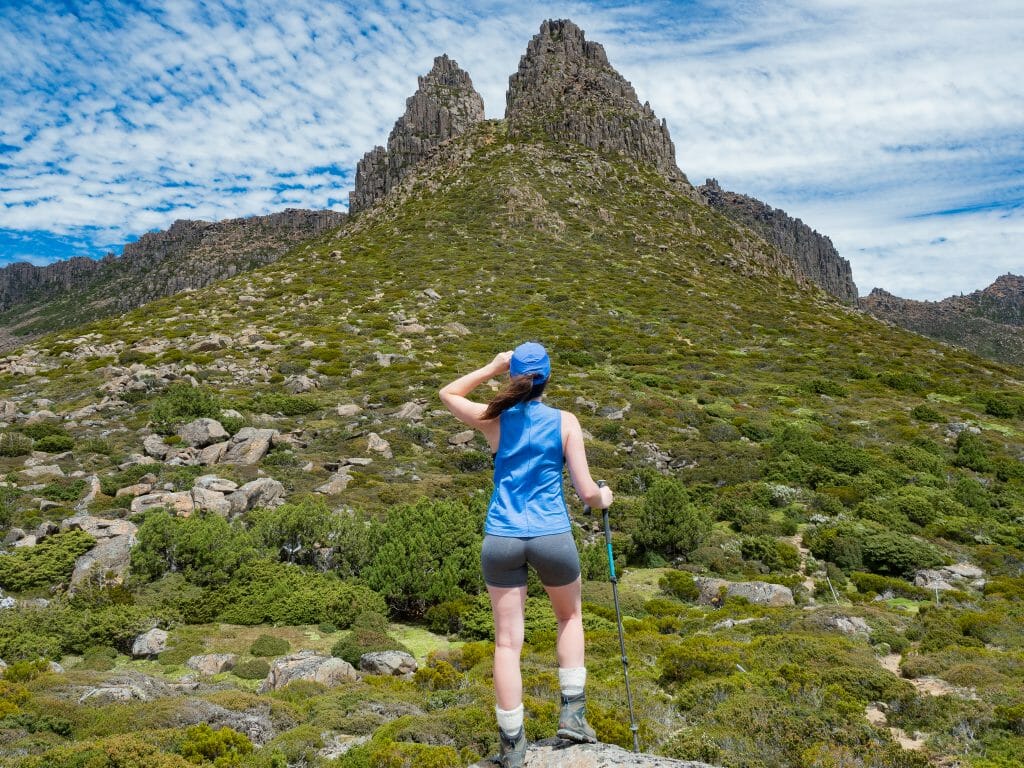
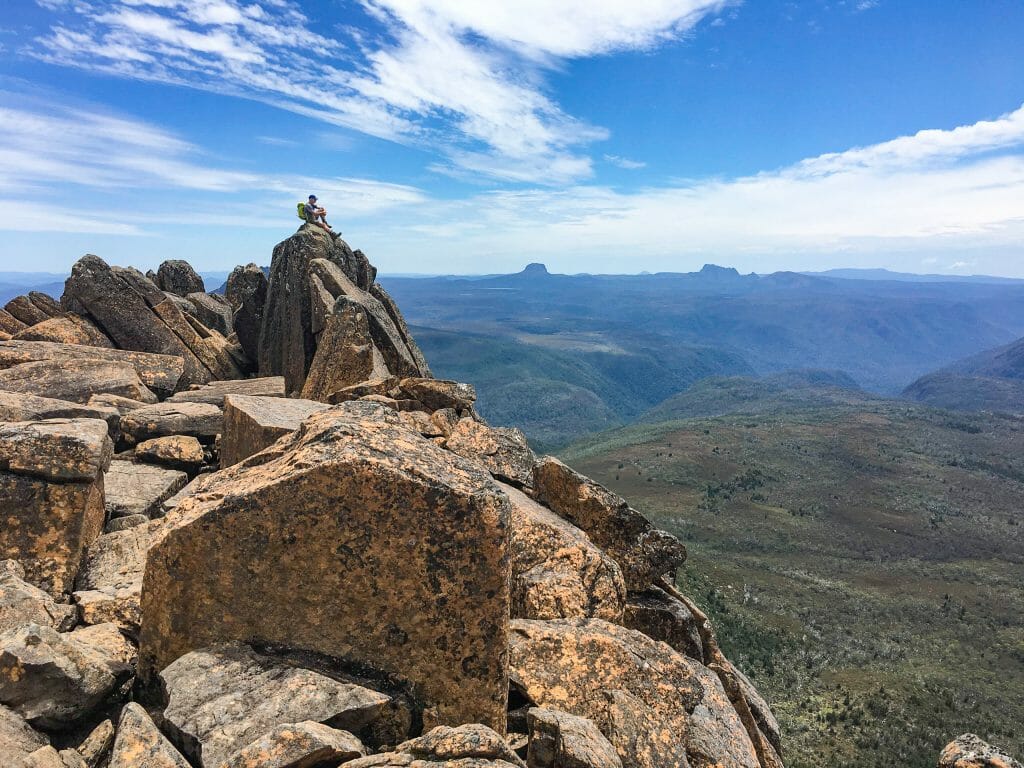
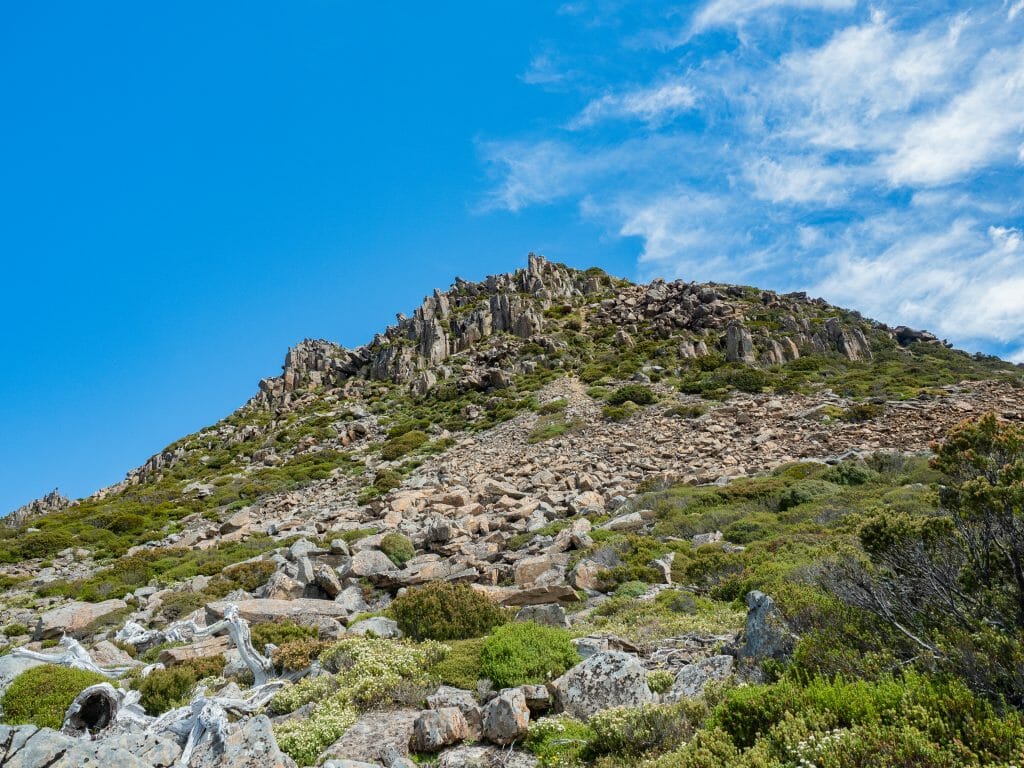
Now halfway along the Overland Track, Day 4 offers a shorter and more flexible stage, with the option to summit Mt Ossa, Tasmania’s highest peak at 1,617m!
The day begins with a gradual climb through forest alongside Douglas Creek, steadily gaining elevation towards Pelion Gap, the high point between Pelion Hut and Kia Ora. At Pelion Gap, hikers can choose between continuing along the main track or tackling one of the side trips, most notably Mt Ossa.
Even without summiting, a short climb towards the saddle between Mt Doris and Mt Ossa rewards you with expansive alpine views in every direction, making this a worthwhile detour for those not keen on the full ascent. For those continuing to the summit, expect a steep, rocky climb with light scrambling and a 3.5-4hr return time.
Back on the main track, the remainder of the day is relatively gentle, with a gradual descent through alpine terrain that transitions into forest as you approach Kia Ora. Head straight for the nearby creek to enjoy a refreshing (and very cold) swim— the perfect way to unwind after summiting Mt Ossa!
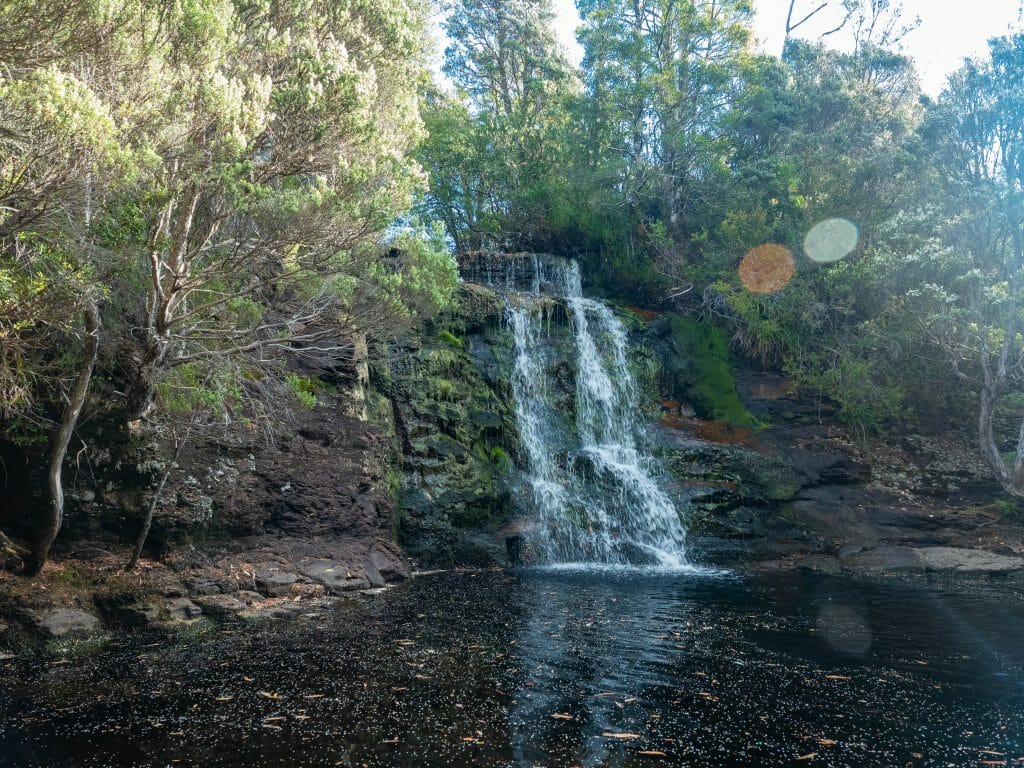
Day 5: Kia Ora to Windy Ridge
- Distance: 9.6km + 1.5km return to Hartnett Falls
- Trail hours: 3.5hrs + 1hr return to Hartnett Falls
- Campsite: Bert Nichols Hut (24 people in hut, others on tent platforms)
The penultimate day on the Overland Track is relatively gentle, continuing south through a mix of eucalypt forest and open sections beneath the rugged peaks of the Du Cane Range.
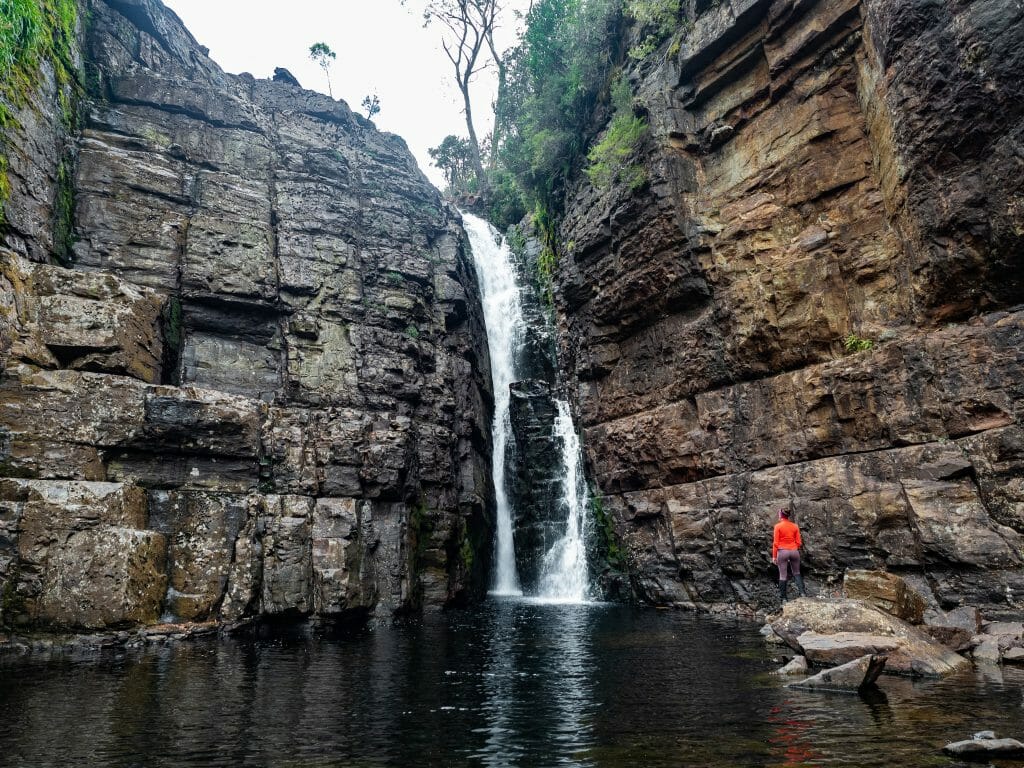
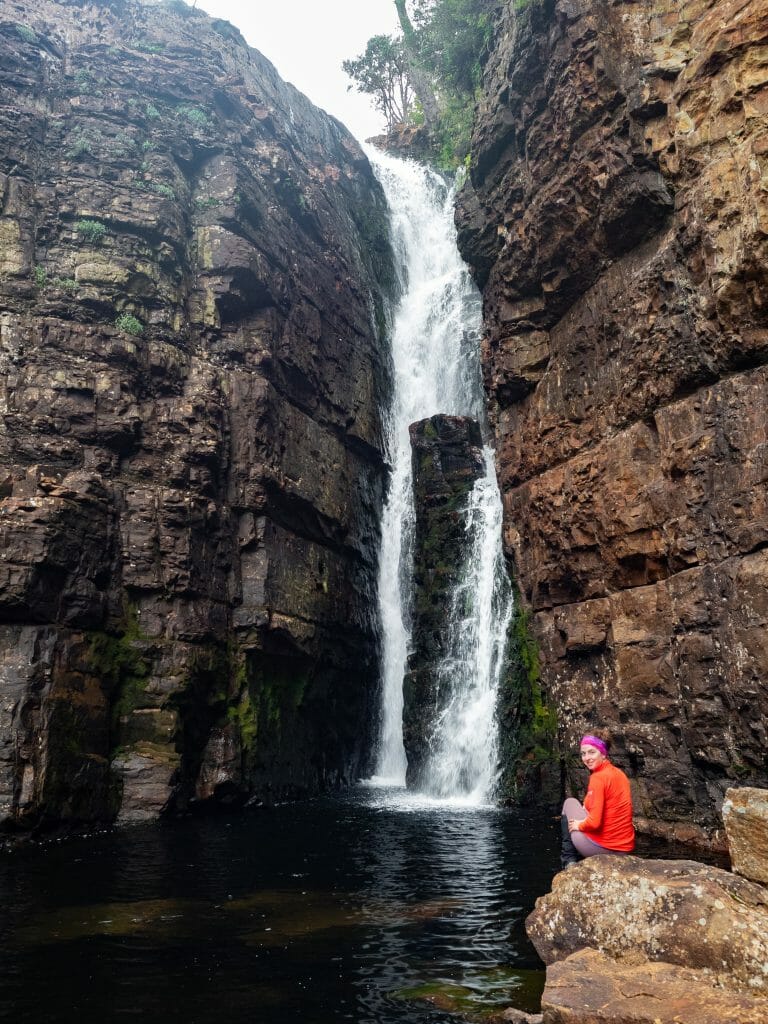
The track undulates gradually throughout the morning, passing through dense rainforest and quieter bushland, with a short and sweet detour to Hartnett Falls only a few minutes off the main trail. In warmer weather, the pool below makes for an incredible (and very refreshing) swim!

Back on the main route, continue through forest with occasional rocky and root-covered sections underfoot, before gradually opening up as you approach Bert Nichols Hut. Many hikers choose to stop here, but if you’re catching the morning ferry across Lake St Clair, we HIGHLY recommend pushing onwards to Narcissus (3hrs)!
Day 6: Windy Ridge to Narcissus
- Distance: 9km
- Trail hours: 3hrs + ferry crossing!
- Campsite (only if extending to 7 days): Narcissus Hut (18 people in hut, others on tent sites)
From Bert Nichols Hut, the final day of the Overland Track begins with an easy, undulating walk through dense forest, following the shoreline of Lake St Clair. After the bigger landscapes and dramatic peaks of earlier days, this section feels like an unhurried conclusion through shaded bushland.
The trail remains well-formed and relatively gentle throughout, making for a relaxed final morning on the track. Before long, you’ll arrive at Narcissus Hut and the ferry jetty, marking the official end of the Overland Track!
From here, board the ferry for a one-hour journey across Lake St Clair to Cynthia Bay. Upon arrival, you’ll find a visitor centre, café, and shuttle connections back to Cradle Mountain, completing your Overland Track adventure.

What to expect on the Overland Track
Terrain
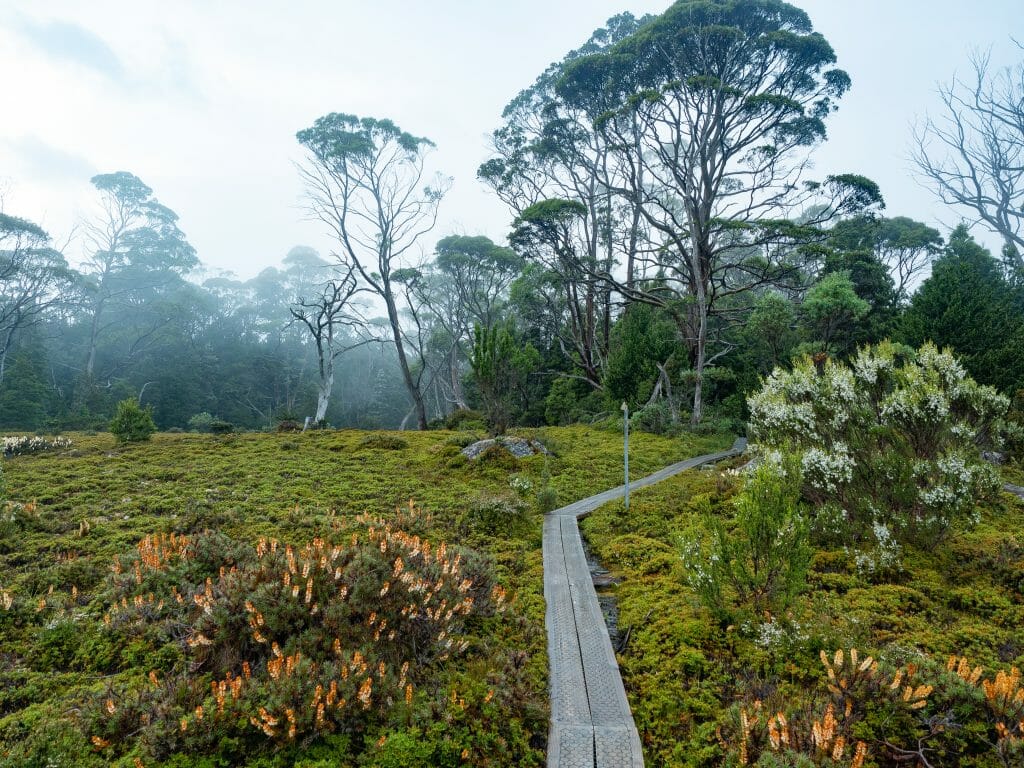
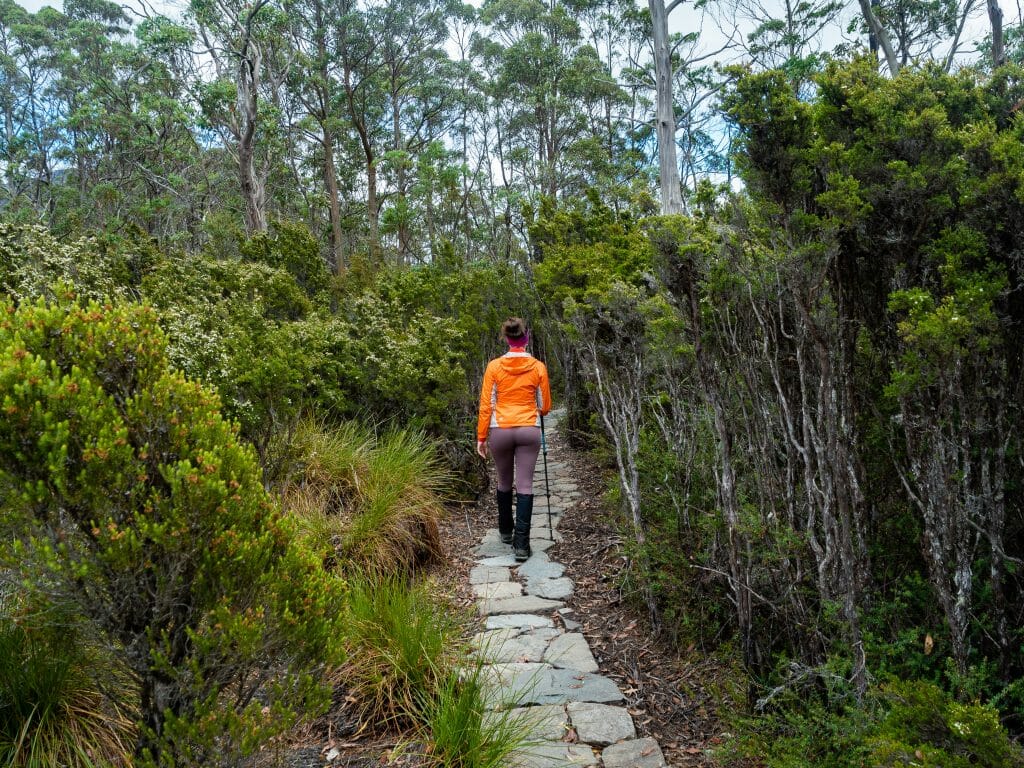
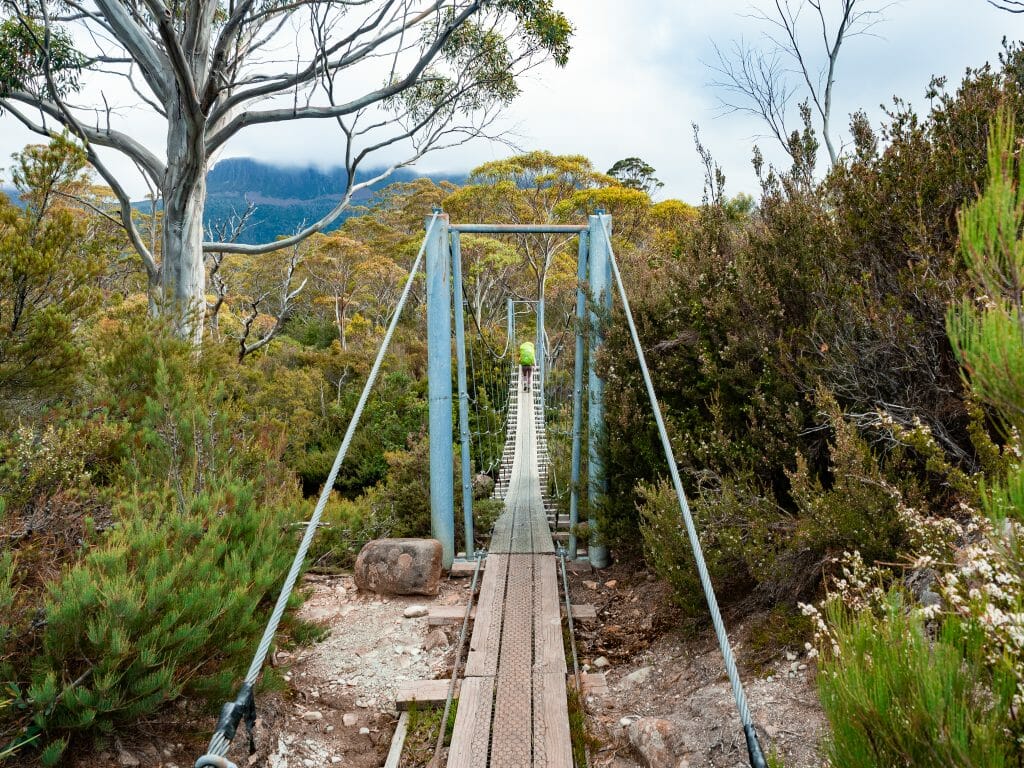
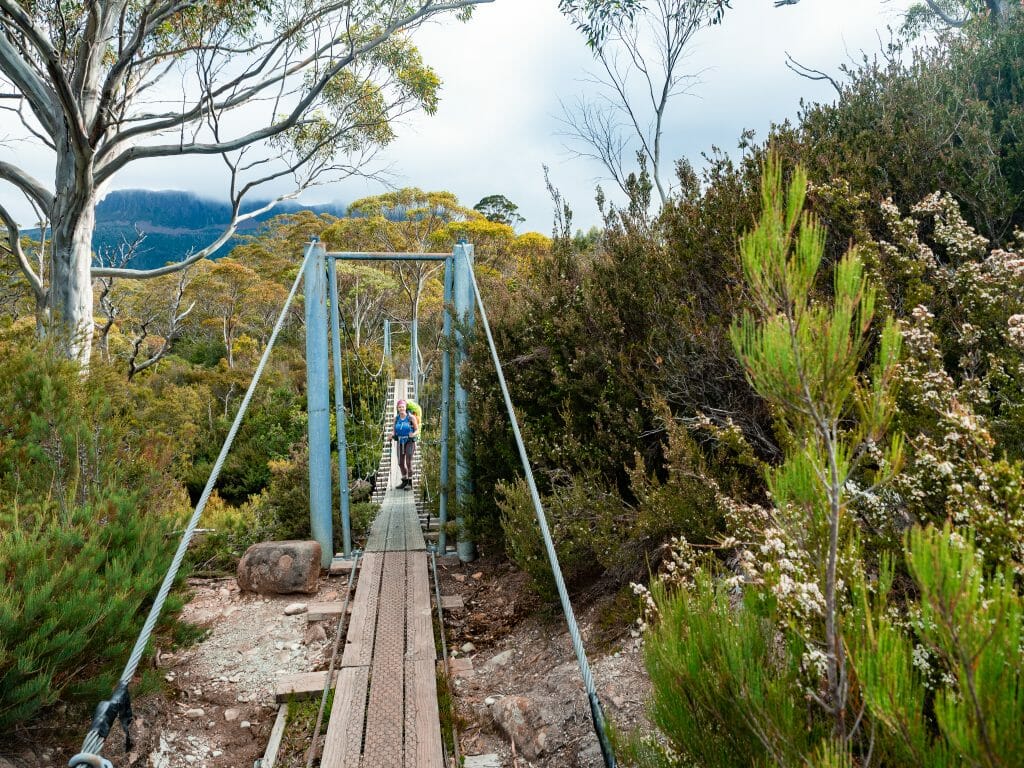
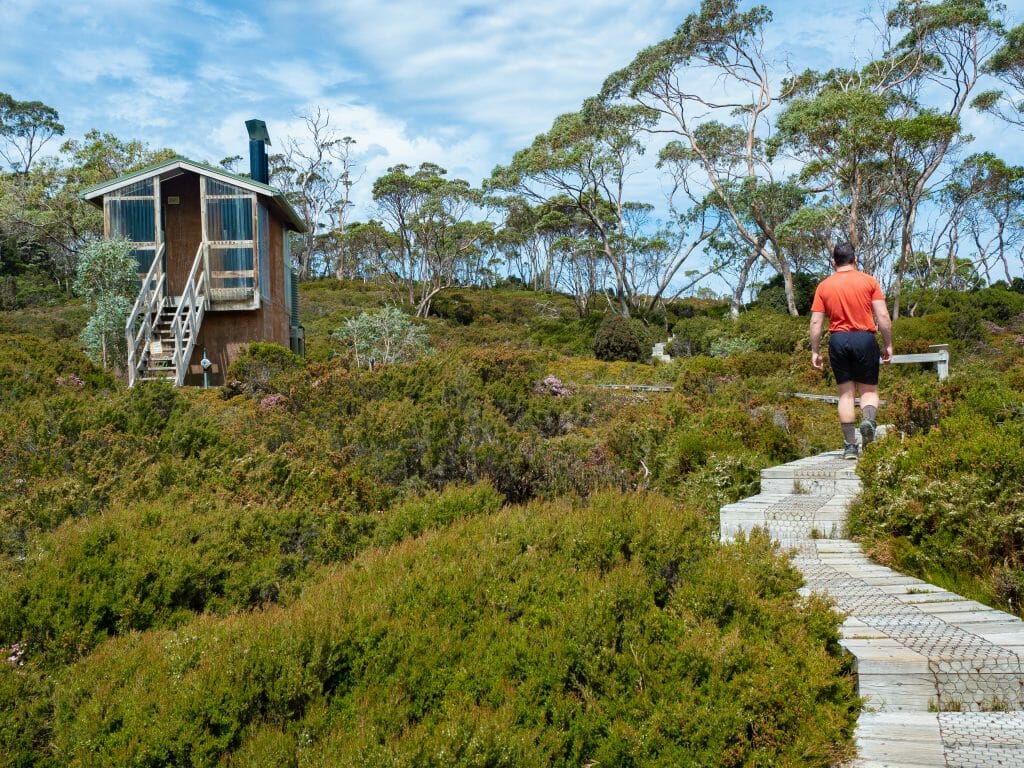
Although there are a few short but steep ascents along the Overland Track, the trail itself is reasonably well-graded. In fact, about 40% of the walk is on boardwalk (duck boards) or platforms lifted just above the bush. Some people dislike these man-made trails, but I personally enjoyed the opportunity to walk on a flat surface so I could enjoy the scenery rather than staring at the ground.
The final section of the Overland Track features very little boardwalk and is instead a hot mess of tree roots and rocks. Once you get off the main track, like for an ascent of Cradle Mountain or Mt Ossa or a side trip to one of the waterfalls, the trail can also be much more rugged and challenging. Trekking poles and robust hiking boots are essential!
>>> Check out all of my Overland Track gear recommendations in this detailed packing list!


Water access
All of the campsites have large rainwater tanks that you can use to fill up your drink bottles or to prepare your meals. Officially, TasParks recommends filtering this water, but we certainly didn’t, nor did most of the other people at camp, and no one seemed to have any issues.
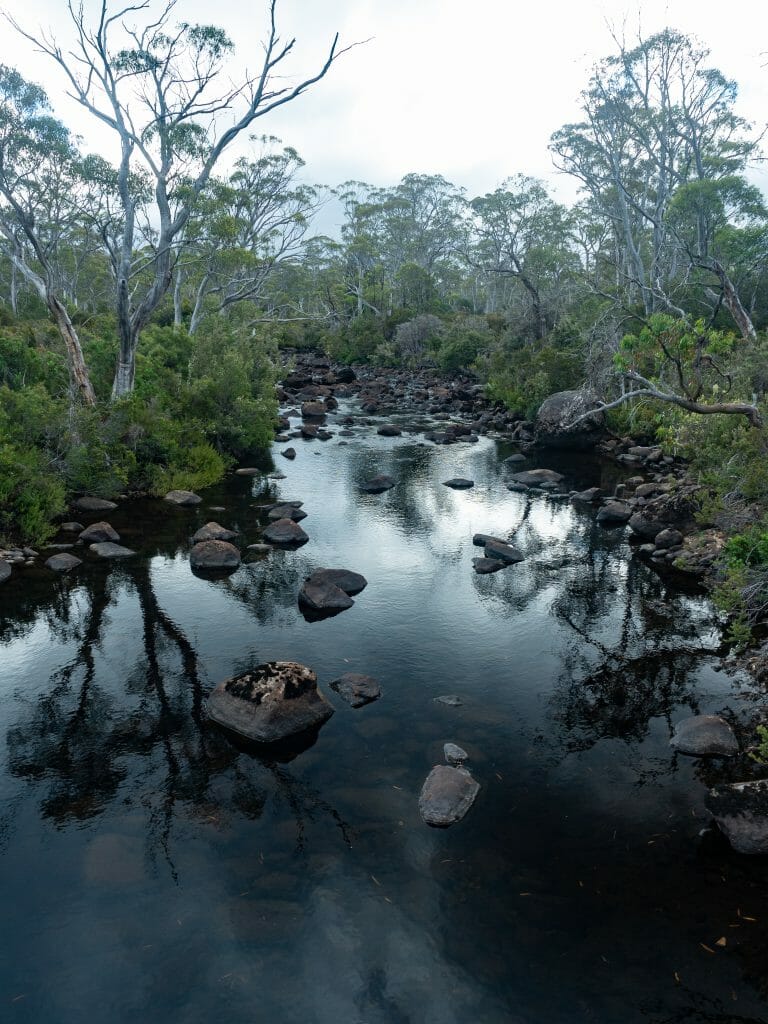
In addition to water at the campsites, there are also a few streams or waterholes along the way that can provide a good source of mid-hike water. You should always carry enough water so that you don’t have to rely on this in summer, as streams have been known to dry out completely during particularly rainless years. If you do get lucky (as we did), these water sources should be filtered, especially if they are stagnant.
Huts & camping
There are 6 huts along the Overland Track, and if you’re following the classic 6-day itinerary, you should stay at 5 huts total, skipping only the last or second-to-last hut. Huts very widely in size and design, but all offer similar ammenities, including:
- Rainwater for drinking, cooking, and washing your dishes
- Drop toilets, although note that there is no running water or toilet paper
- Indoor kitchen with benches for cooking
- Bunk beds with capacity for 16-36 people, depending on the hut
- Raised tent platforms and/or designated tent sites near the hut
We actually preferred sleeping in our own tents along the trail, but the huts are still an excellent way to mingle with other walkers in the evenings. Even if you’re staying in a tent, head into the hut to cook and chat with your fellow hikers— the social aspect of this track was our favourite part of the entire experience and something that makes the Overland very different from other hikes!


As I mentioned earlier, even if you are planning to stay exclusively in the huts on your hike, there is no way to reserve a space in advance so you MUST carry a tent. This is also important if adverse weather or another emergency forces you to set up camp before you reach a hut, which did actually happen to us on Night 1!
>>> Read my complete Overland Track packing list for more info
Swim spots
One of our fellow Overland Track walkers made the comment at Kia Ora Hut that there should have been a list of all the places to swim along the track so you knew where to stop— and here’s that list!
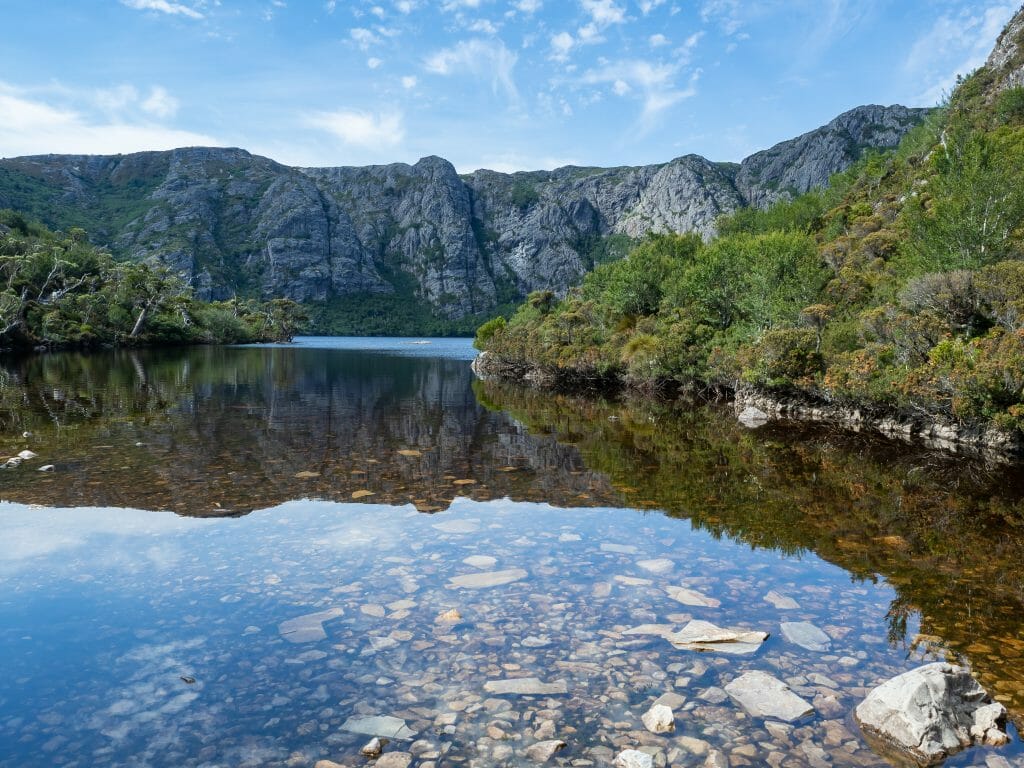
- Lake Will: This is a quick 25min detour from the Overland Track, about halfway through day 2 from Waterfall Valley to Lake Windermere. There’s a little sandy beach area right on the shore that makes for a perfect swim spot and a great lunch break.
- Old Pelion Hut: Less than 10min before you reach Pelion Hut on day 3, there is a turn-off for Old Pelion Hut. From there, follow a little path down to the right to reach a decent sized swimming hole.
- Kia Ora Hut: There are two little rock pools each within a 2min walk of Kia Ora Hut on day 4. To find the larger one, head past the hut, cross the bridge over the creek, and then look for a narrow path that veers off to the left. Follow the little path as it descends steeply into what appears to be a small canyon. You will want shoes to get down to the swimming hole, but it’s certainly not a far or difficult walk. This is a great spot to paddle around and enjoy a bit of a mountain shower after climbing Mt Ossa.
- Hartnett Falls: About a 20min descent from the main trail on day 5, this waterfall has the most perfect swimming hole of everything I saw on the track. It’s definitely worth a visit for the scenery alone.
- Narcissus River: If you arrive at the end of the track with some time to spare, you can enjoy a proper swim in the river right out front of Narcissus Hut. It’s freezing, but it feels amazing to numb all your aches and pains before you return to the real world.
Safety on the Overland Track
All the gear and safety equipment in the world is no substitute for common sense and basic wilderness experience, but it’s still an essential part of a safe and happy hike. In my opinion, these are the three most important safety considerations when walking the Overland Track:
- Be prepared for all weather
- Be ready to respond to a medical emergency
- Be able to call for help if the situation requires
Be prepared for all weather
The weather in Tasmania’s mountains is notoriously wild and unpredictable, and the Overland Track is absolutely no exception. That means bringing warm clothes and rain gear, a durable tent with a rain fly and guy lines (even if you are planning to stay in huts!), and a cold-weather sleeping bag (-10C or better). Read more about my recommended layers for the Overland Track in this packing list.
>>> I also put together a complete layering system guide with all my favourite gear picks for staying warm, dry & comfortable in every condition
When you’re on the trail, always carry enough water for the day plus an emergency stash, since there often isn’t potable water between the huts and it’s possible that bad weather might force you to set up camp in one of the emergency huts or to pitch your tent in a sheltered area.
Be ready to respond to a medical emergency
It’s also essential that you carry a well-stocked first aid kit in case of emergencies, probably the most concerning of which is a snake bite. We saw 12 snakes during our time on the trail, and even though no one has died of a snake bite in Tassie since the 60’s, all snakes in Tasmania are poisonous! People are bitten every year, so it is important to have the necessary items in your kit and to know how to use them.
Most first aid courses in Australia teach the Pressure Immobilisation Technique (also works for some spider bites), but you can get the idea just from watching a video on YouTube. You don’t need to buy a special snake kit (although we actually had one); a few elastic bandages from a supermarket or chemist will more than do the trick.
Make sure you also stock your kit with plenty of bandages, antiseptic, strapping tape (I sprained my ankle and this was invaluable), and assorted drugs (painkillers, anti-inflammatories, antidiarrhoeals, and antihistamines are a good place to start).
Be able to call for help if the situation requires
Lastly, you need to be able to call for help if someone is badly injured (even correctly using the PIT for a snake bite, you have to be urgently rushed to hospital for anti-venom) or if weather conditions get too far out of hand and you’re worried for your safety (e.g bushfire).
I HIGHLY recommend investing in a Garmin inReach Mini, a super-compact satellite communication device that will allow you to message any number or email in sub-emergency situations (letting family know you’ll be delayed) OR contact local rescue services in the event of a true emergency (broken leg).
Both of my parents, who are very experienced mountaineers, have been med-evac’d off summits in the last few years, and they also have a friend whose life was recently saved by a passing group of hikers that used their inReach to call for help.

Packing list for the Overland Track (summer)
Have a look at my core packing lists for heaps of up-to-date recommendations on my favourite hiking layers, backpacking packs, trail boots, camp cookware, and more.
>>> For specific recommendations, check out my Overland Track packing list!
Other things to do in Cradle Mountain National Park
Dove Lake day hike
In addition to the Overland Track, there are a number of shorter hikes that stretch across the National Park. We only had time to squeeze in a quick wander around Dove Lake before we departed on our trek, but the views of Cradle Mountain were incredible, so I strongly recommend making time for an afternoon excursion!
You can reach Dove Lake on the shuttle bus from the Cradle Mountain Visitor Centre (included in the price of your National Parks Pass) and then wander over to Glacier Rock (allow an hour total). It’s a short, easy walk, but it boasts some of the most spectacular views you’ll see in the entire park.
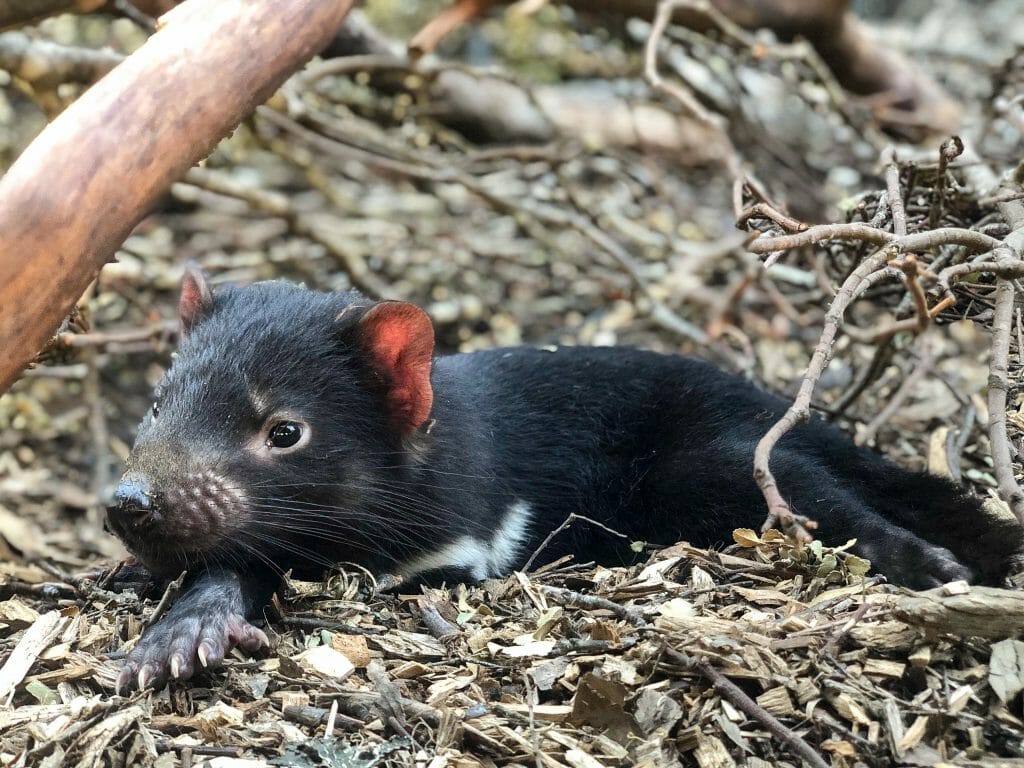
Devils @ Cradle
Less than 1km from the Visitor Centre, there’s an amazing Tasmanian Devil sanctuary that is definitely worth visiting. They are doing heaps of conservation work with the highly endangered Devils, which you can learn all about on a tour of the facility. You’ll also get the opportunity to see Devils and Quolls up close— and they are way cuter than you’d imagine!
We did the After Dark Feeding Tour (which wasn’t actually after dark, since it’s summer) and it was one of the highlights of our entire trip around Tasmania! I also met a veterinary student in the kitchen of our holiday park who was volunteering at the facility, and she strongly encouraged us to do the Joey Encounter tour. We didn’t have time, but apparently it is the absolute best thing to do at the sanctuary.
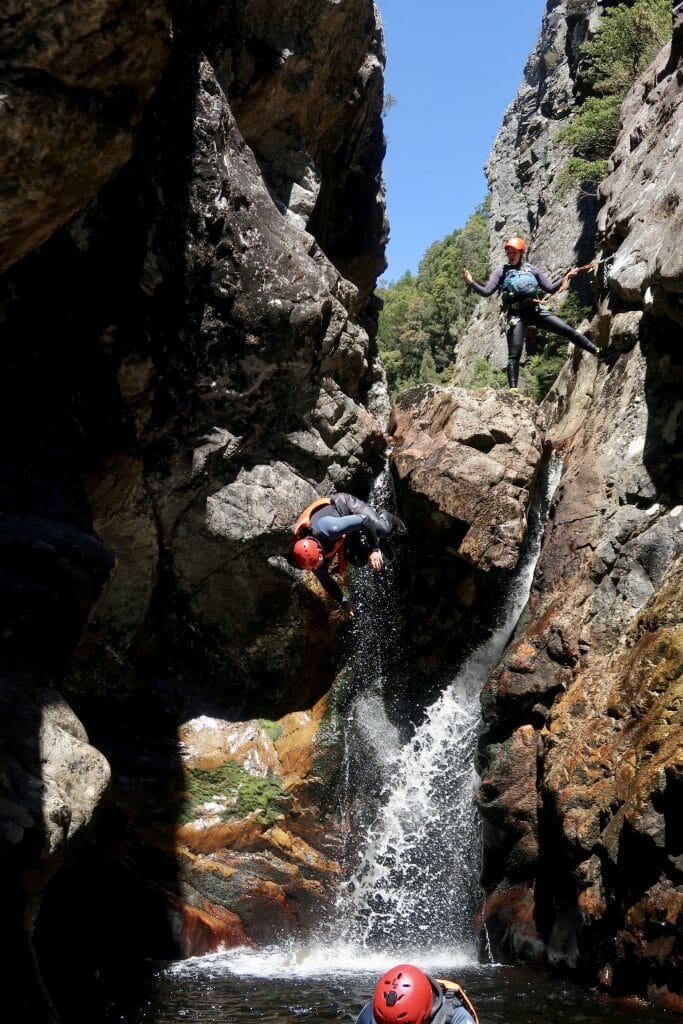
Dove Canyon Canyoning
If adrenaline is more your thing, Cradle Mountain Canyons offers a crazy canyoning tour of Dove Canyon that involves flipping off rocks, abseiling down cliffs, and sliding down natural waterslides.
We had a wild time on our full-day tour, which was pretty steep at $245AUD per person, but definitely worth it. The tour also leaves right from the Cradle Mountain Visitor Centre, which is convenient if you’re looking for something to do the day before your Overland Track walk.
Read more about our canyoning adventures: CRADLE MOUNTAIN CANYONING: JUMPING, SLIDING, & ABSEILING THROUGH DOVE CANYON
Read about more multi-day hikes in Australia
The Comments
Nick
Hi
Love this article and I’m thinking of doing the Overland myself but am wondering if a significant portion of it is on boards, or is that just what many photos seem to portray? I don’t think I’d fancy it so much if there are large portions of the path where boards are (understandably of course) in place.
Thanks in advance for your help.
Nick
brooke brisbine
NickHi Nick, so sorry for the delayed response!
About 1/3 of the Overland is on duckboard, which I know some people don’t like, but I’d encourage you to do the trek anyway! It’s absolutely stunning and suitably wild even with the intermittent boardwalks. And you’ll be thankful for them if you’re trekking in summer, as there are an INSANE number of snakes down there…
Happy trails!
-Brooke