The ultimate guide to solo hiking & camping the Tour du Mont Blanc
Last Updated on 23 April 2026
Crossing through France, Italy, and Switzerland to circle Western Europe’s highest peak, the 180km Tour du Mont Blanc trek is part epic alpine adventure, part authentic cultural experience, but entirely unforgettable. There are few routes in the Alps that rival the iconic TMB, and it’s a combination of the dramatic natural scenery and the charming mountain villages that have made this trek a fast favourite among mountain-lovers.
The Tour du Mont Blanc was my first-ever solo hike and I learned a LOT when I was out on the trail by myself for 8 days. In hopes of passing all that knowledge (and trail & error) onto the next hiker, I put together this complete guide to preparing for all aspects of a solo Tour du Mont Blanc hike, including getting to the trailhead, planning your itinerary, what to expect at the campsites, food/water on the trail, a detailed packing list, and more!
This post contains several affiliate links to products that I use and love. By clicking on these links, I might get a teeny tiny contribution towards my travel fund, at no extra cost to you!
About the Tour du Mont Blanc
Widely regarded as one of the best hikes in the entire world, the Tour du Mont Blanc is a moderately challenging 180km circuit that begins in Les Houches, France, a small town just outside the iconic mountain hub of Chamonix.
Over 8-12 days, the route circumnavigates beautiful Mont Blanc (4,810m), crossing 11 mountain passes and racking up nearly 10,000m in elevation gain through France, Italy, and Switzerland. There are countless variations to the route, but this guide outlines my recommended 8-day anticlockwise itinerary, combining shorter stages and incorporating some of the most scenic high-route alternatives!
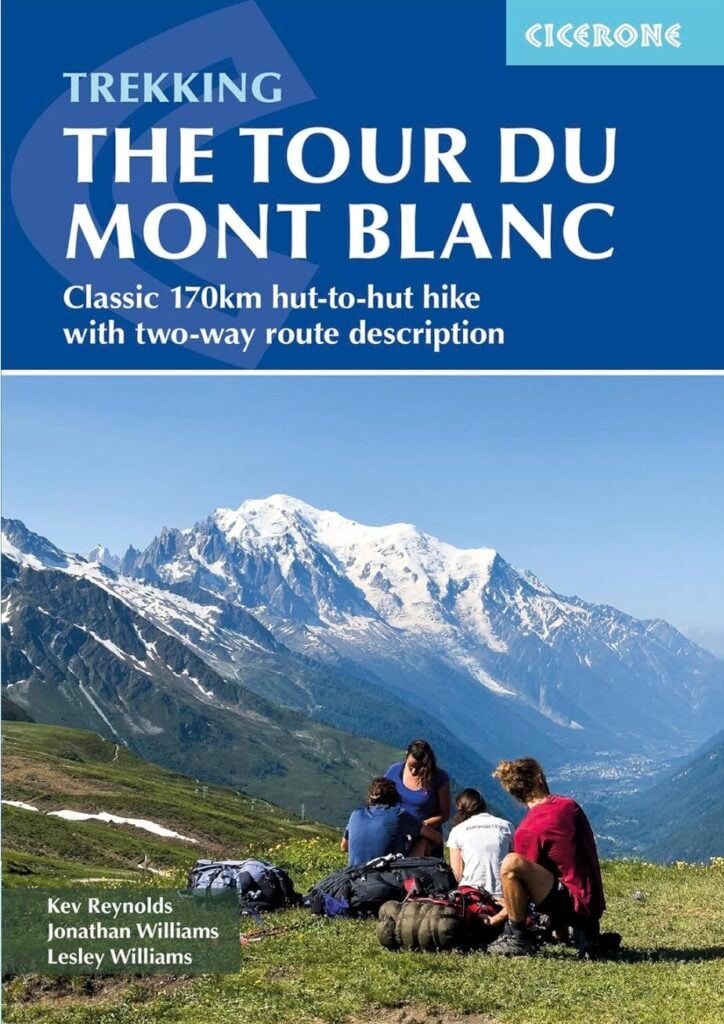
![Map of the Tour du Mont Blanc [from cicerone guidebook]](https://brookebeyond.com/wp-content/uploads/2017/07/trekking-the-tour-du-mont-blanc-location-map.jpg.webp)
How hard is the Tour du Mont Blanc?
The TMB is best described as moderately strenuous— physically demanding, but technically straightforward, with no climbing or scrambling skills necessary to complete the route. The true challenge lies in the cumulative effort of 8-12 days of sustained effort up and over high mountain passes.
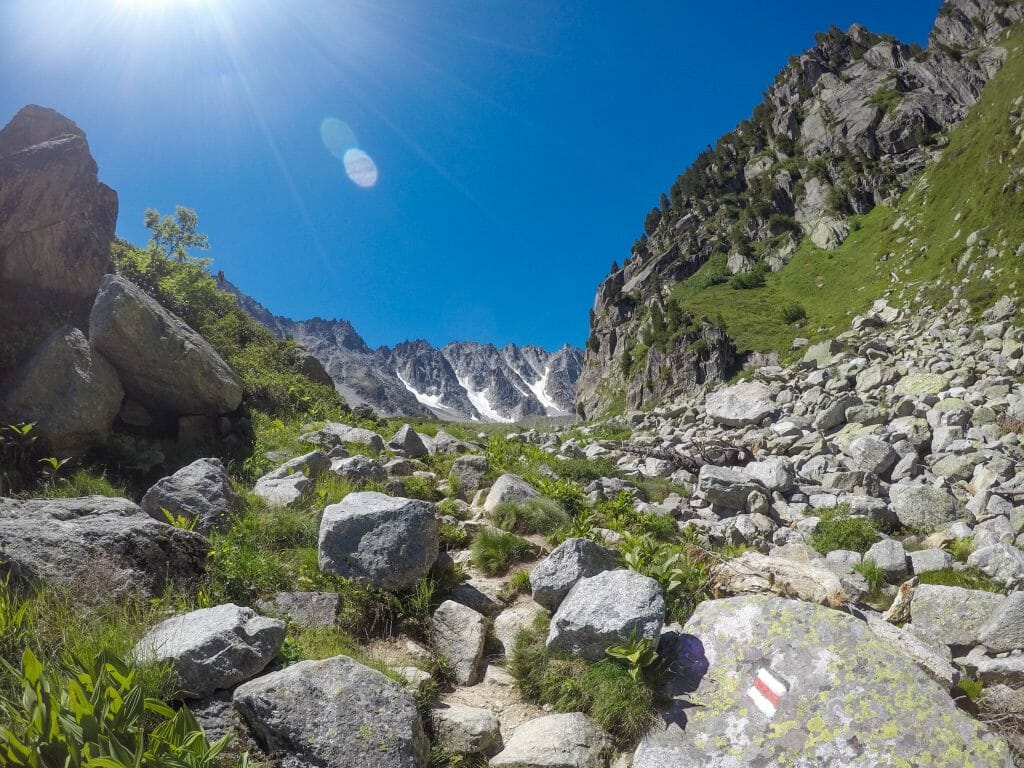
Most days involve 800–1,200m of ascent and descent on steep alpine trails, with 6–10hrs of hiking with a heavy pack (particularly if you’re camping). The terrain is varied but generally well-formed, including dirt paths, rocky sections, switchbacks, and rare ladders or cables (ex. the variant route to Lac Blanc), while the trail markings are frequent and incredibly clear.
All things considered, the TMB is actually achievable for most passionate hikers— the navigational demands are minimal, small villages with food and supplies are frequent, and there are plenty of ways to adjust difficulty by shortening or extending stages. With good fitness and a bit of determination, you’ll be celebrating in Chamonix in no time!
📈 TMB AT A GLANCE
* trail distance: ~180km (112mi)
* trail elevation gain/loss: ~10,000m (33,000ft)
* most-common direction: anticlockwise
* starting point: Les Houches, France (5km from Chamonix)


Hiking the Tour du Mont Blanc solo
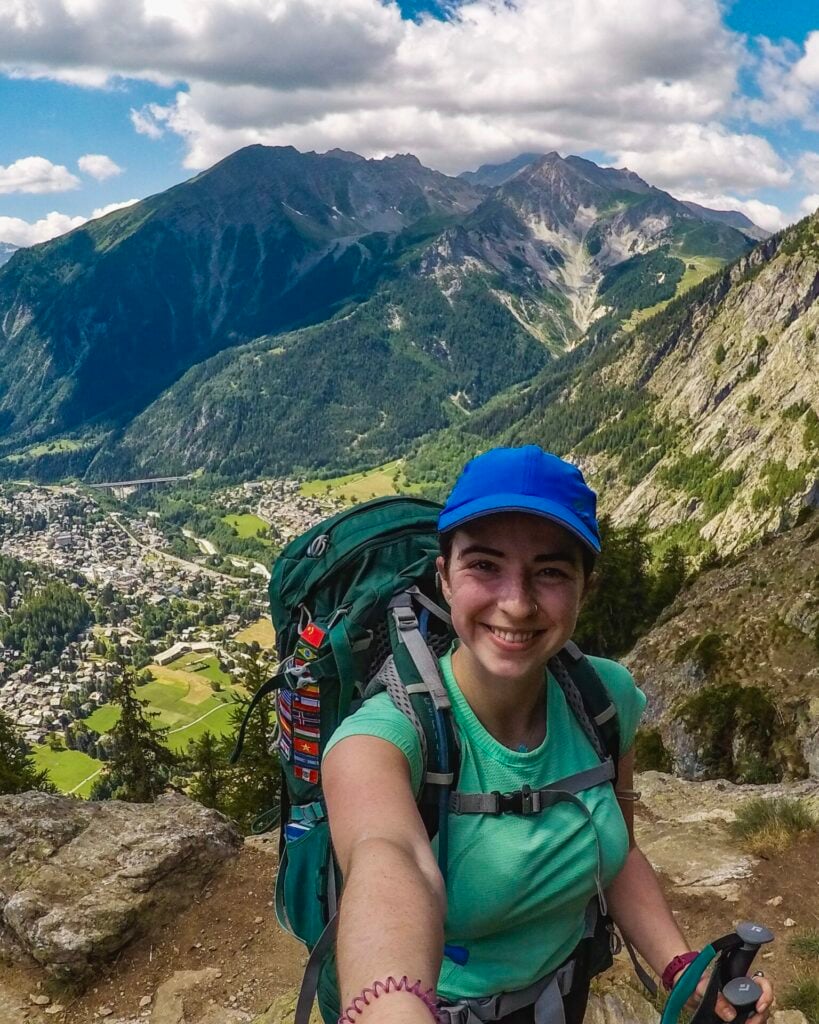
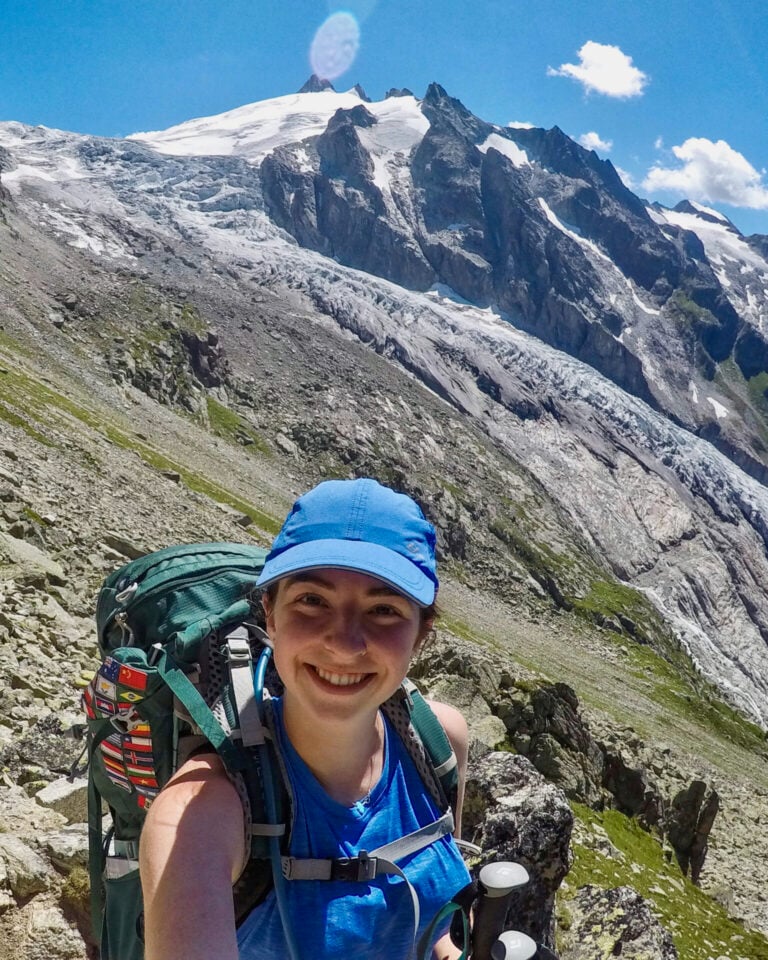
Although it’s possible to hike the TMB with a guided tour, it’s also an exceptionally safe and accessible route to complete independently! Not only was this the longest hike I’d ever done and the most weight I’d ever carried (with a full camping setup), but it was also my FIRST solo hike— and I totally fell in love with experiencing the mountains on my own terms.
>>> I went back 6 years later to summit Mont Blanc completely solo, read about that climb here!
In many ways, the TMB is the perfect introduction to solo hiking. You’re never truly alone on the trail, you’re rarely far from huts or villages with food and accommodation, and help is never more than a few hours away if something goes wrong.
So if you’re wondering whether it’s safe to hike the TMB by yourself, the answer is yes! With basic preparation and good judgement, this route offers the ideal balance of independence, safety, and adventure.
Planning the Tour du Mont Blanc
When to hike the TMB
The TMB is typically hikeable from late June to early September, when the high mountain passes are largely free of snow. Exact timing varies year to year— fresh snowfall is possible even in mid-summer, which is just part of hiking in the Alps.
Most mountain huts also operate within this window, so if you’re planning to stay in refuges, this will largely dictate your timing (but it’s less relevant if you’re camping). I personally hiked in mid-July, which is a less busy time than August when most of Europe is on holiday— there were plenty of fellow hikers on the trail to chat with, but it didn’t feel overly busy.
2026 UPDATE: The TMB has become significantly more popular in the years since I originally wrote this post, and the only reliable way to ensure a quiet(ish) experience is to push into the shoulder seasons in early June or late September.
You’ll need to be prepared to contend with snow on high passes and more dramatic weather overall (so backcountry experience is ESSENTIAL), but the valuable trade-off is avoiding the circus of hikers who descend on these trails in July and August.
Camping vs mountain huts
Choosing between camping OR staying in mountain huts is one of the most important decisions you’ll make when planning the TMB, as it fundamentally shapes your experience, budget, and daily flexibility.
CAMPING ON THE TMB
I decided to camp along the way, which meant that I carried a tent, a sleeping bag, sleeping mat, a camp stove, a pot and cutlery, and a bunch of freeze-dried dinners (I bought bread and cheese along the way to supplement my mountain food).
It was definitely a lot of extra weight, especially compared to the hikers carrying day packs (which occasionally filled me with envy), but overall I had a LOT more freedom and flexibility with my day-to-day itinerary and my hike cost a small fraction of a hut-style hike (a night in a mountain hut costs about 60€ including dinner and breakfast, while camping ranged from free to 14€ per night).
>>> Read my complete Tour du Mont packing list for all the camping gear I used on my trip!
MOUNTAIN HUTS ON THE TMB
Huts offer a very different experience along the TMB, allowing you to carry a much lighter pack, enjoy a hot meal each night, sleep in a proper bed, and skip the hassle of cooking and setting up camp after a long day.
However, if you’re staying in mountain huts along the Tour du Mont Blanc, it’s VERY important to make reservations in advance, particularly in peak season. This means you’ll be largely locked into a fixed itinerary with limited flexibility to adjust your days (and my plans changed about 20 times a day on the trail).
While I can absolutely see the appeal of huts, I personally preferred camping for the added flexibility, lower cost, and maximum sense of adventure! I’ve summarised all of my campsites below, and definitely check out my TMB packing list for an idea of what gear you’ll need to bring.
>>> Read my post about mountain huts in the Dolomites— almost all of this information applies to the huts along the TMB, as well!

Essential resources for the TMB
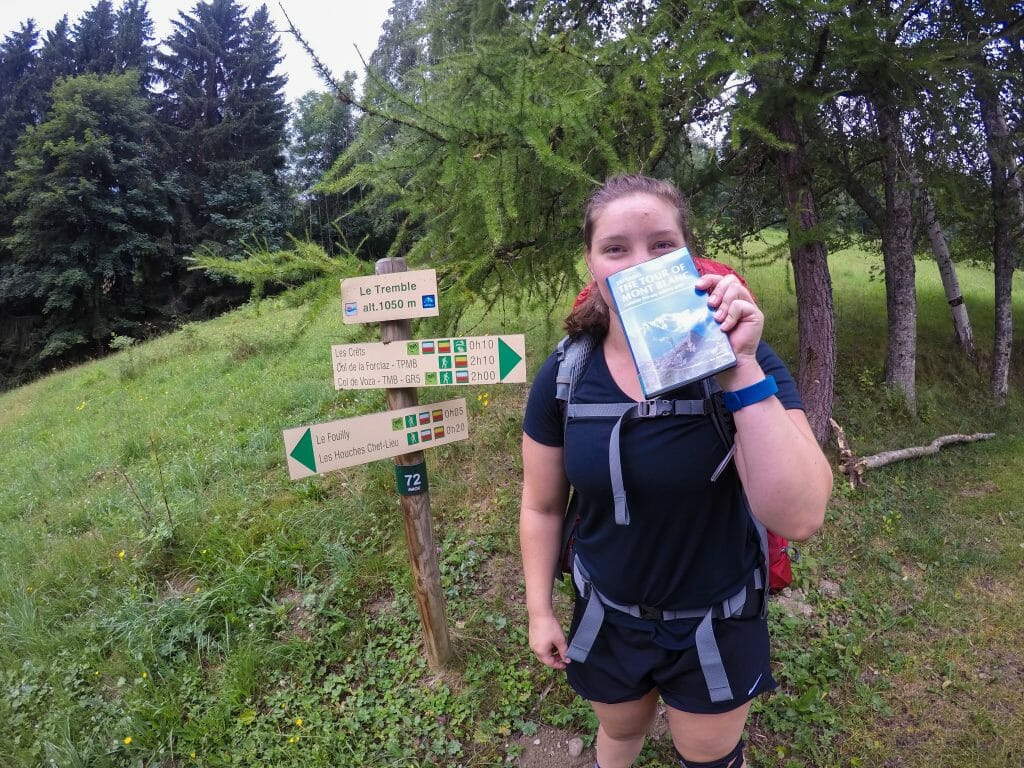
If you’re seriously considering the TMB, I’d highly recommend purchasing Trekking The Tour of Mont Blanc by Kev Reynolds. This guidebook was absolutely invaluable in planning (and re-planning each morning) every single stage of my hike, as well as navigating along the trail, choosing campsites, and finding food in nearby towns.
Updated every few years (most recently in 2024), this has truly become the TMB Bible and you’ll probably see 90% of hikers whip out their copy at the top of every Col and fork in the trail. I highly recommend ordering this book now to aid in the planning process!
Getting to the Tour du Mont Blanc
Getting to Chamonix
Although there’s no airport directly in Chamonix, France, there are a number of reasonable access points from surrounding airports. I’ve spent several summers here since hiking the TMB (climbing Mont Blanc and several other nearby peaks, hiking Haute Route, etc), and my preferred arrival method is flying into the Geneva airport and then catching a shuttle/bus onwards to Chamonix.
The companies operating this route and their specific timetables are always changing, so the best way to reserve bus tickets to Chamonix is through Omio, a site that compares prices and departures across a handful of local transport options.
I’d highly recommend staying in a hotel/hostel in Chamonix or Les Houches the night before your hike rather than a campsite (although there is a nice one in Chamonix). This will allow you to store anything you don’t actually need on the trail, like plane clothes or a laptop, in a secure and free location!
Getting to the trailhead in Les Houches
Although it’s technically possible to begin the TMB in Chamonix, the official trailhead is in Les Houches, about 6km from Chamonix. I stayed in a hotel between Chamonix and Les Houches on the night before my hike, so I just walked 2km to the trailhead on the morning of Day 1.
From the Tourist Information Centre in Les Houches, there’s an arrow directing you to the start of the trek and it’s not a difficult walk. If you’re staying actually in Chamonix (or if you want to save your energy for the trail), there’s also a bus that runs around Chamonix and Les Houches. It’s 3€ for a ticket that works all day on the bus, so you can also use your ticket to do any last-minute gear or snack shopping prior to hitting the trail.
*Tour du Mont Blanc itinerary
The TMB is traditionally divided into 11 stages, with most hikers completing one stage per day as they travel anticlockwise back to Chamonix.
For this itinerary, I’ve combined several stages into a more efficient 8-day route, also adding some of the best high variants and a scenic rest day in Courmayeur. Although I was still an inexperienced hiker at the time, I found this pace very manageable— and this is the exact itinerary I’ll outline below, designed to give you a clear sense of what to expect and what to look forward to!
- Day 1: Les Houches to Les Contamines (20km, 6.5hrs)
- Day 2: Les Contamines to Les Mottets (via Col des Fours) (23km, 7.5hrs)
- Day 3: Les Mottets to Rifugio Elisabetta to Courmayeur (30km, 8.5hrs)
- recommended rest day in Courmayeur, visit Aiguille du Midi
- Day 4: Courmayeur to Rifugio Bonatti to La Peule (28km, 9.5hrs)
- Day 5: La Peule to Champex (24km, 5.5hrs)
- Day 6: Champex to Le Peuty (via Fenêtre d’Arpette) (15km, 6.5hrs)
- Day 7: Le Peuty to Tré-Le-Champ (16km, 4.5hrs)
- Day 8: Tré-Le-Champ to La Flegere (via Lac Blanc) to Chamonix (17km, 5.5hrs)
**All campsite prices quoted below are from the 2017 season; use as a reference, but please understand I do not have the capacity to contact all campsites annually for accurate pricing 🙂

Day 1: Les Houches to Les Contamines
- Distance: 20km
- Elevation gain & loss: 646m & 643m
- Trail time: 6.5hrs
- Official stage: 1
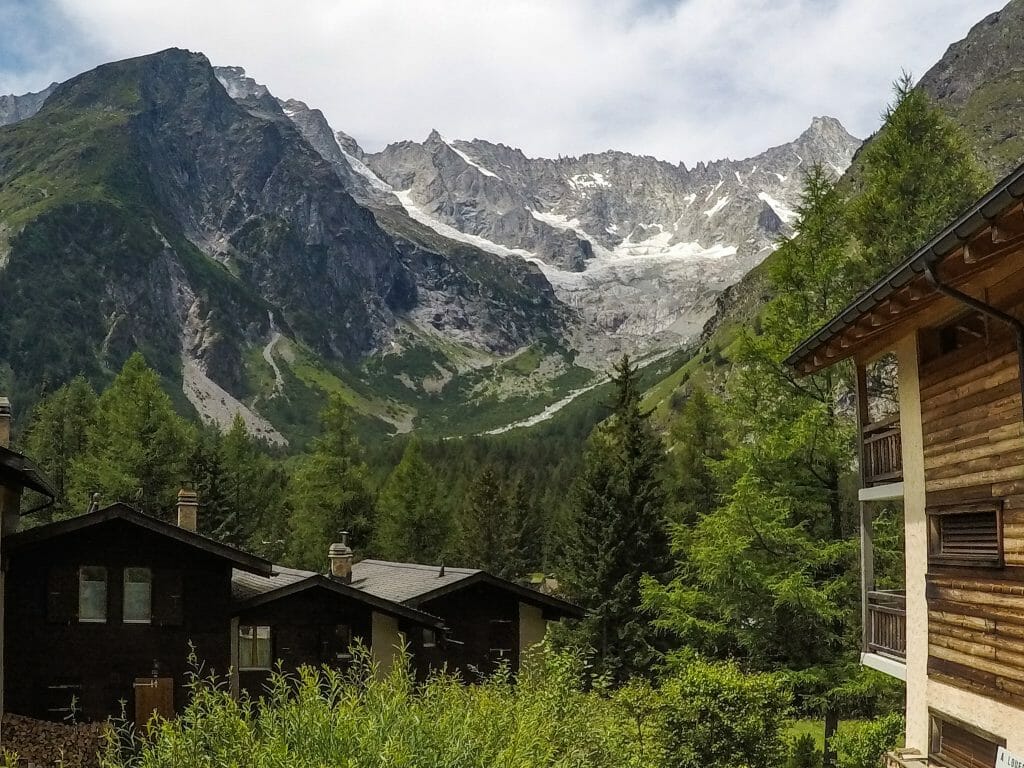
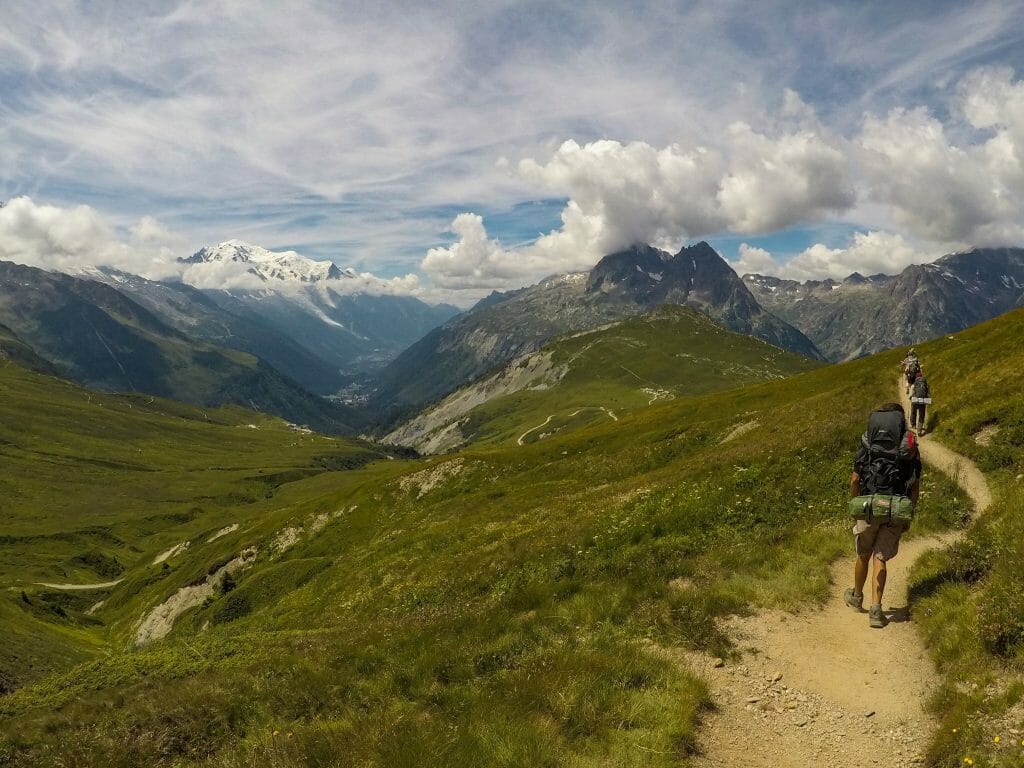
The Tour du Mont Blanc officially begins in the charming village of Les Houches (1,007m) with a steady climb through forest to Col de Voza at 1,653m. Views from today’s high point, along with your first glimpses of Mont Blanc herself, offer a small but exciting taste of what’s to come!
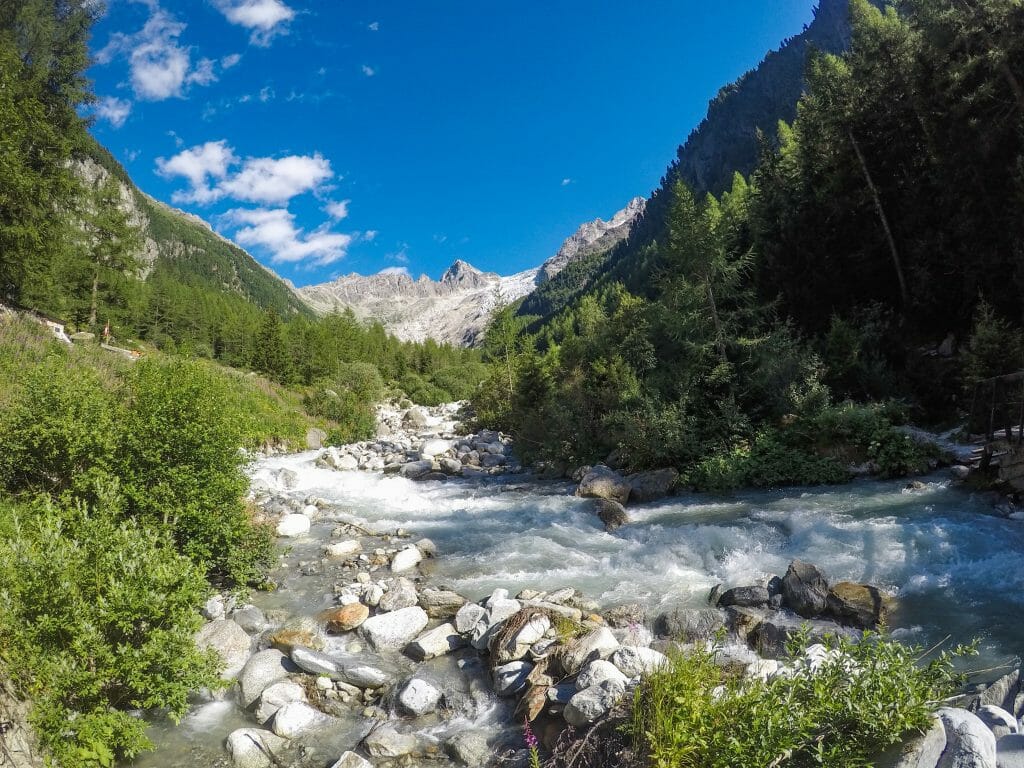
From the col, the route crosses tram tracks and begins a gentle descent towards Bionnassay, a picturesque alpine village that feels quintessentially French, with immaculate gardens and postcard-perfect cottages. The trail continues through a series of equally charming hamlets, finally arriving at La Gruvaz.


After crossing the river at La Gruvaz, the scenery shifts into a lush, forested valley as the trail winds steadily towards Les Contamines (1,167m). Arriving in town marks the end of your first day on the TMB, but Camping Le Pontet is located about an hour further on foot from the centre.
Night 1: Camping Le Pontet
- Price of camping: ~8€
- Price of bed in gîte: 14€
- Facilities: toilets, hot showers, wifi
- Food: a small shack at the campsite sells snacks and drinks
Located about 2km past Les Contamines, this is a lovely campsite and gîte with clean facilities and reasonable prices. Due to torrential rain, I paid a bit extra for a bed in the mountain hut-style dorm and was very happy to be out of the wet and cold, so it’s nice to have that option if the weather turns!
Day 2: Les Contamines to Les Mottets (via Col des Fours)
- Distance: 23km
- Elevation gain & loss: 1579m & 876m
- Trail time: 7.5hrs
- Official stage: 2, including the Col des Fours variant
Particularly with the worthwhile variation over Col des Fours, Day 2 is a significant step up in difficulty from Day 1, crossing three high mountain passes and reaching the highest point on the TMB as you trek towards Les Mottets.


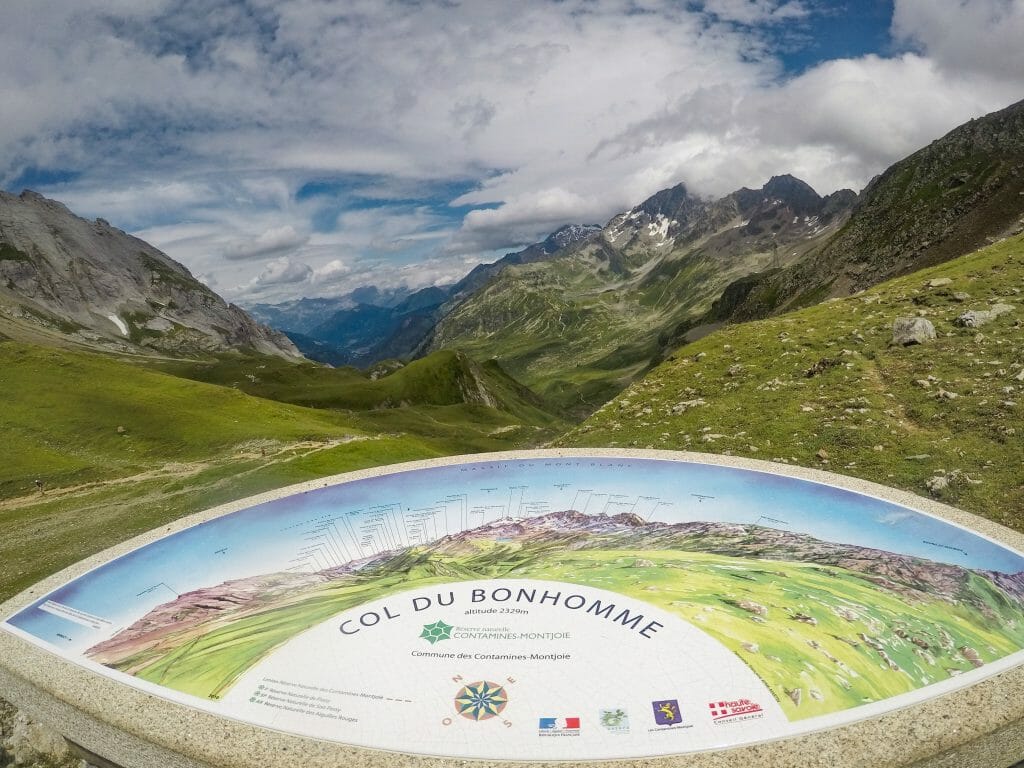
The route begins with a steady climb from Les Contamines (1,167m) through forest to Refuge de la Balme (1,706m). From here, transition into steeper alpine terrain on the ascent to Col du Bonhomme (2,329m), where views open over a rugged landscape of rolling peaks and rocky slopes.
The climb continues across loose, scree-covered terrain to Col de la Croix du Bonhomme (2,483m), and at this point the standard route descends to Les Chapieux while the (highly recommended) variant continues upwards.


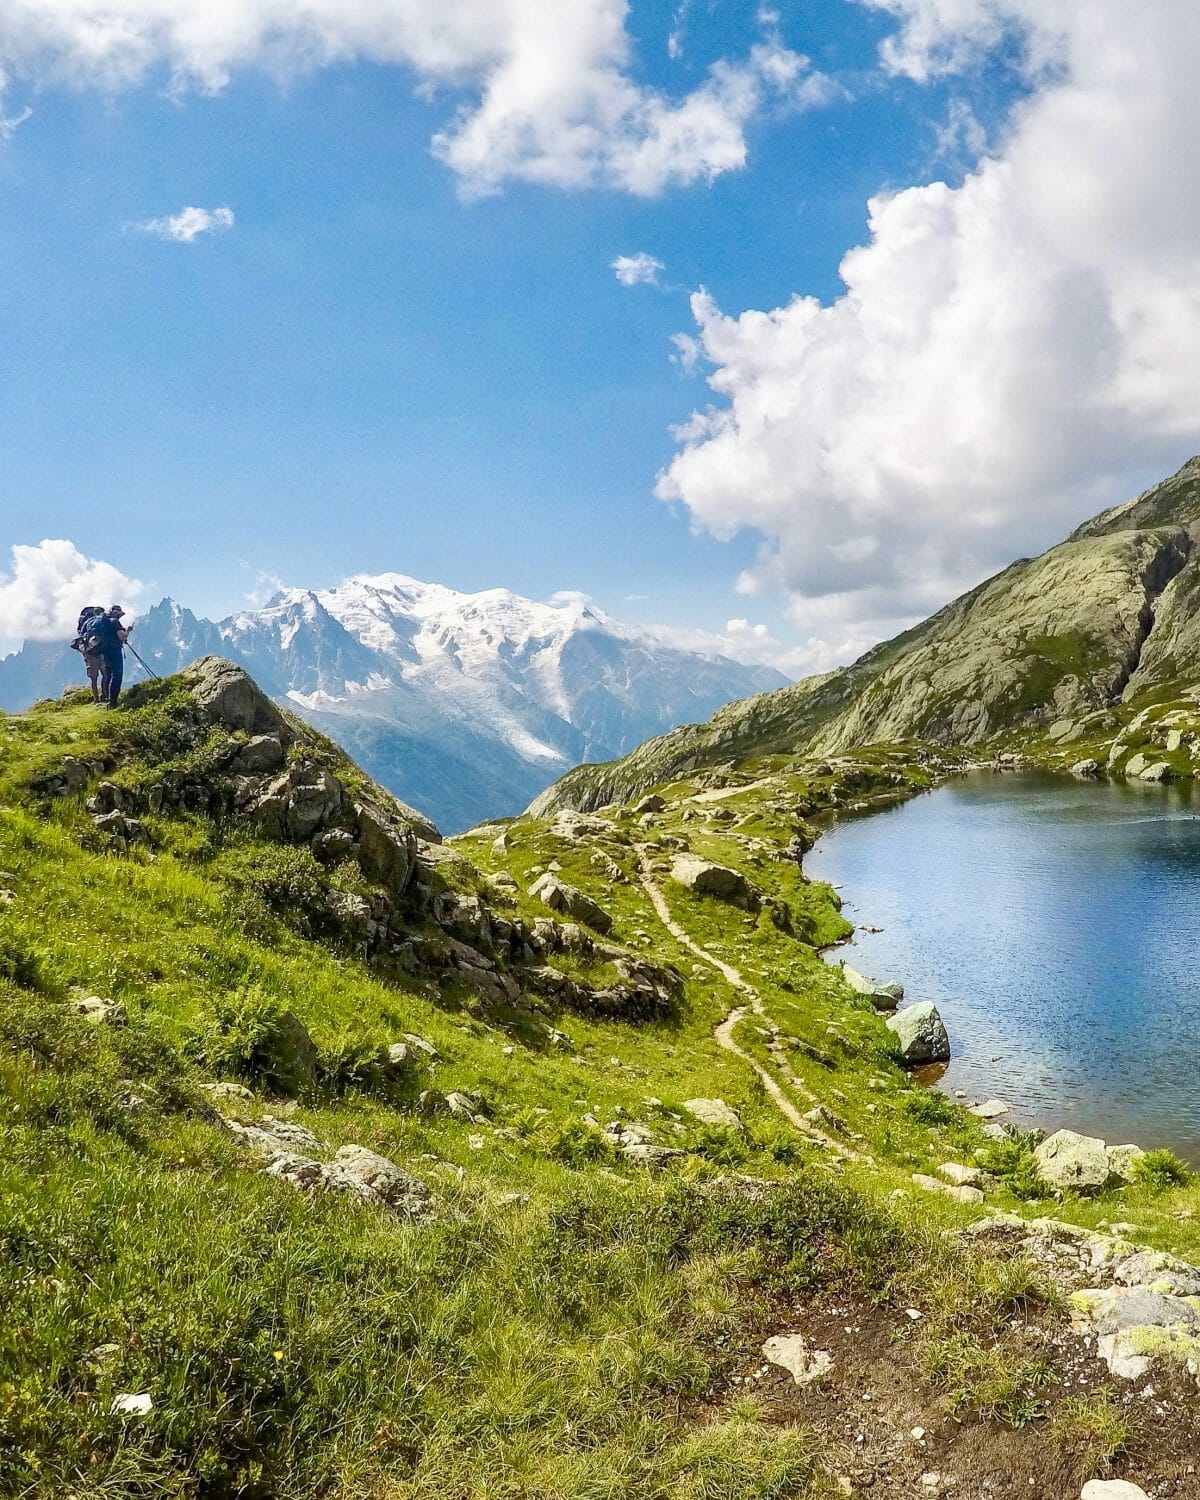
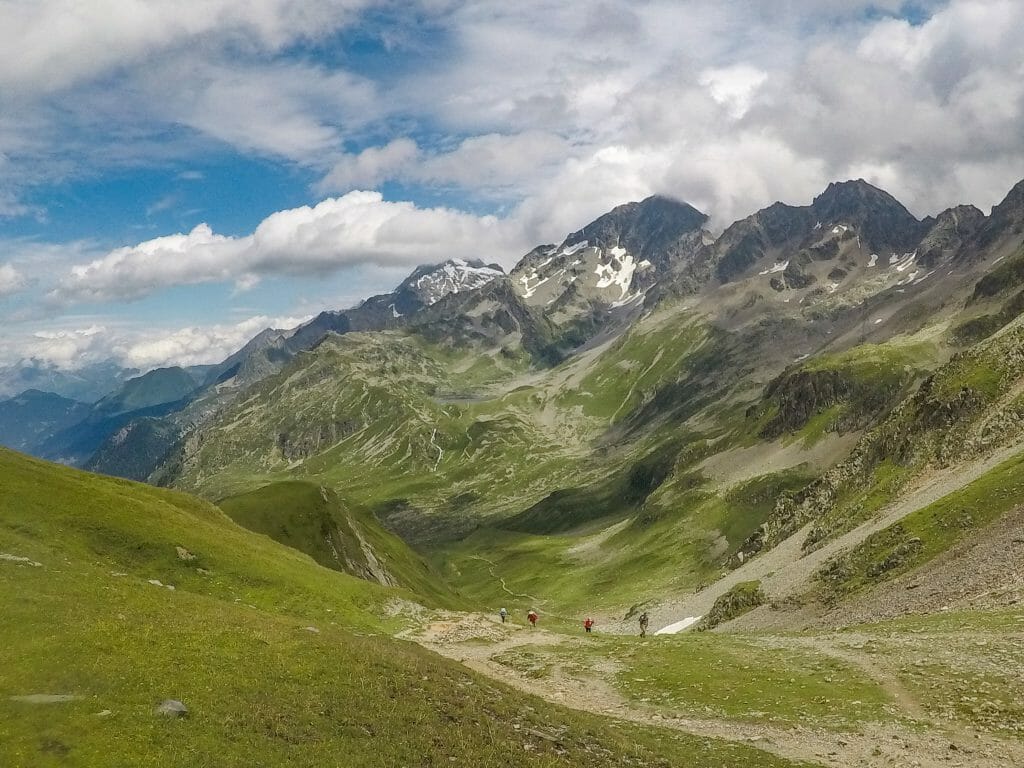
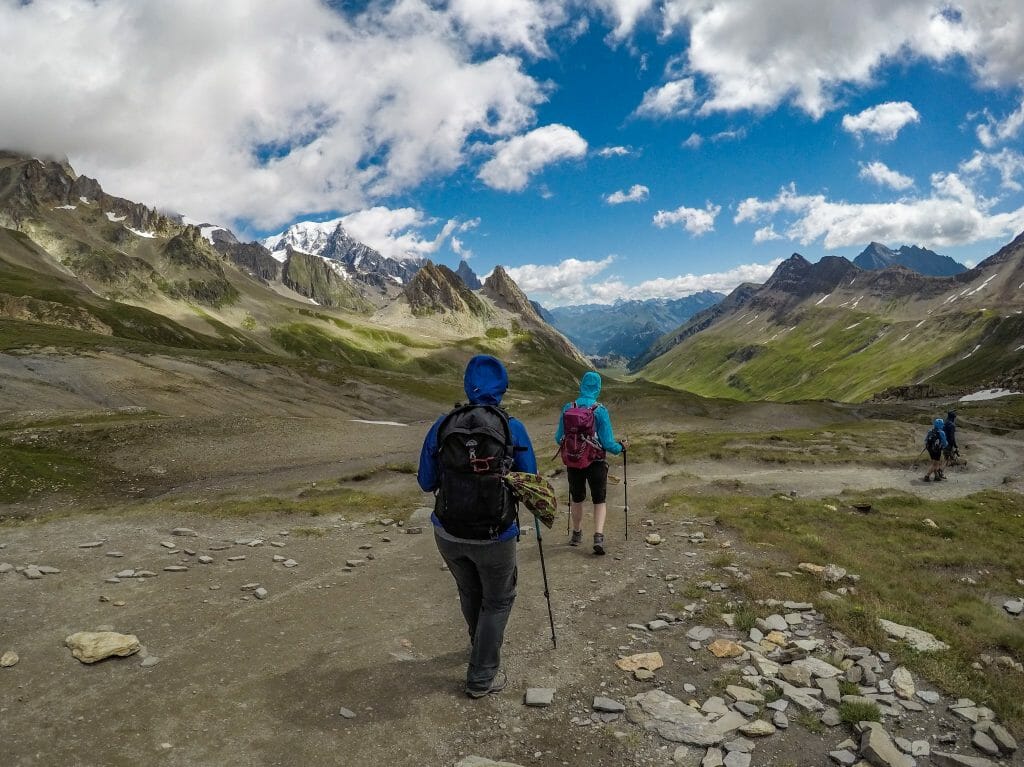
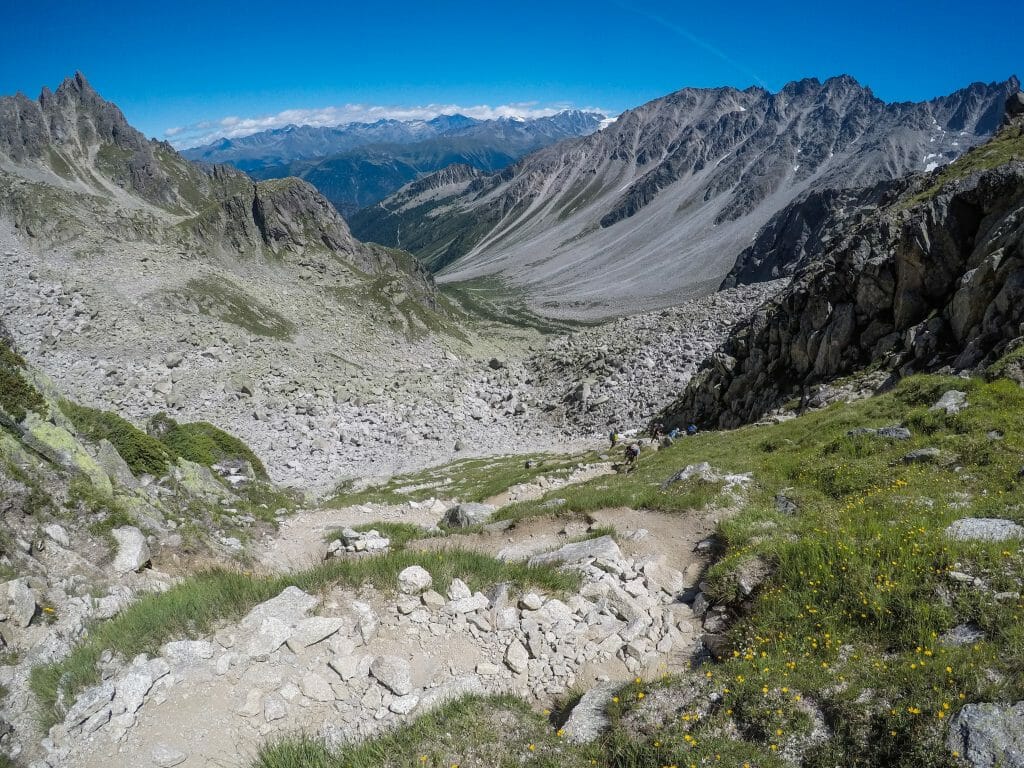
Although it may be tempting to head downhill here, it’s well worth continuing on to Col des Fours (2,665m), the highest point on the TMB (tied with the Fenêtre d’Arpette variation on Stage 8). This short but steep detour rewards with expansive alpine views and a true sense of being deep in the high mountains— wildlife sightings are also common, and I saw several marmottes and chamois!
From the col, a long descent on loose scree requires careful footing before the trail improves underfoot, easing into dirt as it drops through Les Tufs and into the broad valley of Ville des Glaciers (1,789m). A gentle final climb leads to Refuge des Mottets (1,870m), set in a spectacular alpine basin with options for nearby wild camping.


Night 2: wild camping near Refuge Les Mottets
- Price of camping: free!
- Facilities: none, but sometimes possible to pay for a shower at the hut
- Food: sometimes possible to pay for hot food at Refuge Les Mottets
Wild camping is permitted near Refuge des Mottets, but it’s best to check with the hut staff on arrival for the most appropriate place to pitch— I initially set up my tent on the river side closest to the refuge, but was asked to move to a small grassy patch opposite a field of cows.
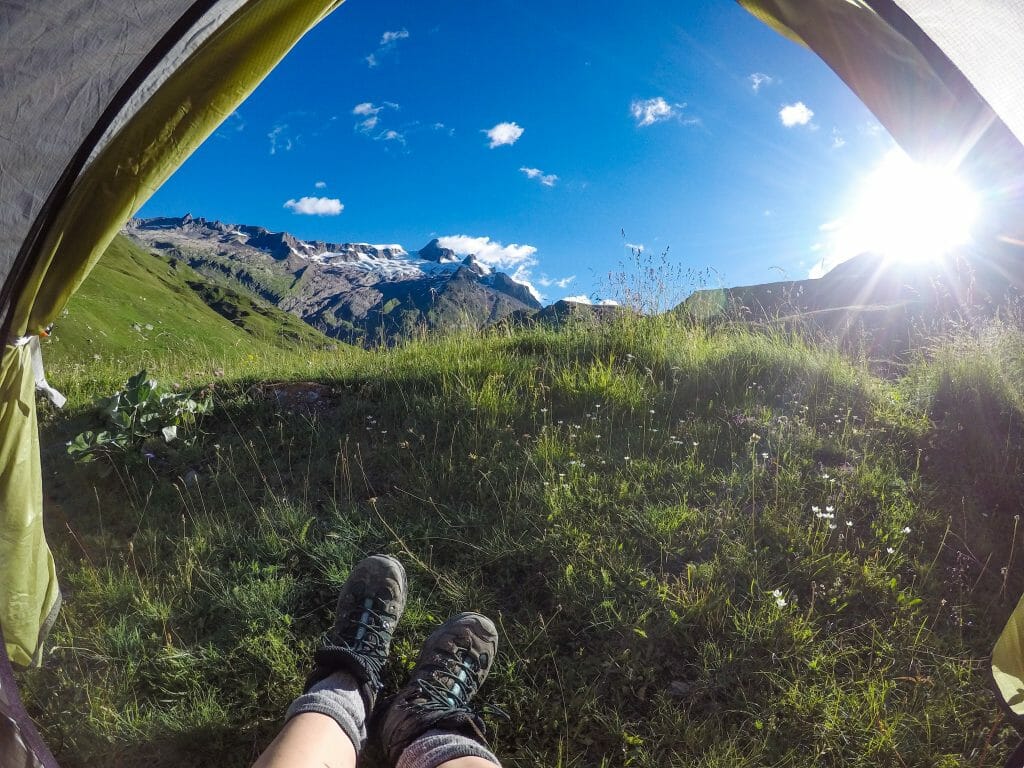
Despite the lack of facilities, this is one of the most scenic camping spots on the entire TMB. Waking up to a chorus of cowbells with uninterrupted views of the surrounding mountains was an unforgettable experience!

Day 3: Les Mottets to Rifugio Elisabetta to Courmayeur
- Distance: 30km
- Elevation gain & loss: 1464m & 1818m
- Trail time: 8.5hrs
- Official stage: 3 & 4
Combining Stages 3 & 4 into a single day makes for a long but incredibly rewarding traverse into Italy, where pizza and gelato await!
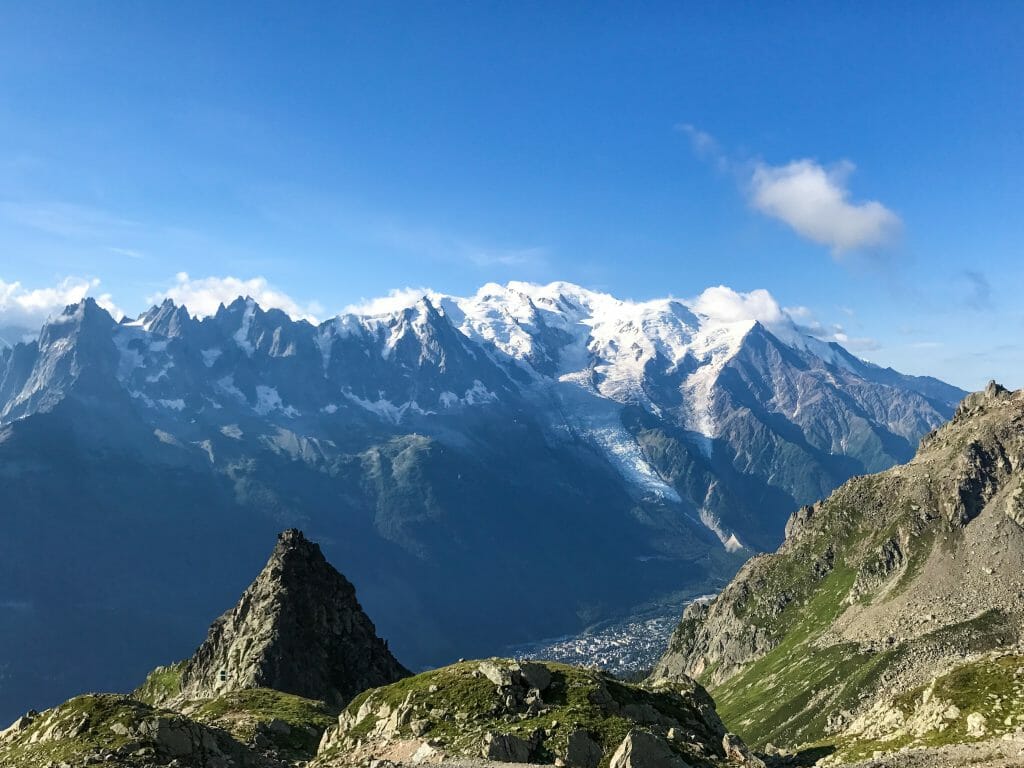
The day begins with a steep ~2hr climb from Les Mottets (1,870m) to Col de la Seigne (2,516m), where you officially cross the border from France to Italy and are rewarded with one of the best views yet of Mont Blanc. It’s often windy and exposed at the col, but the sweeping alpine scenery is absolutely breathtaking!
A short but steep descent leads to Rifugio Elisabetta (2,195m), the traditional end of Stage 3 and a great place to stop for a break— but a bit early to call it a day, in my opinion. Continuing towards Courmayeur adds significant distance, but it’s a worthwhile push if you’re planning a rest day tomorrow or looking to streamline your itinerary.
After about an hour of descending from Rifugio Elisabetta, the trail briefly flattens before climbing steeply once again, packing roughly 400m of elevation gain into a short ascent (thankfully the only major uphill on stage 4). From here, it’s another 1.5hrs along an undulating alpine trail past patches of snow and small tarns to Rifugio Maison Vieille.


Many hikers hope to take the cable car from Maison Vielle (1,956m) to Courmayeur (1,226m) to skip the final 700m descent, but if it’s not running (which is exactly what happened to me), expect a very steep and deeply unpleasant downhill on rocky, root-covered trail into the valley.
Arriving in Courmayeur, trade rugged alpine terrain for a lively resort town that feels like the Italian counterpart to Chamonix, and make sure to celebrate with well-earned pizza and gelato after a huge day on the trail!


Night 3: Courmayeur
- Price of hotel: 40-80€ for a private room
- Food: plentiful pizza and pasta options all over town!
After a long day combining two stages, Courmayeur is the ideal place to rest and recover. A hot shower, comfortable bed, and incredible food make this one of the best overnight stops on the entire TMB— and a perfect place to build in a rest day if your itinerary allows. More on that below!

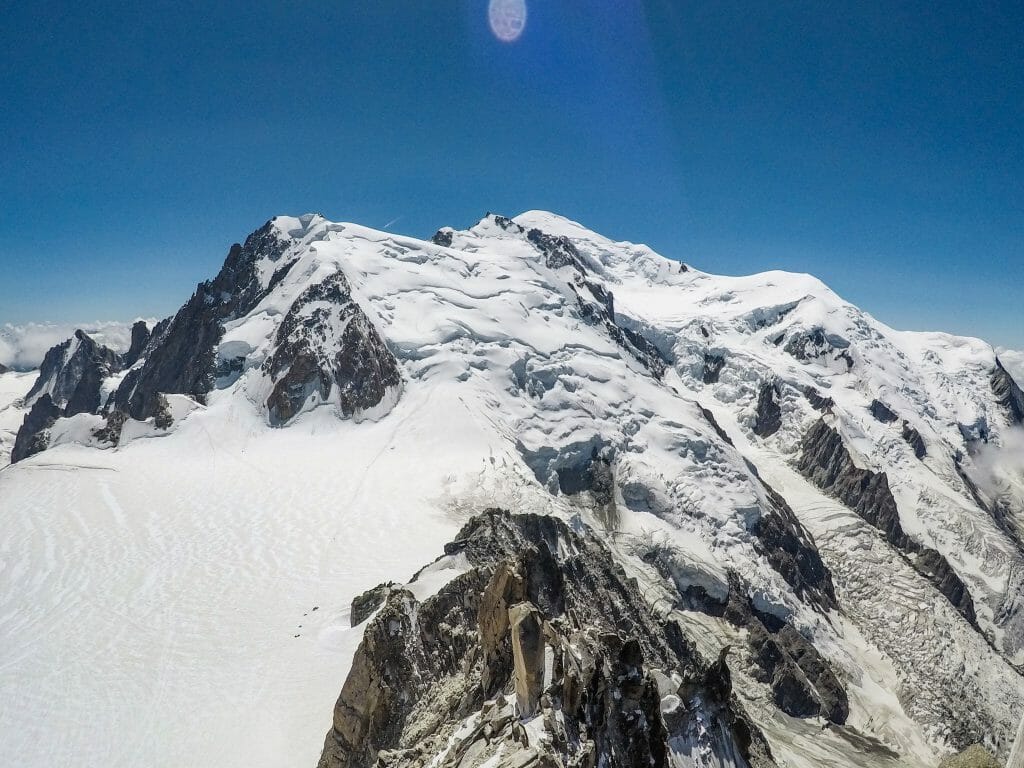
Rest day: Courmayeur + Aiguille du Midi
If you’re planning to incorporate a rest day into this itinerary (which I highly recommend), Courmayeur is an excellent place to do it. Just over 1/3rd of the way through the TMB, this mid-sized Italian mountain offers a great mix of comfortable accommodation, incredible pizza and pasta, and easy access to one of the best side-adventures: Aiguille du Midi.
Starting from nearby Entrèves (a quick 20min bus from the centre of Courmayeur), take the Skyway Monte Bianco cable car up to Punta Helbronner, then continue across the glacier on the Panoramic Mont Blanc gondola to reach Aiguille du Midi in France.


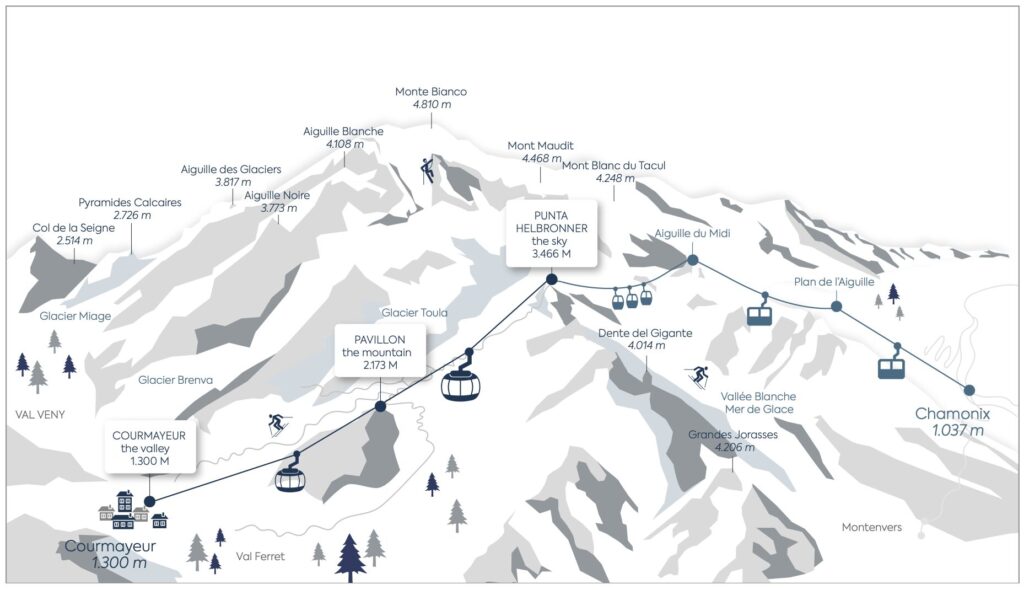
The journey itself is unforgettable, with jaw-dropping views over the Mont Blanc massif the entire way— and it’s one of the most unique ways to appreciate the mountain you’ve been hiking around!
I’ve been up to Aiguille du Midi several times over the years and, although it’s not cheap, it’s absolutely worthwhile! At 3,842m, you may feel the elevation slightly, but allow a few hours to explore the network of terraces, tunnels, and viewing platforms before heading back down.

Day 4: Courmayeur to Rifugio Bonatti to La Peule
- Distance: 28km
- Elevation gain & loss: 1710m & 611m
- Trail time: 9.5hrs
- Official stage: 5 & majority of stage 6
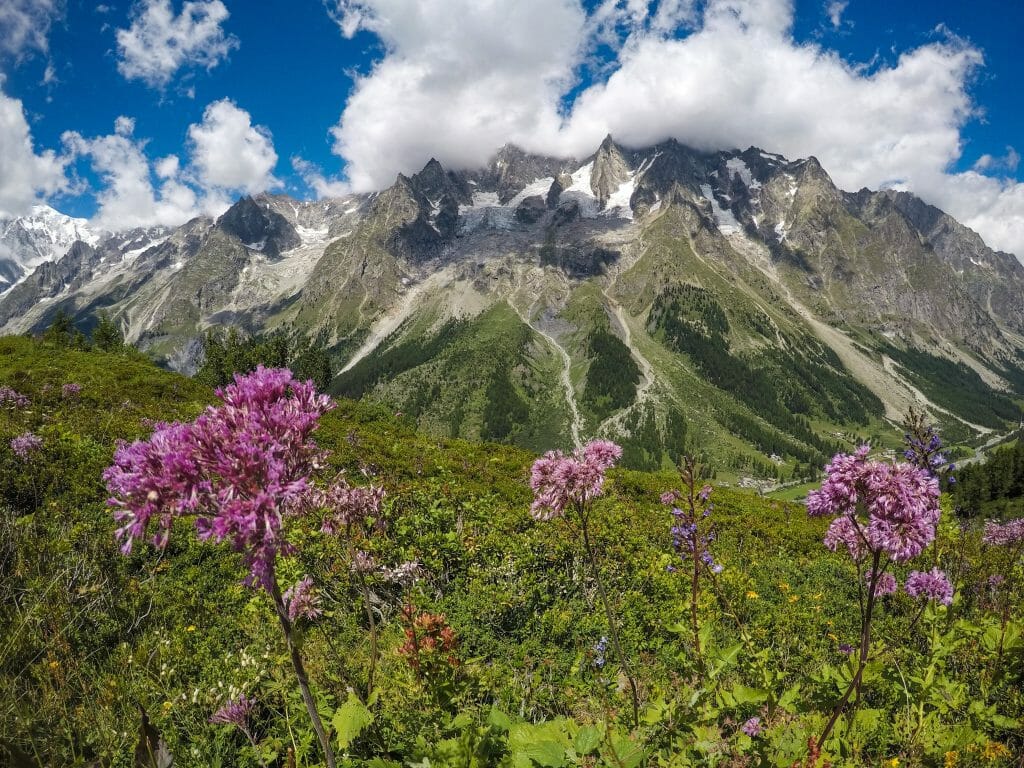
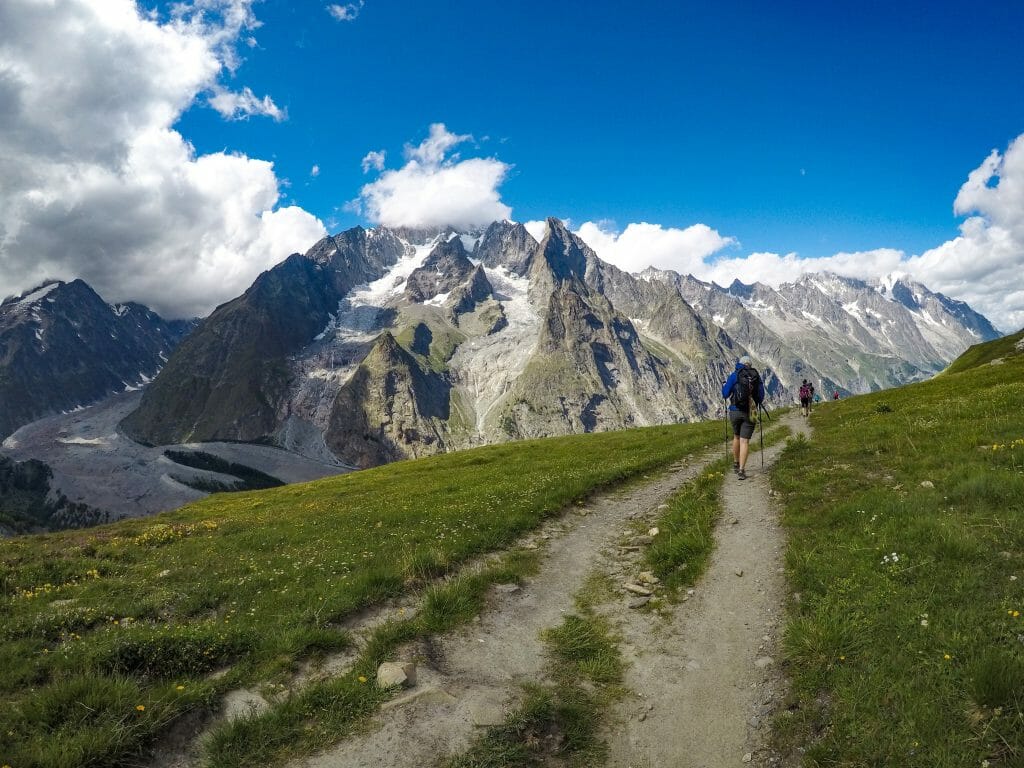
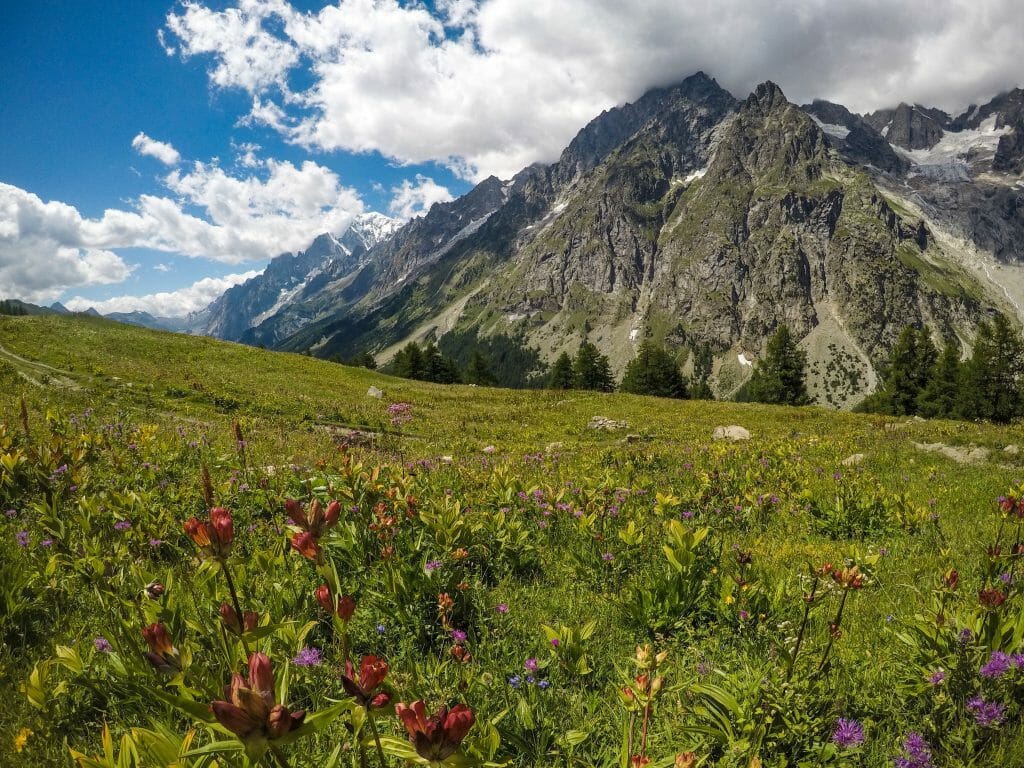
Combining Stage 5 with part of Stage 6 makes for a long but incredibly scenic day, climbing steadily out of Courmayeur (1,226m) on a steep road that quickly transitions into a zigzagging trail above town. The ascent is immediately rewarding, with wildflowers lining the path and frequent glimpses back over Courmayeur and the surrounding valley.
From Rifugio Bertone (1,989m), the trail becomes a beautiful rolling traverse, and in fact one of the most enjoyable sections of the entire TMB! Gentle undulations lead along a high balcony trail towards Rifugio Bonatti (2,025m), with constant views of the Mont Blanc massif and a landscape bursting with wildflowers and butterflies.
Bonatti marks the end of Stage 5 and roughly the halfway point of the trek, so this is a great place to break for a celebratory picnic lunch!
Beyond Bonatti, the trail continues easily at first before descending towards the valley and then climbing again towards Rifugio Elena (2,062m). This section can feel longer than expected, but conditions at Elena aren’t always ideal for camping, which is why I recommend pushing onwards.


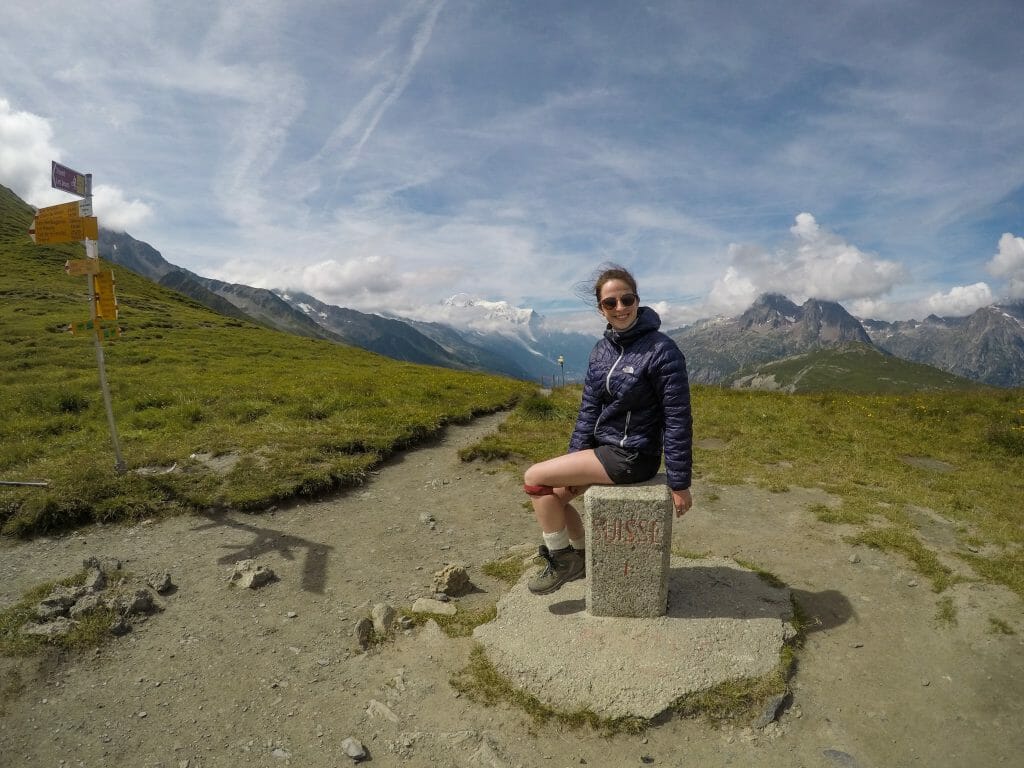
It’s a sustained 500m climb to Grand Col Ferret (2,537m), officially crossing from Italy into Switzerland at this high pass. The col is often extremely exposed and windy, but the views are spectacular and the push is worth it to save time on tomorrow’s route!
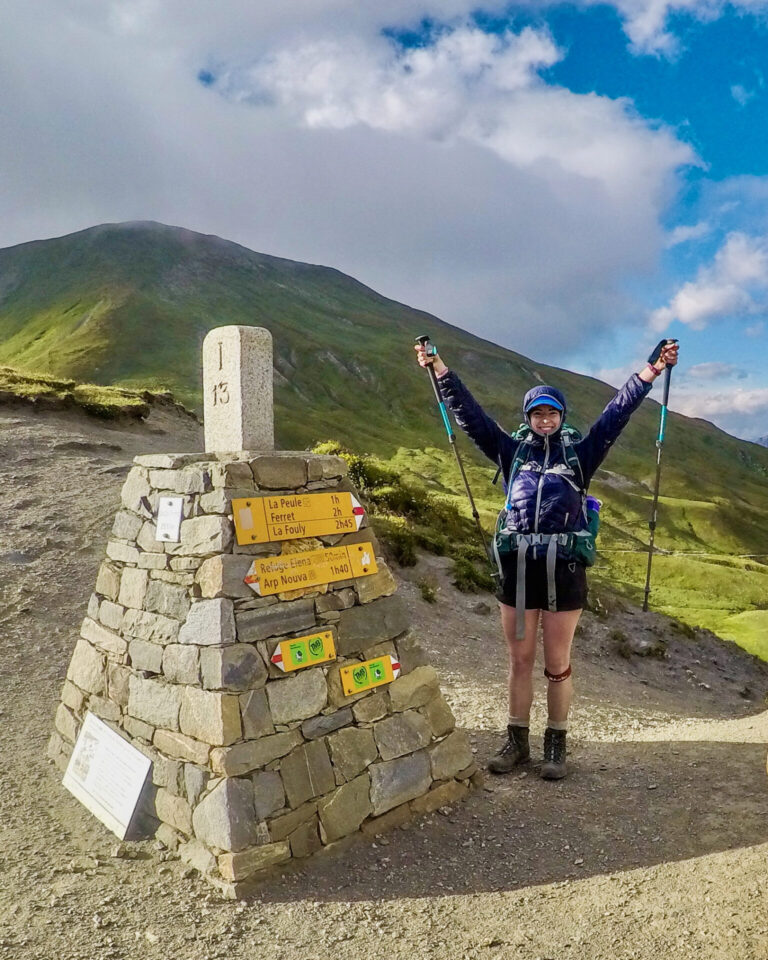
From here, it’s a straightforward 1hr descent into La Peule (2,071m), where camping and accommodation options are available in a beautiful alpine setting just a few kilometres shy of the end of Stage 6.
Night 4: Le Peule
- Price of camping: 15€ to pitch a tent or stay in the unfurnished yurt
- Facilities: toilets, hot showers, indoor seating in the refuge
- Food: hot meals at the refuge, drinks and cheese for sale
La Peule is a fantastic place to spend the night, with excellent facilities, cheese and cold beer for sale, and a cozy refuge atmosphere (much smaller and less formal than other huts on this route). Overall, it’s well worth the extra push over Grand Col Ferret!
A variety of accommodation options are available at quaint Le Peule, including the option to sleep inside an unfurnished yurt for the same price as pitching a tent— a warmer and more comfortable alternative. There are also furnished yurts and dorm beds for those wanting even more comfort.

Day 5: La Peule to Champex
- Distance: 24km
- Elevation gain & loss: 465m & 1465m
- Trail time: 5.5hrs
- Official stage: end of 6 & 7
After the long push over Grand Col Ferret the previous day, this stage feels comparatively relaxed, beginning with a gentle 1.5hr descent from La Peule (2,071m) to the valley town of La Fouly (1,610m), marking the end of Stage 6.


From La Fouly, the route follows a mix of road and trail through a series of charming Swiss villages. While the pavement can be a bit lacklustre (and hard on the feet), the scenery more than makes up for it— immaculate wooden chalets, overflowing flower boxes, and postcard-perfect alpine settings at every turn!
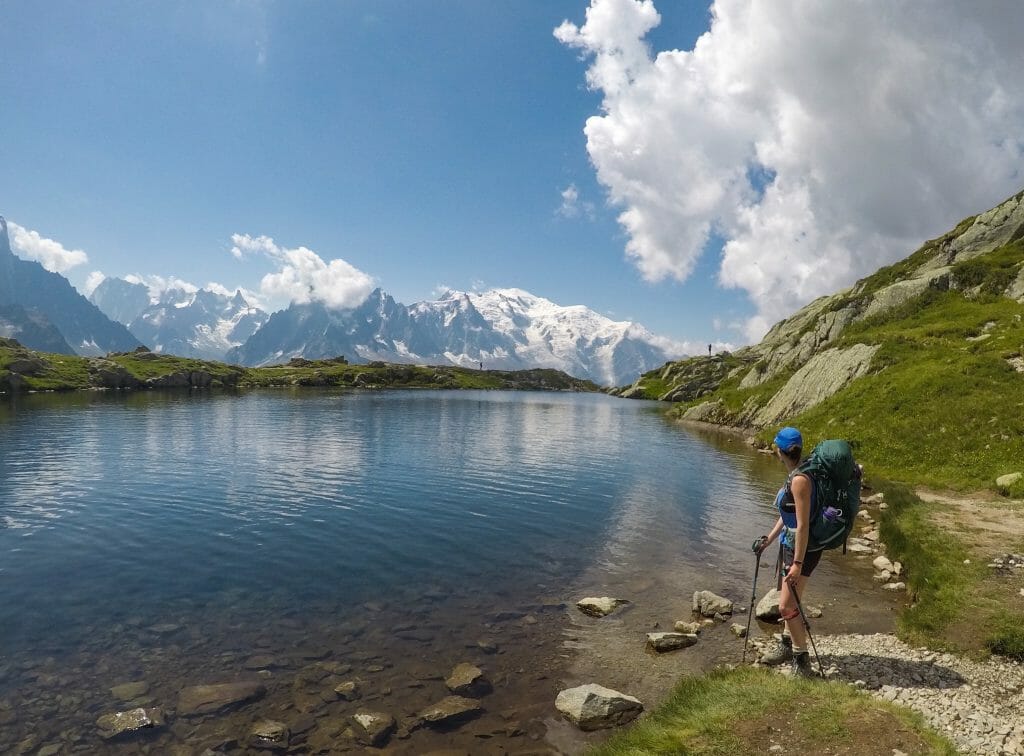
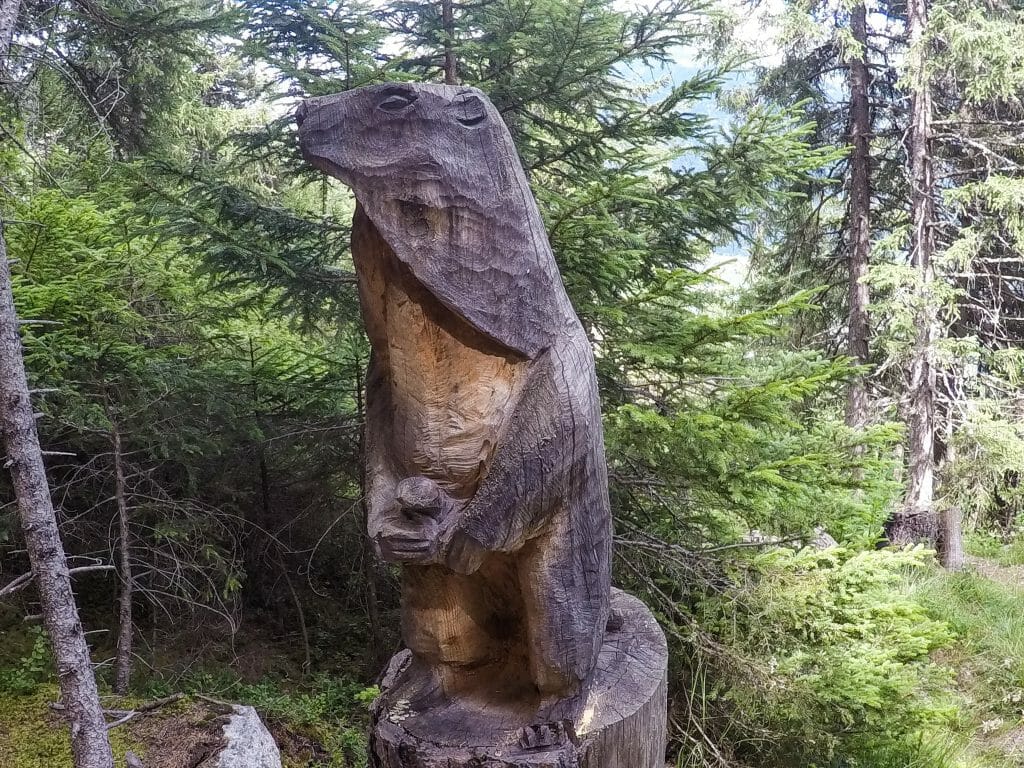
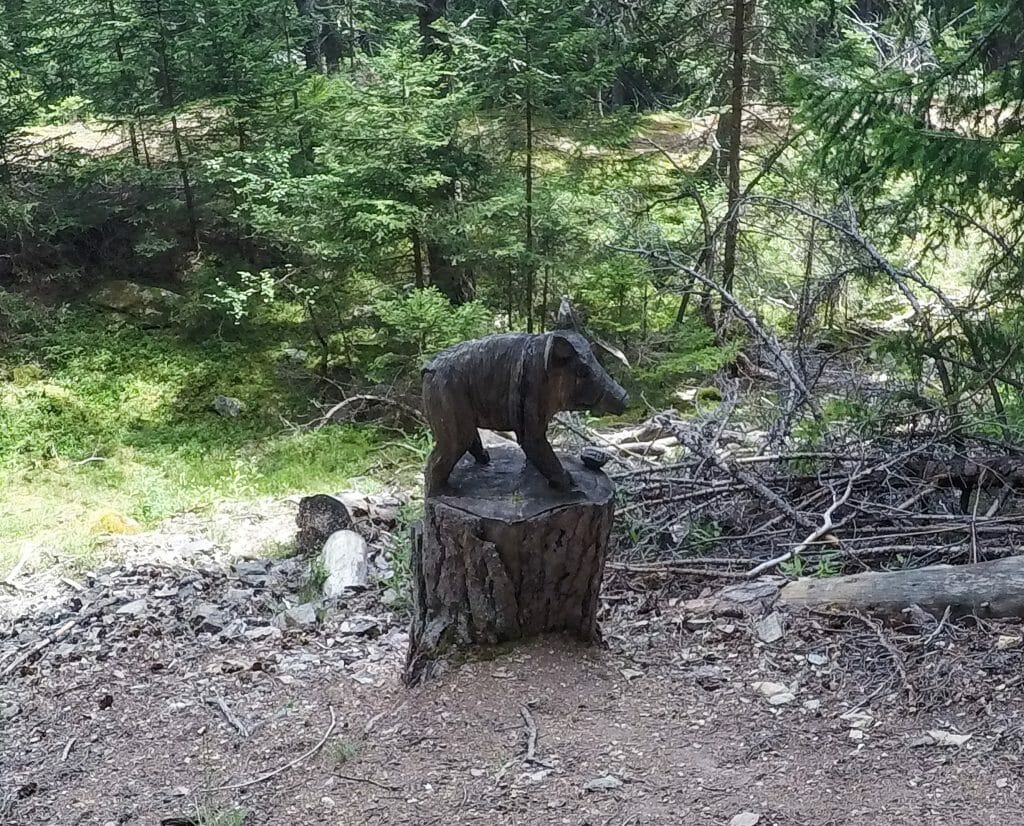
Eventually, the trail leaves the road and enters forest, where the remainder of the day unfolds along a pleasant dirt path through trees and across small streams. The final hour climbs steadily towards Champex (1,466m), nicely punctuated by a series of whimsical wooden animal carvings spaced along the trail until you finally get your first glimpse of the lake through the trees.
The day ends at beautiful Lac de Champex, a stunning alpine lake and the largest village along the Swiss section of the TMB. Aim to get here by early afternoon so you have time to relax and enjoy the gorgeous scenery, as well as the modern conveniences (snack food!) available in town.
Night 5: Camping Les Rocailles
- Price of camping: 15sfr
- Facilities: toilets, hot showers, wifi, picnic tables
- Food: walk to supermarket and restaurants in Champex
Located on the far side of the lake, Camping Les Rocailles is a large, well-equipped site with excellent facilities. And Champex itself is a great place to restock, with several shops in town perfect for picking up fresh bread, cheese, fruit, and other trail treats before settling in for the night.
Day 6: Champex to Le Peuty (via Fenêtre d’Arpette)
- Distance: 15km
- Elevation gain & loss: 1199m & 1339m
- Trail time: 6.5hrs
- Official stage: 8, including the Fenêtre d’Arpette variant
Right beyond the campground in Champex (1,466m), the trail splits between the easier Bovine route and the far more demanding Fenêtre d’Arpette variation.
This high route is widely considered the most difficult stage of the entire TMB, climbing 1,200m to Fenêtre d’Arpette at 2,665m (the joint-highest point on the trek, along with Col des Fours on Day 2) before descending over 1,300m into the valley below.


The climb begins gently through forest alongside a small stream, but soon steepens into relentless switchbacks that gain elevation quickly. As the trees fall away, the trail becomes increasingly rocky, eventually turning into a full boulder field that requires light scrambling and careful route-finding.
It’s a sustained and demanding ascent (3–3.5hrs to the col), but reaching Fenêtre d’Arpette delivers spectacular views in all directions. Take a lunch break at the top to soak it all in!
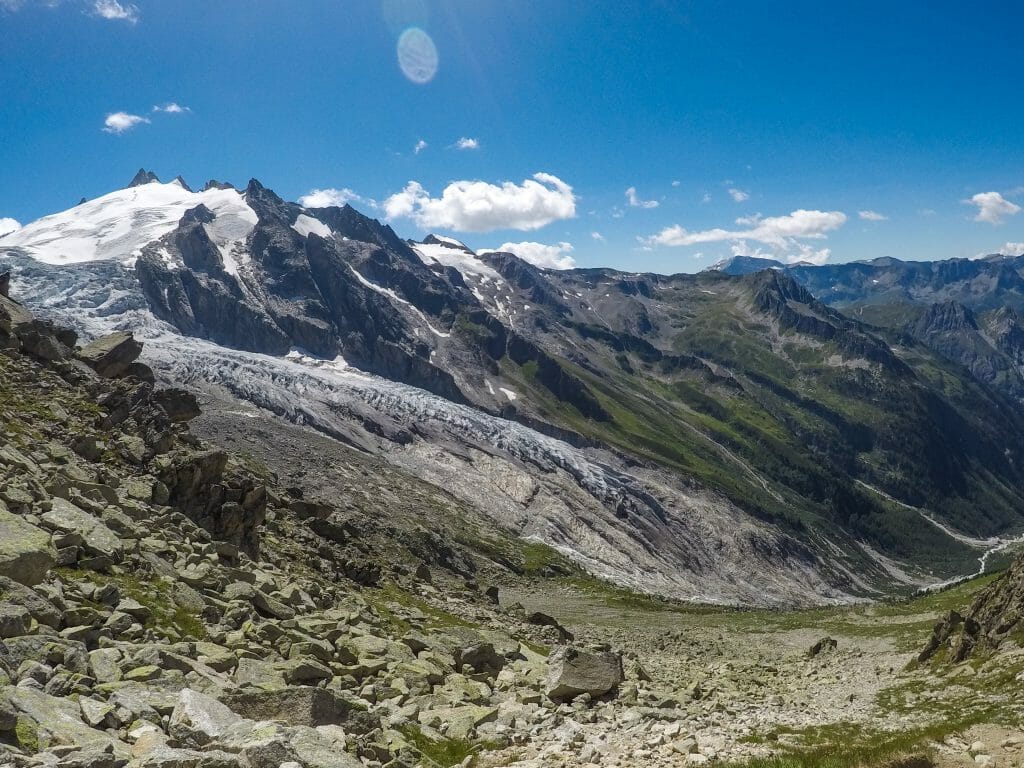
Dropping off the other side, the descent reveals stunning views of the Trient Glacier. Although still slightly technical in the upper section, the trail becomes more manageable underfoot as it continues (and thankfully, it’s much more gentle than the ascent route). After about 2hrs, pass Chalet du Glacier, from which it’s less than an hour to Le Peuty.
After crossing a river, the final stretch follows a concrete road that switchbacks downhill before arriving at the small campsite in Le Peuty (1,328m). This is a tough but incredibly rewarding day (arguably the most dramatic on the entire TMB), but it’s well worth the effort for strong hikers seeking a more adventurous route!
Night 6: Le Peuty
- Price of camping: 4sfr
- Facilities: toilet block outside, small shelter for cooking
- Food: 5min walk to a very tiny shop selling sandwiches and a couple food items, plus a bar with drinks
Since camping isn’t available at Col de la Forclaz (or at least it wasn’t during my hike), Le Peuty is a great alternative just 20min further downhill. The campsite is simple but beautifully located beneath the mountains, with excellent views back towards the Trient Glacier.
Facilities are minimal, but the low cost and scenic setting make this a great budget-friendly stop to end a big day over Fenêtre d’Arpette. There are also some small shops nearby where you can get some food and cold drinks.

Day 7: Le Peuty to Tré-Le-Champ
- Distance: 16km
- Elevation gain & loss: 1069m & 1178m
- Trail time: 4.5hrs
- Official stage: 9
Despite racking up a solid amount of elevation gain and loss, this is a relatively quick and scenic day, especially compared to the effort of Fenêtre d’Arpette the day prior!
From Le Peuty (1,328m), the trail begins climbing almost immediately, gaining elevation quickly through forest on a sustained ascent. It’s a tough start, with around 1.5hrs of steady uphill to reach Col de Balme (2,191m), where you cross the final border of the TMB back into France.
From the col, the route continues along an undulating ridgeline with sweeping views of the Mont Blanc massif— a 20min descent leads to Col des Posettes (1,997m), followed by a brief climb to Aiguillette des Posettes (2,201m), the high point of the day. From here, the trail begins a long and gradual descent towards Tré-le-Champ (1,417m).
Throughout Stage 9, the views are exceptional, especially looking back towards Mont Blanc as the clouds shift and open up across the valley. It’s one of the most scenic stretches of the entire trek, with relatively moderate effort after the initial climb to the Col.
Arriving early in Tré-le-Champ, you’ll have plenty of time to relax or stock up on supplies. Argentière is just 15 minutes downhill via a steep forest trail, and it’s well worth the trip for a proper supermarket resupply.


Night 7: Auberge La Boerne
- Price of camping: 8€
- Facilities: bathrooms inside the Auberge, hot showers, wifi also in the Auberge
- Food: hot meals at the Auberge, 15min walk to a supermarket in Argentière
There are several camping options in Tré-le-Champ and nearby Argentière, but the garden at Auberge La Boerne is a fantastic choice. For a small fee, you can pitch your tent in a peaceful setting and enjoy full access to the auberge’s indoor facilities.
It’s also ideally located for a quick resupply in Argentière, where you’ll find a surprisingly large supermarket (by mountain standards). I highly recommend walking 15min into town to grab snacks, cold drinks, and maybe even a cheeky bottle of wine to celebrate the penultimate day on the trail!

Day 8: Tré-Le-Champ to La Flegere (via Lac Blanc) to Chamonix
- Distance: 17km
- Elevation gain & loss: 760m & 1257m
- Trail time: 5.5hrs
- Variations: 10 & 11, including the Lac Blanc variant
The final day on the TMB begins immediately with a climb from Tré-le-Champ (1,417m), gaining elevation quickly as the trail heads into one of the most iconic sections of the entire route.


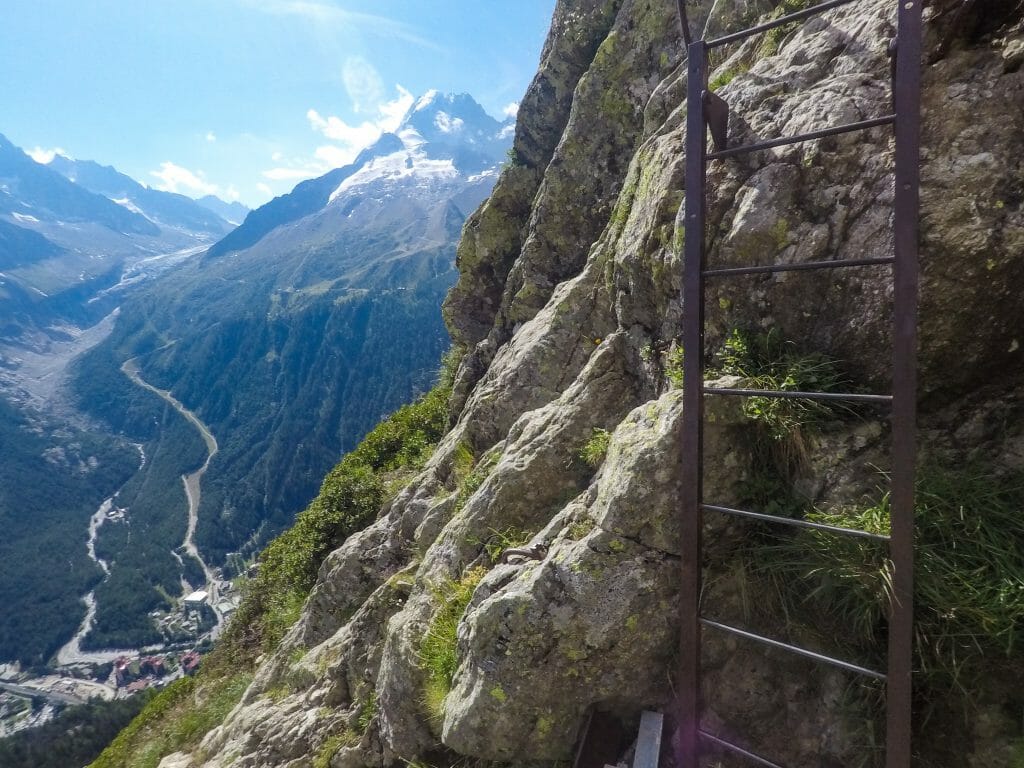
Not far from the start, you’ll encounter the famous ladder section— an exposed and thrilling series of metal ladders, steps, and railings bolted directly into the rock. It’s not technically difficult, but it does require a steady footing and a reasonable head for heights, and it adds a fun, slightly adventurous element to the ascent!
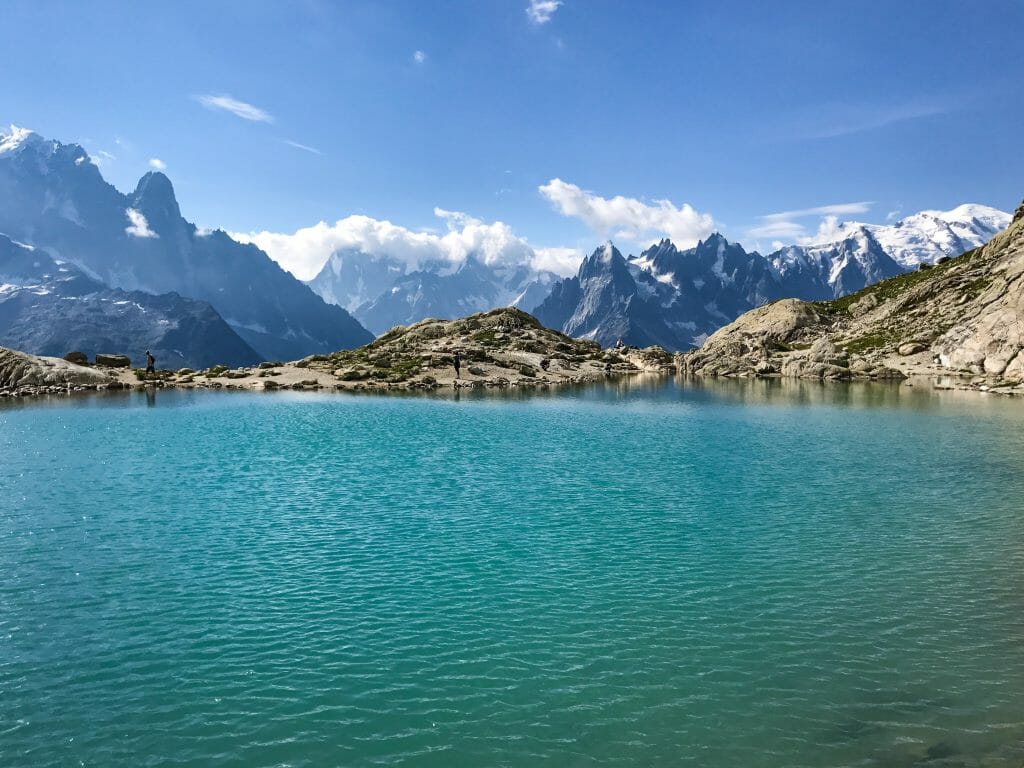
After about 2hrs, the trail reaches a junction: continue along the standard route to La Flégère, or detour towards Lac Blanc (2,352m). The Lac Blanc variant adds only ~40min and is absolutely worth the effort for some of the BEST views on the entire Tour du Mont Blanc!

The climb continues steeply past the Lacs des Chéserys, a few small alpine lakes with spectacular views onto Mont Blanc. A short final push brings you to Lac Blanc itself, a stunning high alpine lake surrounded by dramatic peaks. It’s the perfect place to stop for a break, or even a quick (freezing) swim.


From Lac Blanc, the trail descends towards La Flégère (1,875m), where you’ll rejoin the main route. From here, you can either shorten the descent by taking the cable car or hike about 1.5hrs down a pleasant forest trail into Chamonix (1,035m).
Arriving in Chamonix marks the end of the Tour du Mont Blanc, an unforgettable journey through some of the most spectacular alpine scenery in Europe. If you’re intent on officially closing the loop, it’s only a further 5–8km walk to Les Houches, but I’d recommend celebrating properly in Chamonix with a well-earned dinner, gelato, or drinks after 8 incredible days on the trail!


Night 8: Chamonix
Back in Chamonix, there are a number of campsites in and around the town, as well as a wide range of accommodation options throughout the area.
If you’re keen on finding the best value stay in the valley, I HIGHLY recommend the Chalet Alpin du Tour— accessible on a 2hr trail from Lac Blanc OR on the free bus connecting Chamonix to the small village of Le Tour. With an alpine membership, you can stay here for 14€ per night (in a private room, if it’s not busy) and they offer excellent hot meals and cold beer!
I stayed again at the Rocky Pop between Chamonix and Les Houches (where I stored my bags while hiking), and this is a convenient place to treat yourself to a hot shower and a comfy bed! Plus, the perfect way to officially close the loop!
What to expect on the Tour du Mont Blanc
Navigation
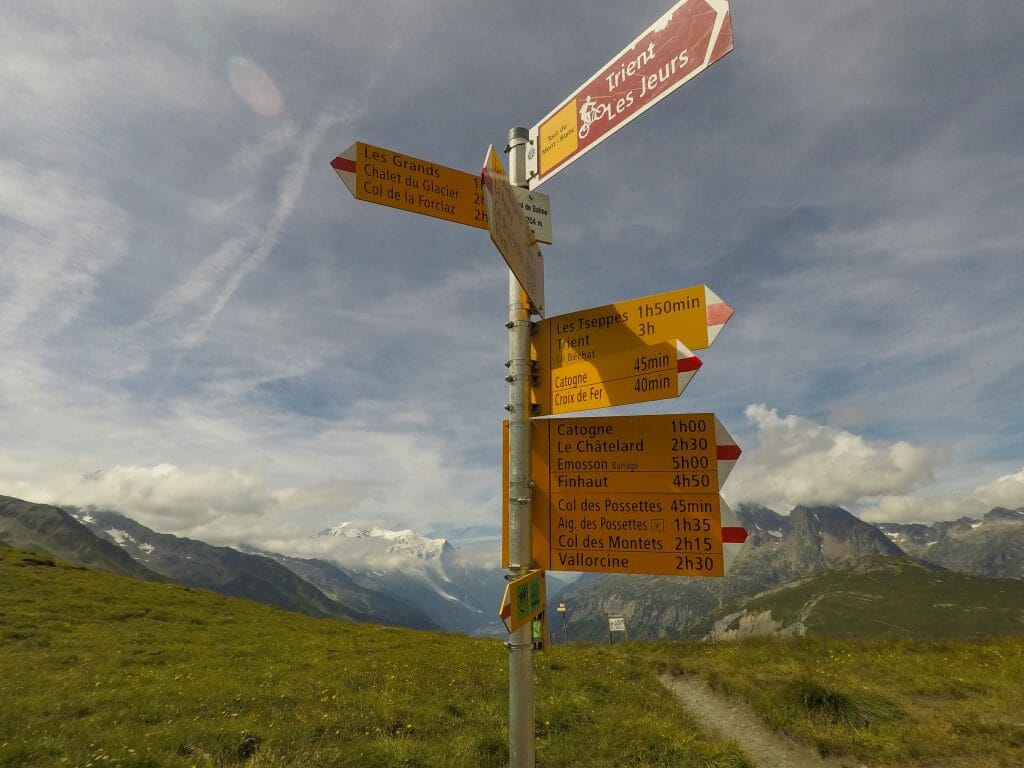
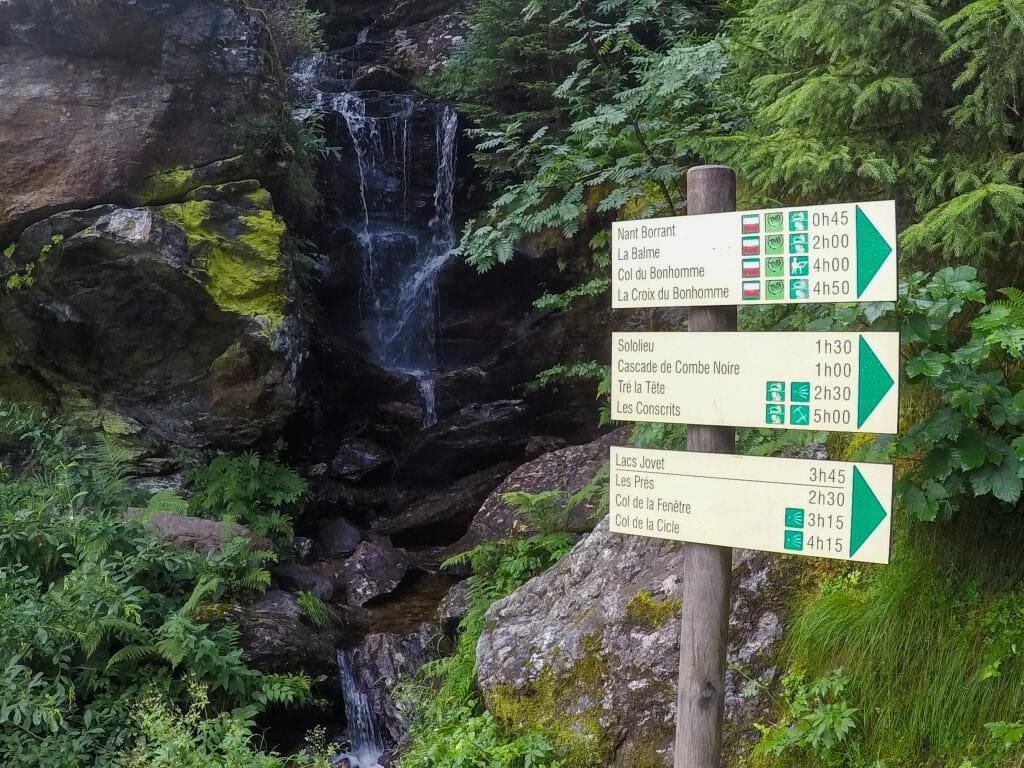
Between clear TMB signage, painted trail markers on rocks, detailed directions in the guidebook, and a steady stream of other hikers, it’s extremely easy to stay on route throughout the TMB. This is by far one of the simplest multi-day trekking routes when it comes to navigational demands!
When I first hiked the TMB back in 2017, I was an absolute novice when it came to trail navigation— and even then, I never got lost. On a few occasions, I wasn’t completely sure which fork to take, but there were usually other hikers nearby to ask, or I’d simply pull out my very handy guidebook and consult the directions once again.
Food access
One of the most unique (and convenient) features of the TMB is how EASY it is to access food along the trail! Every single day, you’ll pass at least one refuge, most days include a small town with basic shops, and every few days you’ll find a proper supermarket— which means campers don’t need to carry all of their food for 8-12 days on the trail.
There’s often the option to purchase packed lunch (15€) or hot dinner (20-30€) at a rifugio, but for an even simpler and more budget-friendly option, you can supplement freeze-dried meals or trail food with fresh bread, cheese, cold meats, and fresh fruit purchased as small markets along the route. I typically paid just 1€ for a baguette and ~4€ for a generous wedge of cheese.
Most refuges also sell drinks (beer, soft drinks, juice, coffee) for a few euros, making it easy to stop for a break and refuel during the day.

Water access
As for water, there are little troughs with eau potable every few hours, clean water at all the refuges, and even delicious glacier water in little streams along the way. The water was so plentiful along the TMB that I actually found carrying just 1L at a time was a great way to keep my pack light!
I didn’t really encounter anyone who was purifying their water, and certainly never felt the need to, but you can pack a lightweight hiking filter if you want to be extra cautious (especially in areas near livestock).


Camping facilities
Camping on the TMB is easy and widely accessible, with well-equipped campsites available along most of the route. All the campsites I stayed at were excellent— clean toilets, hot showers (at most sites), and reasonably priced from ~4 CHF to 14€ per night (prices from 2017).
In most cases, campsites are clearly listed in the TMB guidebook and easy to locate, but in a few instances, there were no campsites listed within hours of where I was hoping to stay. Asking other hikers usually turned up good information, but wild camping can also serve as a great backup.
Regulations for wild camping vary across the Tour du Mont Blanc (not permitted in Switzerland), so be sure to check current rules. If in doubt, stop into a mountain hut and ask— staff will often direct you to a nearby area where you can pitch your tent without issue!
Packing list for the Tour du Mont Blanc
Check out my super-detailed packing list for the Tour du Mont Blanc, adaptable for those camping or staying in huts along the trail!
>>> For more hiking layers, boots, packs, and camping gear recommendations, check out my outdoor gear page!


Read about other top multi-day treks
- Alta Via 2: complete hiking + via ferrata route guide
- Alta Via 4: complete hiking + via ferrata route guide
- The ultimate guide to independent & solo hiking the Huayhuash Circuit in Peru
- The Overland Track: a guide to Tasmania’s most iconic multi-day hike
- O-Circuit: the ultimate guide to hiking Torres del Paine in 8 days
The Comments
Goda
Hey! We used your guide for AV4 and are planning on TMB soon!! We don’t want to hike for 11/12 days nor do we want to run and finish the full itinerary in 6 days. We want to hike 10-15 miles a day and then just stop. Is there a start/end point combo you would recommend to cover 50-90 miles of the full trek? I can’t find anything other than sprinting the full hike in less time but that’s not what we are going for so I am hoping you have some
Suggestions.
brooke beyond
GodaHi Goda, so honoured to hear you are planning another hike using my guides!! I actually did do the entire TMB in 8 days (with full camping gear and food– it could even be a bit faster if you’re carrying a light pack and staying at huts), so it’s not necessary to spend 11/12 days on the trail.
But if you don’t want to move at that pace, then I’d suggest starting the route in Courmayeur and finishing back in Chamonix. This cuts nearly 80km off the start of the trail, and in my opinion, you would miss less here than elsewhere on the trail. It’s also logistically reasonable to get to Courmayeur, which is a decent-sized town on the Italian side.
Hope that helps!
xx bb
Steve
HI, FOUND your AV 2 guide very helpful hiking through this Sept 9-20. looking to do Tour du Mont Blanc and AV 4 summer 2026. Would like to use your guides for these as well and maybe have a little help w trip planning/hut reservations. Would you assist me with this? thanks, steve
brooke beyond
SteveHi Steve,
Send me an email if you’re still interested in some help planning and booking TMB + AV4!
bb@brookebeyond.com
João
Just want to say thank you so much for all this described and funny planning guide. It gave me a lot of courage to do it!
I wish great adventures for you 🙂
brooke beyond
JoãoSo happy to hear that, João! Hope you had an amazing time 🙂
Liron
Hey Brooke a few random things:
-did you wash your clothes during your time there? How did you keep things clean/pack light and make it last
-do you have any tips on tricks in terms of changing clothes, taking socks off etc etc.
-where did you buy your mountain food? Did you bring it with you or buy it locally?
– did you have any issues leaving your belonging at Chamonix and them holding it for you before the trip?
Thanks heaps, your guide is incredibly detailed, you’ve given me the confidence to go
brooke beyond
LironHi Liron,
– I didn’t wash my clothes and just wore the same stinky 2 shirts the entire time, but there are opportunities to wash in a river or lake if it’s important to you
– I DO have a sock trick! On an 8-day hike like TMB, I’d bring 3x liners and 3x boot socks– wear the liners each for 2-3 days and rotate the boot socks (days 1-3 hike in Socks 1 and sleep in Socks 2; days 4-6 hike in Socks 2 and sleep in Socks 3; days 7-8 hike and sleep in Socks 3)
– I bought all mountain food prior to the trek, it’s super expensive in Chamonix, so pack it with you!
– no issues storing stuff in Chamonix, this is super common and most hotels have dozens of guests doing this every day
Hope that helps, let me know if you think of anything else 🙂
xx bb
SAM SAM
OMG thank you so much for your post! So far, it’s the clearest and most informative one, without overwhelming information!! You cut all the unnecessary descriptions and went straight to the points! Much appreciated
Landi Smith
Thank you so much for writing this article – honestly, it’s been so helpful in the overwhelm of information out there (and yet very little on camping TMB!). It was comprehensive and encouraging and made it seem like far less of a big deal to plan and organise a solo TMB while camping. I recently camped the West Highland Way in Scotland and totally fell in love with camping along a hiking route – it really is magical.
Did you have to book your campsites ahead of time or did you just show up on the day and they had spaces available? If you didn’t book ahead, did you ever struggle to find a campsite with availability for you on the day? My fear is not booking anything and then not having a space to sleep for the night.
I also wondered about the dehydrated meals – from what you’ve seen regarding how frequently you pass through towns (and the infrastructure of each town), do you think it is possible to post dehydrated meals from Chamonix to yourself to the towns and villages ahead, so that you don’t have to carry your whole trip’s food in one go?
Thank you so much for your wisdom and advice on the TMB! It has definitely increased my excitement.
brooke brisbine
Landi SmithHi Landi, delighted to hear you found this post helpful!
Back when I did the hike in 2017, it wasn’t even possible to reserve campsites and I’m not sure if that’s changed, but I certainly never had an issue finding somewhere to stay for the night. The vast majority of hikers are booked into the huts, and even though I’m sure the campsites have gotten busier in the last several years, I don’t imagine they could turn you away in the middle of the mountains where wild camping is prohibited.
It would theoretically be possible to post food to yourself in various towns, but the logistics of this might get a bit complicated. I’d possibly recommend instead that you visit a local mountain store to restock your dehydrated meals at various points. If you start out with enough food for a few days from Chamonix, you could easily restock in Courmayeur, Italy and Champex, Switzerland. I’d also recommend supplementing with some fresh food like bread and cheese, readily available from these and smaller towns along the route. It should be no problem to find food– you’ll pay a premium buying dehydrated meals in the Alps, but still less than it would cost you to mail food ahead, I’d imagine.
Hope that helps! Wishing you a wonderful hike 🙂
xx bb
Eva
Hello, thank you for the inspiration and courage this article helped me to (re)gain ! I planned to go TMB in one week with friends, but it looks like I might have to go alone. It scared me so I googled about solo hiking this route and found your blog. After reading I feel confident to make it and even excited for the trip again 🤩 Thank you, Eva 🙋🏻♀️ (from Czechia – to explain my English 😁)
brooke brisbine
EvaAh Eva, I am SO glad you found this post! That was exactly how I felt when my friend pulled out at the last minute and I was faced with doing this alone. But the TMB is what developed my lifelong love of solo trekking and I am immensely grateful for how it all turned out! It’s ok to do things scared 🙂
You got this, girl!!
xx bb
Chuck
This is really good and encouraging post. I was planning to go TMB, but because I don’t have experiences on the thru-hiking from abroad, so I just thought about guided tour. But this post really is encouraging me to go solo thru-hiking. I love the post.
brooke brisbine
ChuckHi Chuck, I’m stoked to hear that! The TMB really is a great first-time long-distance hike. You’ve got options to camp or stay in huts (with a lighter pack), a lot of bail-out/rest day opportunities, a fairly busy trail in case you need support, small towns every few days to restock… it’s a safe environment to push yourself a little and see what you can do!
Happy trails 🙂
xx bb
Peter
Thanks for so many helpful facts and tips that I haven’t found anywhere else (e.g. how cold it is at night and how you slept). I almost didn’t look at something calling itself ‘The Ultimate’ but am so glad I did…you deserve a big prize!
brooke brisbine
PeterAh thank you so much, Peter!
I agree “ultimate” may be a bit of a big call, but I did my best to include everything I learned from my solo hike, so I’m really glad it’s continuing to provide value to other unsupported hikers even all these years later.
Happy trails 🙂
xx bb
Vanessa
Really useful information as I am thinking of doing this hike alone as a woman.
Did you still get blisters on this trip with your sock liners?
brooke brisbine
VanessaHi Vanessa,
Yes, sadly it is not a complete solution… but it helps a lot! I recommend toe sock liners, vaseline, and KT tape, this is the most effective (though still not 100%) solution I’ve found after a lot of very painful trial and error. If you’re the kind of person who is very blister prone (like me), another good strategy is taking your boots and socks off at lunch to let them dry out a bit, since sweaty feet are a breeding ground for blisters.
If you do still end up with blisters, make a careful assessment of whether to pop them or not, and for me, the decision usually comes down to how large and painful it is. For blisters that I know aren’t going to ~calm down~ overnight, I will lance them with a sterile needle (just use a lighter), press the fluid out with an alcohol wipe (don’t tear the skin!), let air-dry, and then put antiseptic + bandaid before walking anywhere around camp. For particularly bad cases, you can take the bandaid off before bed and let it continue to dry out, but usually this strategy works well to nip blisters in the bud. If it’s a small and not terribly irritated blister, it often just takes care of itself overnight, but then make sure you are covering/cushioning the area well in your boot so you don’t just continue to aggravate the area.
That was my very long blister protocol, hope it helps lol!
xx bb
John Andrew
Hi, thanks for posting an amazing blog about the ultimate guide to solo hiking & camping the Tour du Mont Blanc. The Tour du Mont Blanc is a breathtaking adventure, and this ultimate guide to solo hiking and camping is a game-changer. From trail tips to gear essentials, it’s a comprehensive resource for anyone seeking the thrill of the great outdoors. With this guide in hand, you’ll navigate this iconic trek with confidence, embracing the serenity of solitude while forging unforgettable memories amidst the stunning Alpine landscapes.
Thanks for once again. Keep posting such types of informational blogs.
John
OMG, you saved me Brooke!
I’m John from Vietnam, Im about to do TMB this September and was so stressed due to the last minute planning. All the refuges are booked and i was gonna cancel this hike until i found this article.
Thanks the universe!
I hope you are having a great day exploring the world.
Thank you so much for sharing!
brooke brisbine
JohnHi John, I am so glad you found this article helpful, that makes me so happy!
Hope you had a phenomenal time on the trail, it’s one of the very best 🙂
xx bb
Mina
That was very helpful,
Thanks Brook, I hiked Lycian way in Turkey, wonderful but it would be my first time solo hiking in August. like to hike with you in some part of the world, would be happy to receive your friendship email.
The best
Mina
brooke brisbine
MinaHi Mina,
The Lycian Way looks incredible, that’s definitely on my list! Hope you enjoyed the TMB & happy trails 🙂
xx bb
Aimee Frazier
Hi Brooke- Thanks for so much useful information! I’d love to know what knee brace you used – the link is broken. I’ll be trekking the TMB in September and will definitely need a knee brace. Thanks again!
Youtube Travel Here
Hello! Great blog article with a lot of useful information! I have a question: how many kg was your total backpack weight? I’m 70kg and my backpack weights 15kg. I’m not experienced with multiple day hikes but I do often hike a few hours day trips. I’m still doubting if I take too many kg or not. Because food for a few days is around 2kg and camping gear around 3kg so that’s already 5kg extra if you go camping! While non-camping people already take around 10kg in their daypacks
brooke brisbine
Youtube Travel HereOn the TMB, I’d estimate I carried around 16kg and I’m 58kg, but obviously this is SUPER personal– what one person can carry is not the same as another. I struggled A LOT with that weight at the time, but I can climb Class 4 routes with a 23kg bag now without issue, so fitness (and not just general fitness, but specific fitness with regard to carrying a pack) is also a major factor.
The best advice for anyone reading this is to train WITH pack weight prior to the trek!
Happy trails 🙂
xx bb
Emma
Hi Brooke,
This was such a useful article! Thank you so much for sharing. I was wondering if you’d be able to answer a query I have. We’re planning the trip for our honeymoon next year.
Is it possible to book accommodation/a home base (we’re thinking apartments through AirBnb) in some of the villages and then do some of the key trails each day. We would have a car, so would be able to drive to different sections of the trail each day to do some of the amazing hikes or trail runs.
If we have 7 days, we could book accommodation at:
– Chamonix for 2-3 nights
– Champex for 2-3 nights
– Courmayeur for 2-3 nights
Do you think we’d be missing out on some of the higher altitude hikes?
Would love to hear your thoughts!
Thanks, Emma
brooke brisbine
EmmaHi Emma, so glad you found this post helpful! This is actually what my boss just did with her husband and their baby– basing out of a few towns, they were able to hike ~70% of the TMB as day hikes and then drive between towns to complete other sections. Your proposed itinerary would definitely be possible.
However, let me just warn that you will be missing out on the true TMB experience! If there’s not a super compelling reason to stay in town, I would strongly encourage you to book rooms in the huts so you can hike the full trail and really get into it– they are very comfortable, serve great food, and the social aspect is really fun. You can definitely still build in a rest day or 2 along the way, but I think it’s really worth it 🙂
Hope that helps, definitely let me know if you have further questions and I can also reach out to see exactly how my boss structured her itinerary with the car if that’s absolutely what you want to do.
xx bb
Sheilynne
Been searching for days trying to find a SOLO hiking blog for the TMB, and bonus a lady solo hiker! Well curated details and answered all of my questions without being so heavily wordy (which i end up losing interest in lol). Basically planning this on a whim this week for a September trip, cause hell, why not! From the PNW to the Tour du Mont Blanc <3
brooke brisbine
SheilynneAhh Sheilynne, thanks so much for reading and I’m so happy to hear about another solo lady getting out there on the TMB! Hope you had an absolutely fabulous time this September, it’s such a wonderful experience 🙂
Happy trails!
xx bb
Anne
HI Brooke, great to read all this information! I think I’m gonna do this. The TMB is said to be challenging, I wonder: is this because of exposed or otherwise dangerous passages?
I solo-hiked (and wild camped) the Alta VIa 1 in the Dolomites. It was challenging, and pushed my limits slightly, safetywise. Are there passages that were scary?
brooke brisbine
AnneHi Anne, thanks so much for reading and I SO encourage you to do the TMB! It’s not very exposed or dangerous, the challenge of the TMB just comes from the length and the elevation gain, which is not insignificant– nearly 2x the gain of AV1 (and only 1.5x the length, so yes, it is much steeper).
Wishing you a wonderful adventure!
xx bb
Aimee Frazier
Thanks for so much great, difficult information, particularly about camping! I am a wilderness guide, and have done lots of solo trips, but none in a foreign country. My question is about the knee brace you used. After all these years guiding trips with heavy packs, I also have screaming knees. It looks like the link no longer works. Might you have an updated link to the brace you used? Thank you so much!
brooke brisbine
Aimee FrazierHi Aimee, thank you so much for the sweet comment and apologies for the broken link! I realise this is probably too late to be helpful for your TMB trip, but for future reference, this is my favourite knee strap: https://amzn.to/3uio9tu
Happy trails 🙂
xx bb
Jack Tinberg
Thank you so much for this post. I have been finding it difficult to get all this information from one place! Planning my trip now and thank you for saving me a ton of time and $$$$.
brooke brisbine
Jack TinbergThanks for reading, Jack, I’m so glad to hear you found this post helpful 🙂
Happy trails!
xx bb
Alan
Hey Brooke,
So thinking of a last minute solo trip soon, late June.
I haven’t done solo hiking or camping before so worried about the weight and competency with the tent gear.
I am happy to pick up food at refuges to remove that weight. Do you believe it is possible to not bring the mattress pad. Just bring tent, sleeping bag and maybe a light pillow?
Thanks,
Alan
brooke brisbine
AlanHi Alan, I hope you made it out onto the trail for your solo trip this summer! Did you end up camping? I hope you did indeed bring a mattress pad, as I would absolutely never EVER recommend backpacking without one– they aren’t very heavy and you would have an atrocious sleep. I’m sure you figured out the perfect system 🙂
Happy trails!
xx bb
Pablo Fernandez
One of the best guides online. Cheers!
brooke brisbine
Pablo FernandezThanks so much for reading & for your kind words, Pablo! Hope you had a fantastic time on the trail 🙂
xx bb
Michaela
I found the info very useful as I´m planning this tour (solo hike and camping like you) this August. Thanks for sharing!:)
brooke brisbine
MichaelaHi Michaela, so glad you found the information helpful!
Happy trails 🙂
xx bb
Dani
MichaelaMe too! Hehe also this August, see you there!
Thanks for info! I will try to carry 6 kg backpack with tent
Yu
Hi Brooke,
I’m from Taiwan:)
Thanks for this article, it is very helpful.
I plan to hike TMB solo in Jun this year, and I am wondering if it is safe.
If I hike along the main trail, Is there clearly marked on the road?
In your experience, how risky is it if I fully prepared? Thanks.
brooke brisbine
YuHi Yu, thanks for reading!
The TMB was my first solo backpacking trip and I found it to be absolutely excellent– safe, well-marked, trafficked enough that you’re not alone for too long, frequently punctuated by shops/restaurants in small towns, intermittently connected to transport… If you’re prepared for the physical challenge, then you could hardly find a better solo hike!
Hope that helps and happy trails!
xx bb
LM
Some spectacular photographs of spectacular scenery. Thanks for information on pricing. I am such a novice at touring possibilities I get a bit stuck on simple unimportant stuff. Example, do gas canisters in France have compatible fittings for gas stoves we buy here in Scottish camping shops? Thanks again for info.
Regards
LM
brooke brisbine
LMHi Lee, thanks for reading, glad you enjoyed my early attempts at photography 🙂
I had no issue finding compatible gas canisters; Chamonix draws hikers from all over the world, so it’s not hard to source outdoor essentials to fit any set-up. I don’t know if Scotland has a super unique fitting, but I suspect you’d be fine!
Hope that helps and happy trails!
xx bb
Jonathan
hello,
thank you for this article very helpful. When you planned your campsites did you have to reserve them, or did you just show up the day of and pay?
brooke brisbine
JonathanHi Jonathon,
Back in 2017, I just showed up for the campsites with no bookings whatsoever (I don’t think reservations were even possible at that time), but I can’t comment on whether this is still true in 2023.
If anyone else reading this has recently hiked the TMB, we’d greatly appreciate your feedback!
xx bb
Jonathan Lloyd
Hello/Bonjour,
Your guide has been the most helpful of any on the internet thus far! Thank you.
I would like to ask, how far in advance did you book on trail reservations (gite, refuge, or campsite)? A lot of guides recommend booking 6-9 months in advance. I like being flexible and hiking 25-30km days… Thoughts or recommendations on reservations?
Thank you! 🙂
brooke brisbine
Jonathan LloydHi Jonathon!
At the time I hiked the TMB, there were no reservations required at any of the campsites, so my itinerary was 100% flexible. This may not be the case for camping anymore, I’m not sure, but definitely if you plan to stay in refugios, you really should book in advance. As a solo person, I’d say you have a good shot at snagging a last-minute spot, and even the possibility of arriving day-of and getting a bed if someone cancels (this worked for me in the Dolomite huts!)– but it’s still recommended to have a tent as a backup.
Hope that helps a little!
xx bb
Derek
Good’ay Aussie, great to have your expert advice.
Brooke , I have followed your advice and purchased the guide book you recommended.
I walked the Larapinta Trail out of Alice Springs in June 2022 and found it very tough (at 70) doing more than 12 kms a day. So I thought I would walk around Mont Blanc in twice the time.
My idea was to luxuriate in a Chalet with good wine and food every second night and to spend the intervening evening at altitude in the mountains in a tent. I am used to camping in the Snowy Mts in winter. I have bought a hyperlite back and am having a special (under 1kg dyneema tent) made for me in Japan.
Big question, walking in June before the crowds, would I be allowed to do it? (camp in the mountains outside the normal camping areas). What do you think from your experience?
brooke brisbine
DerekHi Derek,
I think that sounds like a wonderful adventure perfectly balanced with comforts, which the TMB certainly lends itself to. Throughout much of France and Italy, I found it easy enough to wild camp– sometimes in plain view, other times farther from the trail and rifiguios– but this is technically forbidden in Switzerland, so you’ll be confined to the (well-appointed) campsites here. If these aren’t open, I think wild camping would be unobjectionable, so either way, this should be very doable.
Happy trails to you!
xx bb
Wendy
Hello Brooke,
I have read through this vlog several times hoping I trek the TMB next month (travel restrictions…). I eat vegan and wondering if food will be difficult to purchase in the shops along the way. I don’t eat bread or cheese which I have read is a huge staple.
I will be tenting as well and wondering if there is anything you would change regarding your route if you were to do it again. I will be using yours as a guideline due to time.
Thank you for sharing such a fabulous informative vlog.
Cheers
Wendy
brooke brisbine
WendyHi Wendy,
I am SO sorry for the slow reply to your comment– maybe you can share if you were able to find anything vegan-friendly along the route, as others may have a similar question?
Hope you had a wonderful experience on this trail!
xx bb
Y
Hello, when you were camping — did you ever worry about your belongings in the tent especially when you’re away (e.g going for a shower)? How did you deal with that?
Thanks!
brooke brisbine
YAs you are, I was a little wary prior to undertaking the trek alone, but it ended up feeling incredibly safe to leave things in the tent while I went to shower or find cheese nearby. I’d imagine you’ll feel the same, but if not, it’s easy enough to bring any real valuables (camera, etc) with you.
Hopefully you have as wonderful an experience as I did!
Ben
Thanks for the website help lot more hikes plans for me.
brooke brisbine
BenHi Ben, so glad to hear it!
Happy trails 🙂
-Brooke
Aga
Hi Brooke,
Thanks for this article, so many helpful tips!
Did you leave your things and backpack in the tent in the evenings? I wonder how safe it would be to leave it for a while and for example go for a dinner or a walk in the evening.
Thanks!
brooke brisbine
AgaHi Aga, so glad you found this post helpful!
I never had any issues leaving my stuff in the tent– whether you’re wild camping or staying at a designated site, the TMB is (generally speaking) incredibly safe.
Happy trails!
-Brooke
Kristen
brooke brisbineHi Brooke,
Thank you so much for this great article! I see you stated that you recommend hiking boots with ankle support, do you always hike in hiking boots? I am not an avid hiker but the few I have done, West Highland Way, Inca Trail, and local hikes, I have done in running sneakers. I have been debating the need for hiking boots for this hike and cannot get a true feel if they are necessary or not. I like sneakers since I feel like they are more comfortable and you don’t get blisters which is important for such high mileage days however everything I have read for this hike say hiking boots. Thank you so much for your helpful tips!
brooke brisbine
KristenHi Kristen,
This is such a personal choice! I’d never go on an overnight hike without boots, but that’s because I have terrible ankles and really need the support. I know plenty of others (like you) would PREFER to hike in shoes, even on a multi-day trek… as crazy as it sounds to me 🙂
For the TMB, I’d REALLY encourage boots because of the rough, rocky terrain and steep ascents/descents (especially if you do the high variants, which often descend over scree fields)– but I actually saw a man doing it in Teva sandals, so clearly it’s a matter of preference. People also run this trail (not the high variants, though) as part of an Ultra, so they’d be in shoes as well.
I have also done the Inca Trail, and the real difference is the weight you’re carrying, the distances you’re walking, and the rugged trail conditions on this trek, which far outweigh the demands of the 4-day Inca Trail.
The best compromise in my eyes would be bringing both shoes and hiking boots. My parents are avid mountaineers and this is what they do– they wear shoes on flatter, less demanding days when they want to maximise comfort (and also when they’re just walking around the campsite) and then wear boots on the more demanding days. This requires some additional pack weight, but if you’d be bringing camp shoes anyway (I usually bring Birkenstocks), then it’s not an enormous jump to bring a light pair of runners.
I really hope that helps!
-Brooke
Jamie
Hi Brooke!
I was originally planning to hike TMB with a friend at the end of july/beginning of august. Unfortunately plans have changed and my friend is no longer able to come with. I’m pretty confident with solo travelling via hotels, but I’m not sure how confident I am to solo travel on a thru hike with camping only. Your page is helping me feel way more confident about doing this solo! How did you find the trail as a solo female hiker? You mentioned it being safe and that’s what I have read in multiple places. Were there any times you felt concerned about your safety? How were the people? Did you feel like there was always someone near you to help you out in case you got lost or were confused about something? Thank you so much in advance!
brooke brisbine
JamieHi Jamie,
I was actually in the exact same situation! I had planned to do the TMB with a friend, she backed out at the last minute, and I was really nervous about doing it alone– it was my first solo trek, I had to carry a 2-man tent and all the cooking gear by myself, and I’m not a great navigator. In the end, I just went for it, and it ended up being one of the best experiences of my life.
As you’ve read here and in other places, the hike is completely safe and I never once felt uncomfortable. The TMB is very popular, so you’ll never go more than a few hours without passing someone who can help if needed. The people on the trail were amazingly friendly (hikers are always the best kind of people!), and I made some really lovely friends that I hiked with for one or two days as our itineraries overlapped. Every day or second day at most, you will pass through a small town, so there are also plenty of points where you can take a rest day if needed or restock supplies.
Thankfully, the trail is super easy to follow. There are signs and markers everywhere and the main guidebook is really all you need, I didn’t even bring a map or GPS and was fine.
I would highly recommend camping, as it will give you the most freedom in terms of how far you go each day. This is great for a solo hiker because you might make friends and want to camp with them at a closer spot than you originally planned or you might be alone and want to keep trekking until 7pm because, well, why set up camp early if you’re alone?
I think if you can do it with a friend, you can do it by yourself, and you might just find that it’s far more rewarding that way 🙂
Happy trails, and feel free to ask any other questions you might have before July!
-Brooke
Hes
JamieHi Jamie did you/ are you still planning to do your trip?
Jamie
HesI wish! Brooke had great information and I was really excited to do it by myself however like most things these days. I had to cancel it because of the pandemic….I read that the trail has been really nice with the lack of people so I would have loved to still go, but I’m living in Korea and if we leave the country…we are legally obligated to do a 14 day quarantine upon return…not enough vacation days for that unfortunately. I hope to reschedule it for next summer if things start looking up!
Gosia
Hi Brooke! Thank you for your post 🙂
I was just wondering if you could give me a rough estimate of how much the total trek cost you (excluding your flights and travel expenses to reach the starting point)- but things like accommodations during and cost for food?
Thanks!
Gosia
brooke brisbine
GosiaHi Gosia,
I personally spent 90€ on accomodation for the entire trek, and that’s including one night where I paid 40€ for a B&B in Courmayeur, so it could have been much cheaper. All other nights were camping along the trail!
In terms of food, I had 2x mountain meals each day on the trail, so that’s about $25AUD each day + maybe $5 in snacks. I’m not sure where you’re based, but this is my favourite mountain food: http://packitgourmet.com
Hope that gives you an idea 🙂
-Brooke
Jen
I feel much confident now. Thank you and enjoy your new adventure !
Jen
Hi Brooke,
I’m so glad to find so much helpful info from your blog. I’m planning to hike solo for the first time in June. My main concern is about the trail. Were the trails clearly marked? Would I be able to tell which way to take especially when there’s no one around to ask on the entire TMB loop?
Thanks,
Jen
brooke brisbine
JenHi Jen, it’s great to hear that you found this post helpful!
I was worried about the same thing before my trek, especially since I am a really poor navigator… Thankfully, the trail is INSANELY well marked, with signs at just about every junction listing KMs and time to the next waypoint. I’d recommend having the guidebook pages with you, but you don’t need a separate map or GPS. Also, there are usually people to ask, it’s a popular trail 🙂
Hope that helps; happy trails!
-Brooke
José
Amazing thanks for sharing!!
brooke brisbine
JoséThanks for the comment & happy trails! 🙂
Bradley
Hi Brooke,
Fellow Sydney resident here!
Just wanted to say thank you for this awesome write up, it has really provided me with some invaluable insight into how I should approach the trip 🙂
I plan to hike the TMB early July next year, but considering I’m fairly new to hiking and have never done a solo hike in my life, I’m a bit concerned about the overall difficulty. Would you suggest I hold off attempting the hike until I have some more experience in this kind of thing?
I would very much like to mirror your approach to the hike, and suspect I will end up following your itinerary as closely as possible once I’m over there.
Thanks heaps, Brooke!
Brad.
brooke brisbine
BradleyHi Brad, so happy to hear you found these posts helpful and that you are planning to hike the TMB! It is truly incredible.
This was also my first ever solo hike and I’d definitely recommend it to you as the perfect introduction to hiking alone. It is a physically strenuous hike, sure, but the navigational demands are really minor, there are plenty of other people on the trail, lots of well-appointed campgrounds, and near-daily opportunities to pass through a town or take a rest day as needed. If you are confident in your ability to carry a heavy pack and make the long ascents, I wouldn’t worry about the rest!
Definitely let me know if you have any other questions about the TMB, I’m more than happy to share further details of my experience and just general trekking advice, having since done a lot more 5-10 day hikes around the world.
Happy trails!
-Brooke
Clare
BradleyBrad — TMB will be my 3rd solo hike. I recommend the Laugavegur Trail in Iceland (50 miles with the extra day to the coastal waterfall) and the northernmost 70 miles of the Kungsleden in Switzerland, each is 5 days.
Brooke — Thanks for this! I feel much more confident about my solo trip (which has been postponed for 2 years).
brooke brisbine
ClareThanks for reading and happy trails, Clare! Crossing my fingers that this will be your year 🙂
Yannick
Hi Brooke,
Thank you for sharing your experience. It sounds amazing.
Did you have to prebook the camp spots? or did you just show up and pay as your entered?
Kind regards.
brooke brisbine
YannickHi Yannick,
Apologies for the late reply, I’m travelling in South America at the moment and I haven’t had very reliable internet!
As for the campgrounds, no, you absolutely don’t need to book anything in advance. I didn’t have any trouble getting a spot and I think it’s very unlikely they would turn you away even if they were fairly crowded. Worst case, you can wild camp, but I sincerely doubt it will come to that. The campsites are large and there are often several options within a few kms.
Hope this helps and have a wonderful hike, the TMB is amazing!
-Brooke
Yannick
Hi Brooke, I love your website- it is really helpful!
Could I please ask if you had to book the campsites? or did you just show up at the campsite and request a place to stay?
Kind regards,
Geert
Thanks for all the info, I loved reading about your adventure.
Do you know what your total base weight was of your pack without water etc? Thanks!:)
brooke brisbine
GeertHi Geert, thank you for the kind words!
My TMB weight: 15kg total
base weight (bag and camping gear) 6kg
+ food 2.5kg
+ clothes, toiletries, electronics (camera, etc) 5kg
+ water 1.5kg
Hope this helps 🙂
-Brooke
Elliot
Thanks, this website has wonderful info. We will be doing the TMB in a couple of weeks. Do you think a jetboil is something that is necessary to bring? We were thinking of just buying food at convenience stores along the route. Are there enough of those that you won’t need to bring any freeze-dried meals?
brooke brisbine
ElliotThanks, Elliot!
Well, you have a few options for food along the TMB. The first is that you can buy hot meals at mountain huts (or restaurants when you pass through town), the second is that you can cook all of your own food, but the best option, in my opinion, is a combination of both! Food in the mountain huts can be really expensive (about 25€ per dinner), so it will really blow your budget out. Plus, there are a number of campsites that aren’t right next to a mountain hut or in a town, which will make it pretty challenging to get food (this is assuming you’re camping??).
When I hiked the TMB, I cooked but supplemented my dehydrated mountain meals with bread and cheese bought along the way. I even enjoyed an incredible pizza for dinner when I passed through Courmayeur!
Hope this answers your question– and have a wonderful time on the TMB, it really is amazing!
-Brooke