• start here
  • about
  • group trips
  • brooke beyond

  • hiking guides
  • outdoor gear
    • hiking boots
    • hiking backpacks
    • cold-weather layers
    • backpacking tent
    • outdoor sleep system
    • backcountry food
    • day-hike packing list
    • hut-to-hut packing list
    • via ferrata packing list
    • backpacking packing list
    • mountaineering packing list

brooke beyond

Ecuador / Latin America

Ruta de las Cascadas: biking the Waterfall Route in Baños, Ecuador

29 March 2020

Last Updated on 5 June 2022

Situated in the misty foothills of Volcán Tungurahua, the jungle air thick with a palpable, infectious energy as countless cascadas drum out a beat amongst the trees, Baños is THE place to go for outdoor activities in Ecuador. Amazingly, its high adrenaline offerings are every bit as spectacular as the setting.

Perfectly blending Baños’ lush water-rich scenery with an adventurous DIY excursion through the mountains, cycling the Waterfall Route should be at the very top of your list while in Ecuador’s adventure capital. This post contains everything you need to know about setting off to visit Baños’ best waterfalls, ziplining over the trees, and finding beautiful swimming spots along the way, all without the need for a tour or guide.

Read more about Baños: 9 AMAZING THINGS TO DO IN BAÑOS: A GUIDE TO ECUADOR’S ADVENTURE CAPITAL

What's in this guide

Toggle
  • About the Waterfall Route
  • Practical information
    • What it costs
    • Hiring a bike
    • What to pack
  • *Overview: the Waterfall Route
  • Cascada de Agoyán
  • Cascada Manto de la Novia
  • Paílón del Diablo
  • Cascada Rocío Machay

About the Waterfall Route

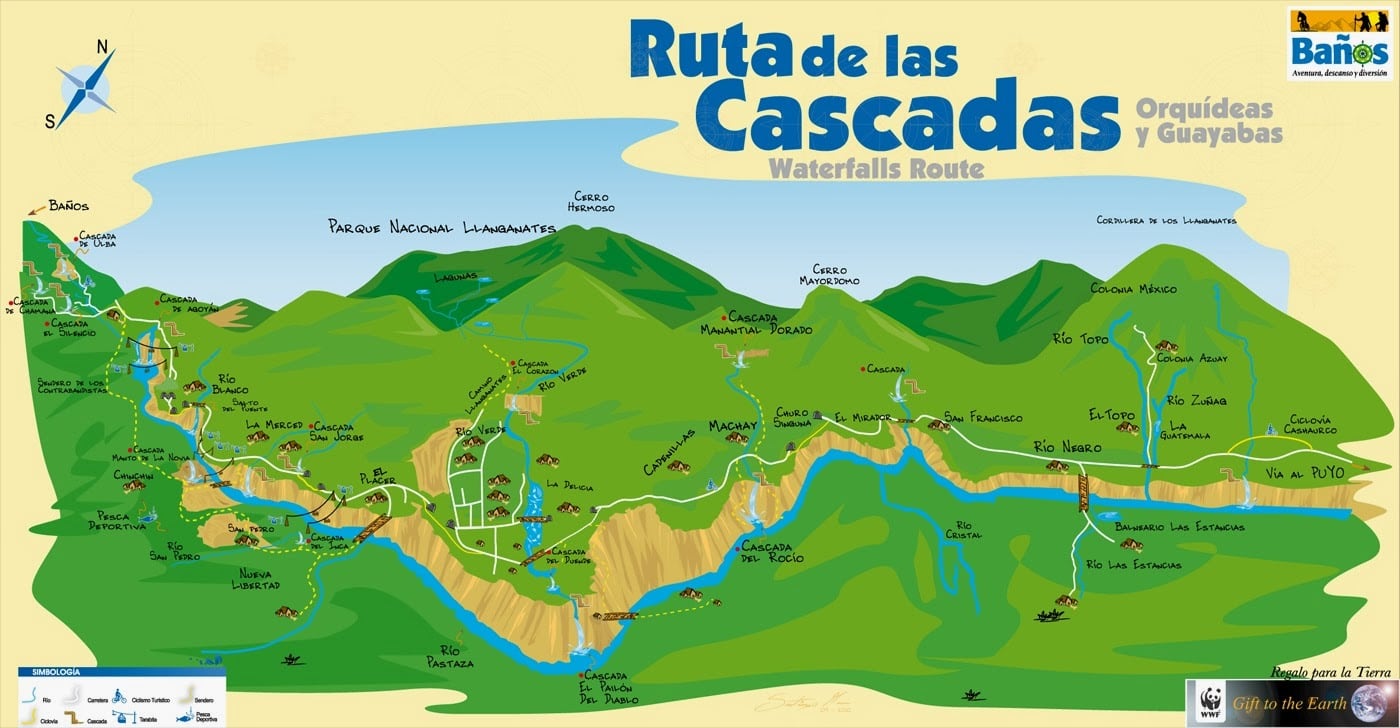
The Waterfall Route, or the Ruta de las Cascadas, is a 25km cycle route from Baños towards the town of Puyo, taking in countless waterfalls, ziplines, cable cars, swings, and even a bungy jump along the way. Although the route technically follows the entire 61km highway, only the first half is realistically cycled in a day (and it’s the highlights, anyway), so that’s what I’ll cover in this post.

As mentioned, most of the Waterfall Route does follow the highway, making for reasonably easy way-finding and delightfully manageable terrain, but necessitating some road-sharing with cars. Another bonus is that the road is almost exclusively downhill from Baños, so this trip really is suited to cyclists of any fitness level. Once at your final destination, whether it’s the popular end-point at Paílón del Diablo or my recommended finale at Cascada Rocío Machay, there are frequent shuttles that will return you and your bike back to Baños for just $2USD.

Map of Waterfall Route biking path Baños Ecuador
[photo from Baños Tourism]

Practical information

What it costs

  • Bike hire (full day): $10USD
  • Ziplines/swings/cable cars: $10-20USD each
  • Entry to El Paílón del Diablo: $1.50USD
  • Lunch (incredible carne asada at El Paílón del Diablo): $7USD
  • Shuttle back to Baños: $2USD

Hiring a bike

Given the popularity of the Waterfall Route, every tour agency in the entire town, and even some of the hostels, will be hiring bikes to eager travellers. I paid $10USD for my bike from GeoTours Ecuador (Calle Ambato right in the centre of Baños), and this seems to be a pretty standard rate for a full day of hire.

Make sure you get a helmet and definitely check the bike before leaving town, as you’ll want excellent brakes for this ride. As previously mentioned, you’ll be able to catch a shuttle back to Baños from Paílón del Diablo or Cascada Rocío Machay ($2) at the end of the day, and this doesn’t need to be reserved in advance.

What to pack

  • Sunnies + hat
  • Sunscreen
  • Rain jacket
  • Swimmers + towel
  • Runners
  • Water bottle
  • Camera, best in a waterproof case
  • Money for lunch & activities (see What it costs above)
Friends in bike helmet at waterfall Baños Ecuador

Biking the Ruta de las Cascadas with new friends

*Overview: the Waterfall Route

The Waterfall Route from Baños is seriously such a spectacular excursion that I’d recommend dedicating a full day to explore properly. Make an early start so you have plenty of time to stop off at each waterfall, partake in some of the crazy adventure activities, and just generally gawk at the breathtaking scenery without having to check your watch. We set out at 9am and made it back around 6pm, a seriously full day, but I wouldn’t have wanted any less time than that!

Although a majority of people only cycle 18km from Baños to the Paílón del Diablo, the most impressive waterfall on the route, I’d encourage you to finish off at Cascada Rocío Machay instead (if time allows), since it’s the best place to actually have a swim. Depending on the humidity and how much sweat/grime you’ve accumulated over 20km+ on a bike, this may not only be a luxury, but also something of a necessity.

Cascada de Agoyán waterfall Baños

Cascada de Agoyán

Cascada de Agoyán

Heading east from Baños along the main highway, the road quickly becomes a real downhill thrill-ride, zipping along next to cars and zooming through an eerie tunnel cut into the mountainside. With the help of momentum, it doesn’t take long (about 25min) to reach the first stop of the day, thundering Cascada de Agoyán.

From this stop, you’ve got excellent views across the valley to the double waterfall spewing out of the verdant mountains, plus a selection of interesting activities. I personally did the flying fox zipline, which offered an amazing aerial view of the cascada and Rio Pastaza below. It wasn’t the most adrenaline-pumping zipline I’ve ever done, but for just $10USD, it was extremely worthwhile. You can choose to return via a second zipline or in a little cable car, and I chose the later so I could enjoy a bit more of the scenery, which really was incredible.

Ziplining over jungle in Baños
Ziplining in Baños
Girl smiling in cable car Baños Ecuador
Returning from the zipline at Cascada de Agoyán
Ziplining over jungle in Baños
Ziplining in Baños

Cable car in front of waterfall Baños Ecuador
Cascada de Agoyán

People ziplining over Cascada Manto de la Novia waterfall Baños

Ziplining over Cascada Manto de la Novia

Cascada Manto de la Novia

Continuing on the bikes for about 15min, you’ll come to Cascada Manto de la Novia, or Bridal Veil Falls (which seems to be an incredibly popular name for waterfalls worldwide, as I can think of at least several others in Aus, NZ, Canada, and the US). This is another gorgeous cascada spilling over the lush mountainside and into the Rio Pastaza, and there are even more activities around this bustling roadside viewpoint.

The best way to experience Cascada Manto de la Novia is by taking the little cable car across the gorge ($1) and then walking down to a viewing platform nearer to the falls, but there is also a large swing, another flying fox zipline (with multiple lines running parallel), and what appears to be a human catapult.

Girl smiling at Cascada Manto de la Novia waterfall Baños Ecuador
Cascada Manto de la Novia on the Waterfall Route
Cascada Manto de la Novia waterfall Baños Ecuador
Cascada Manto de la Novia

Paílón del Diablo waterfall Baños Ecuador

Devil’s Cauldron Waterfall

Paílón del Diablo

From Cascada Manto de la Novia, it’s a further 25min onwards to what most consider to be the main event, the spectacular Paílón del Diablo, or Devil’s Cauldron. There’s an impressive network of paths and viewing platforms surrounding the falls, so this is sure to be a much longer stop than the previous two if you want to properly explore (and I’d highly recommend you do!). After paying the $1.50 admission fee, you can cross the suspension bridge and descend to varying platforms to view the falls. It’s a pretty fair walk, all said and done.

One of my absolute favourite experiences was the Grieta al Cielo, or Crack to Heaven, a narrow tunnel through the rocks that leads you directly below the thundering falls. At times, you have to literally crawl through tight passageways and even squirm through a cave, and once you come out under the cascada, expect to be fully saturated— but it’s amazingly fun and such a unique view of the famous falls.

After exploring Paílón del Diablo, grab some lunch from one of the many restaurants surrounding the complex. There are some nice bars where you can enjoy a beer overlooking the mountains and a number of traditional restaurants serving up insanely good food, grilled fresh right in front of you. As we were walking by, one of the ladies handed us a bite of whatever she was currently searing up, and it was so unbelievably good that I just ordered it without any further questions. It ended up being one of the best meals I’ve ever had in Latin America.

Paílón del Diablo waterfall Baños Ecuador
Cascada el Paílón del Diablo
Couple in front of Paílón del Diablo waterfall Baños Ecuador
Cascada el Paílón del Diablo

Friends at Paílón del Diablo waterfall Baños Ecuador
Saturated in the Grieta al Cielo
Paílón del Diablo waterfall Baños Ecuador
Cascada el Paílón del Diablo
Girl at Paílón del Diablo waterfall Baños Ecuador
Under the flow of the Devil’s Cauldron

Girl in bikini swimming in Cascada Machay waterfall Baños

Cascada Machay

Cascada Rocío Machay

Most people seem to wrap up their day at El Paílón del Diablo, but less than 15min down the road is Cascada Rocío Machay (also called Cascada del Rocío or just Cascada Machay on some maps), one of the only places to swim along the route and probably my favourite stop because there were practically no other people.

There’s a rack to lock your bikes up just off the road and then there’s a 15min or so walk down to the waterfall along wooden stairs and swing bridges. For the best swimming spots, walk out towards the river and you’ll find some deeper pools where you aren’t constantly at risk of being sucked over the edge by the current.

It’s slightly slower climbing back up to the bikes thanks to the steep hillside, but it’s certainly worth the effort. You can typically catch a shuttle back to Baños right from here, but in the event that there’s not a lot of other people or it’s getting a bit late, there’s always the option to cycle back to El Paílón del Diablo, where 10x as many shuttles seem to be operating, thanks to the crowds.

Girl in bikini swimming in Cascada Machay waterfall Baños
Cascada Rocío Machay
Cascada Machay waterfall Baños
Cascada Machay

Girl in bikini swimming in Cascada Machay waterfall Baños
Wading through Cascada Machay

Man walking on bridge in front of waterfall Baños Ecuador

Walking to Cascada Machay

Read more about Ecuador

9 AMAZING THINGS TO DO IN BAÑOS: A GUIDE TO ECUADOR’S ADVENTURE CAPITAL

WHAT TO DO IN QUITO: 12 AWESOME THINGS TO DO IN ECUADOR’S CAPITAL

ABSOLUTELY EVERYTHING YOU NEED TO KNOW ABOUT A LAND-BASED TRIP TO THE GALÁPAGOS (WITHOUT A CRUISE)

GALÁPAGOS PACKING LIST: WHAT TO PACK FOR A LAND-BASED TRIP

THE BEST PLACE TO SCUBA DIVE WITH MANTA RAY IN ECUADOR: BAJO COPE, AYANGUE

THE PERFECT 2-3 WEEK GALÁPAGOS & MAINLAND ECUADOR TRAVEL ITINERARY

THE ULTIMATE ECUADOR TRAVEL GUIDE

TAGS:travel guides
4 Comments
Share
brooke beyond

Hey, I'm Brooke and I'm obsessed with getting off the beaten path, exploring backcountry gems & travelling beyond the ordinary! I left Australia 5 years ago after finishing a PhD in Biomechanics & have been travelling the world full-time ever since (joined by my life/climbing partner, James). Whether it’s road-tripping through Mexico, climbing alpine peaks in the Andes, scuba diving in the Red Sea, or tackling epic via ferrata in the Dolomites, I hope this blog will inspire your future adventures & help you find wonder in every corner of the globe. xx bb

Leave a Comment Cancel Comment

The Comments

  • Doris Murguia
    28 July 2021

    I will be traveling in October 2021 and interested in going by bike to the waterfall route. Do they have a safe place to leave the bike while you go zip lining? or other activities?
    thank you for sharing.

    Reply
    • brooke brisbine
      Doris Murguia
      28 July 2021

      Hi Doris,

      Many of the stops have actual bike racks, since cycling is such a common way to experience this part of Baños, but from memory there are a couple viewpoints/activities that don’t have designated racks, and here you can just lay or rest your bike in a safe place. No problems at all finding somewhere to leave it while you’re out exploring!

      Safe travels and enjoy Ecuador!
      -Brooke

      Reply
  • Kenan Dudley
    1 June 2021

    Thanks for this post!

    This is by far the most informative piece I have read on the subject, while there are loads of blogs that have written about the bike route, this is the only one with accurate information – especially pointing out that special waterfall past the Diablo.

    Really appreciate you taking the time to write the piece properly!

    Reply
    • brooke brisbine
      Kenan Dudley
      21 July 2021

      So glad to hear you found this post helpful, Kenan, and thank you for the wonderful comment!

      I absolutely loved this bike ride, hopefully you find just as much adventure along the way as I did 🙂

      Reply

You May Also Like

18 January 2024

Pico de Orizaba climbing guide: summiting Mexico’s highest peak

26 April 2025

Complete Fitz Roy Trek packing list: what to pack for hiking in El Chaltén, Patagonia

12 December 2021

Vanlife Baja & Mexico: How to get the best Mexican auto insurance for a converted van or camper

hi, I’m brooke!

I'm obsessed with getting off the beaten path, exploring backcountry gems & travelling beyond the ordinary! I left Australia 5 years ago after finishing a PhD in Biomechanics & have been travelling the world full-time ever since (now joined by my life/climbing partner, James). I hope this blog will inspire your future adventures & help you find wonder in every corner of the globe. xx bb

read my story
currently exploring

currently exploring

mexico

read our gear guides

🥾 hiking boots

🎒 hiking backpacks

🌨️ cold-weather layers

⛺️ backpacking & alpine tents

🛌 sleeping bag & pads

🍪 backcountry food

📸 travel camera gear

✈️ travel clothing

trail guides

summit guides

itineraries

outdoor gear

GPS maps

recent posts

  • Climbing Iztaccíhuatl volcano

    2-week Mexico volcanoes itinerary: climbing Pico de Orizaba, Izta, Malinche & Toluca

    3 June 2025
  • Mexico City: the perfect 5-day itinerary for CDMX

    31 May 2025
  • Climbing Iztaccíhuatl volcano

    Driving in Mexico: essential road trip guide for foreigners

    28 May 2025
  • 10-day Rwanda road trip itinerary: gorillas, volcanoes & Lake Kivu

    25 May 2025
  • 2-week Patagonia itinerary: best of Torres del Paine & Los Glaciares/El Chaltén

    22 May 2025

@brookebeyond_
brooke ✨travel & mountain gal

@brookebeyond_

  • We took our own engagement photos in the Swiss Alps this summer and here’s how it went 👉🏼

(#8 might just be my personal fave 😂)

ALSO this post is for anyone who’s gotten the (woefully mistaken) impression that I am “naturally photogenic”
  • absolutely one of the most amazing little hikes we did in Switzerlnad this summer (& the competition was stiff) 🤩🏔️🌞🌸

📍Saxer Lücke

GETTING THERE: catch the Frümsen gondola to Staubernkanzel

HIKE: 1hr (2.5km, 250m gain) to this amazing viewpoint

WHEN TO GO: the best lighting is in the afternoon, these photos were taken around 4pm and it just kept getting better!
.
.
.
.
.
#swissalps #switzerland #saxerlücke #swisssummer #alpstein
  • the BEST easy hike in Zermatt 🏔️🥾✨

For spectacular views of the Matterhorn, the enormous Monte Rosa massif, and the Gorner Glacier (as well as 29 peaks over 4,000m!), there’s no better EASY hike than Riffelberg to Gornergrat, accessible via the Gornergrat Railway in Zermatt. 

The hike only takes about 2hrs at a leisurely pace (I did it 7 weeks after knee surgery!), so it’s suitable for families and non-hikers with even a basic level of fitness 🏃🏻‍♀️

🇨🇭 START FROM ZERMATT
- purchase tickets (day-of is fine) from Gornergrat Railway, right across from Zermatt train station

🚞 GORNERGRAT RAILWAY
- tickets from Zermatt to Riffelberg cost 42CHF ($50USD)— there’s no discount for return, so keep it flexible by purchasing one-way
- the train takes the about 25min, sit on the right side for best views!
- when you finish the hike at Gornergrat, buy a one-way ticket back to Zermatt for 66CHF ($80USD)
- save 50% on tickets with the Swiss Half Fare Card— the pass costs 120CHF ($150USD) and lasts for a whole month, it’s almost always worth it!) 

🥾 HIKE DETAILS: RIFFELSEE TO GORNERGRAT
- the route is 5km with 560m elevation gain (entirely uphill)
- the best views of the Matterhorn are around Riffelsee, where several small lakes offer perfect reflections
- near Rotenboden (the train station in between Riffelberg & Gornergrat), there are excellent rocky viewpoints of both Matterhorn and Monta Rosa— it’s easy to find quiet views if you hike around a bit!
- as you get closer to Gornergrat, Monte Rosa and the Gorner Glacier are right in your face
- almost everyone does this hike in reverse (Gornergrat to Riffelberg), I just personally hate hiking downhill— but you can swap if you’d rather descend the entire way!
  • 2 months after knee surgery and barely a week after I stopped walking with a knee brace and cane, I was honestly so proud to be able to do this (objectively very easy) 5km hike with 250m gain— it may not seem like much, but for me, this was a HUGE step forward 🥹

📍 Saxer Lücke, Switzerland 

it’s been an extremely challenging recovery, both physically and mentally… but the milestone moments always fill me with hope that things are indeed getting better ❤️‍🩹

special shoutout to my fiancé/hiking partner/personal cheering squad @slatojc for slowing down with me on the trail and always offering a hand down slippery rocks before I even have to ask
  • it’s another “if it wasn’t so stupid beautiful, I’d never set foot in this country again because it’s bleeding me dry” kinda summer 🇨🇭🌸☀️🏔️🦋✨

(hands up if you feel personally victimised by Swiss prices but you can’t stay away because MOUNTAINS 😭😭)
  • magical summer sunsets in Switzerland ✨
.
.
.
.
#swissalps #stoosridge #swisssummer #sunset
  • BEST EASY HIKES IN SWITZERLAND 🇨🇭❤️‍🩹

just 2 months after knee surgery, I found myself travelling through Switzerland— in search of easy hikes that were actually accessible post-op 🩼 

luckily, there’s hardly a better place in the world for easy hiking than the Swiss Alps!!

so whether you’re recovering from an injury, hiking with older parents/young children, or just a non-hiker who loves an epic view, this short list of HIGH VALUE viewpoints & hikes offer the most spectacular mountain scenery with minimal challenge

💸 BUDGET TIP: buy the Swiss Half Fare Card to save 50% all these gondolas and trains, which can seriously add up!!

- Stoos Ridge: take the Stoosbahn to the little village of Stoos + walk about 15min to the chairlift that can take you all the way up to Fronalpstock— you can walk as little or as much as you want up here, the views are amazing right away
- Riffelsee: take the Gornergrat Railway from Zermatt to Riffelsee + hike 20min to the 2 beautiful alpine lakes (then either hike 1hr up to Gornergrat or catch the train)
- Saxer Lücke: catch a gondola + hike 1hr (2.5km, 250m gain) to this amazing viewpoint— hardest on this list and not suitable for those with extremely limited mobility 
- Kleine Scheidegg: take the train or the gondola from Grindelwald + hike about 20min uphill to the lake
- Jungfraujoch: from Kleine Scheidegg, take the gondola to Jungfraujoch + walk around the viewing platforms
- Trockener Steg: take the gondola from Zermatt + walk 10min from the top of the cable car to the lake for incredible Matterhorn views
- Oeschinensee: 20min walk from the top of the Kandersteg cable car to the lake (bus also available), then you can walk as little or as much as you want around the lake or on the famous Panorama Trail
.
.
.
.
.
#easyhikes #swissalps #matterhorn #jungfraujoch #oeschinensee #stoos #switzerland
  • This is my 2nd summer back in Zermatt to climb the Matterhorn— and my 2nd summer NOT climbing the Matterhorn 😑

In 2023, a wicked snow storm blew through the night before my planned ascent and grounded all climbing parties… and then I had knee surgery less than 2 months before our repeat trip to Zermatt this year. I won’t lie, it’s been extremely disappointing to spend nearly 2 weeks in one of the most expensive places in the world, and STILL not do the thing I came here to do 😅

But alas, here we are in Zermatt again! (and apparently not for the last time)

Even though we are slowly going bankrupt, it’s a gorgeous place to be in the summer with no shortage of amazing trails!

Can’t wait to share some of what we’ve been up to— my first little hikes since surgery 🤩
  • we’ve spent the last several weeks in Switzerland and, in many ways, I couldn’t have chosen a better destination for post-knee-surgery recovery— where else in the world can you get views like THIS with 1hr of easy hiking?!

I’m not sure I’ll ever truly prefer the accessibility of the Alps to true backcountry… but there’s no denying that I couldn’t be outside any other way right now and it’s given me a whole new appreciation for the hundreds of gondolas, funiculars, and trains that connect non-hikers or mobility-impaired enthusiasts like myself to otherwise unreachable heights!

I’m enormously grateful for the opportunity to rehab my knee under legendary peaks rather than fluorescent indoor lights, so THANK YOU Switzerland 😍
follow @brookebeyond_

travel beyond the ordinary

Explore my travel guides, custom itineraries & blog posts with an interactive world map ✨

all destinations

  • We took our own engagement photos in the Swiss Alps this summer and here’s how it went 👉🏼

(#8 might just be my personal fave 😂)

ALSO this post is for anyone who’s gotten the (woefully mistaken) impression that I am “naturally photogenic”
  • absolutely one of the most amazing little hikes we did in Switzerlnad this summer (& the competition was stiff) 🤩🏔️🌞🌸

📍Saxer Lücke

GETTING THERE: catch the Frümsen gondola to Staubernkanzel

HIKE: 1hr (2.5km, 250m gain) to this amazing viewpoint

WHEN TO GO: the best lighting is in the afternoon, these photos were taken around 4pm and it just kept getting better!
.
.
.
.
.
#swissalps #switzerland #saxerlücke #swisssummer #alpstein
  • the BEST easy hike in Zermatt 🏔️🥾✨

For spectacular views of the Matterhorn, the enormous Monte Rosa massif, and the Gorner Glacier (as well as 29 peaks over 4,000m!), there’s no better EASY hike than Riffelberg to Gornergrat, accessible via the Gornergrat Railway in Zermatt. 

The hike only takes about 2hrs at a leisurely pace (I did it 7 weeks after knee surgery!), so it’s suitable for families and non-hikers with even a basic level of fitness 🏃🏻‍♀️

🇨🇭 START FROM ZERMATT
- purchase tickets (day-of is fine) from Gornergrat Railway, right across from Zermatt train station

🚞 GORNERGRAT RAILWAY
- tickets from Zermatt to Riffelberg cost 42CHF ($50USD)— there’s no discount for return, so keep it flexible by purchasing one-way
- the train takes the about 25min, sit on the right side for best views!
- when you finish the hike at Gornergrat, buy a one-way ticket back to Zermatt for 66CHF ($80USD)
- save 50% on tickets with the Swiss Half Fare Card— the pass costs 120CHF ($150USD) and lasts for a whole month, it’s almost always worth it!) 

🥾 HIKE DETAILS: RIFFELSEE TO GORNERGRAT
- the route is 5km with 560m elevation gain (entirely uphill)
- the best views of the Matterhorn are around Riffelsee, where several small lakes offer perfect reflections
- near Rotenboden (the train station in between Riffelberg & Gornergrat), there are excellent rocky viewpoints of both Matterhorn and Monta Rosa— it’s easy to find quiet views if you hike around a bit!
- as you get closer to Gornergrat, Monte Rosa and the Gorner Glacier are right in your face
- almost everyone does this hike in reverse (Gornergrat to Riffelberg), I just personally hate hiking downhill— but you can swap if you’d rather descend the entire way!
  • 2 months after knee surgery and barely a week after I stopped walking with a knee brace and cane, I was honestly so proud to be able to do this (objectively very easy) 5km hike with 250m gain— it may not seem like much, but for me, this was a HUGE step forward 🥹

📍 Saxer Lücke, Switzerland 

it’s been an extremely challenging recovery, both physically and mentally… but the milestone moments always fill me with hope that things are indeed getting better ❤️‍🩹

special shoutout to my fiancé/hiking partner/personal cheering squad @slatojc for slowing down with me on the trail and always offering a hand down slippery rocks before I even have to ask
  • it’s another “if it wasn’t so stupid beautiful, I’d never set foot in this country again because it’s bleeding me dry” kinda summer 🇨🇭🌸☀️🏔️🦋✨

(hands up if you feel personally victimised by Swiss prices but you can’t stay away because MOUNTAINS 😭😭)
We took our own engagement photos in the Swiss Alps this summer and here’s how it went 👉🏼

(#8 might just be my personal fave 😂)

ALSO this post is for anyone who’s gotten the (woefully mistaken) impression that I am “naturally photogenic”
We took our own engagement photos in the Swiss Alps this summer and here’s how it went 👉🏼

(#8 might just be my personal fave 😂)

ALSO this post is for anyone who’s gotten the (woefully mistaken) impression that I am “naturally photogenic”
We took our own engagement photos in the Swiss Alps this summer and here’s how it went 👉🏼

(#8 might just be my personal fave 😂)

ALSO this post is for anyone who’s gotten the (woefully mistaken) impression that I am “naturally photogenic”
We took our own engagement photos in the Swiss Alps this summer and here’s how it went 👉🏼

(#8 might just be my personal fave 😂)

ALSO this post is for anyone who’s gotten the (woefully mistaken) impression that I am “naturally photogenic”
We took our own engagement photos in the Swiss Alps this summer and here’s how it went 👉🏼

(#8 might just be my personal fave 😂)

ALSO this post is for anyone who’s gotten the (woefully mistaken) impression that I am “naturally photogenic”
We took our own engagement photos in the Swiss Alps this summer and here’s how it went 👉🏼

(#8 might just be my personal fave 😂)

ALSO this post is for anyone who’s gotten the (woefully mistaken) impression that I am “naturally photogenic”
We took our own engagement photos in the Swiss Alps this summer and here’s how it went 👉🏼

(#8 might just be my personal fave 😂)

ALSO this post is for anyone who’s gotten the (woefully mistaken) impression that I am “naturally photogenic”
We took our own engagement photos in the Swiss Alps this summer and here’s how it went 👉🏼

(#8 might just be my personal fave 😂)

ALSO this post is for anyone who’s gotten the (woefully mistaken) impression that I am “naturally photogenic”
We took our own engagement photos in the Swiss Alps this summer and here’s how it went 👉🏼

(#8 might just be my personal fave 😂)

ALSO this post is for anyone who’s gotten the (woefully mistaken) impression that I am “naturally photogenic”
We took our own engagement photos in the Swiss Alps this summer and here’s how it went 👉🏼

(#8 might just be my personal fave 😂)

ALSO this post is for anyone who’s gotten the (woefully mistaken) impression that I am “naturally photogenic”
@brookebeyond_
@brookebeyond_
•
Follow
We took our own engagement photos in the Swiss Alps this summer and here’s how it went 👉🏼 (#8 might just be my personal fave 😂) ALSO this post is for anyone who’s gotten the (woefully mistaken) impression that I am “naturally photogenic”
2 days ago
View on Instagram |
1/5
@brookebeyond_
@brookebeyond_
•
Follow
absolutely one of the most amazing little hikes we did in Switzerlnad this summer (& the competition was stiff) 🤩🏔️🌞🌸 📍Saxer Lücke GETTING THERE: catch the Frümsen gondola to Staubernkanzel HIKE: 1hr (2.5km, 250m gain) to this amazing viewpoint WHEN TO GO: the best lighting is in the afternoon, these photos were taken around 4pm and it just kept getting better! . . . . . #swissalps #switzerland #saxerlücke #swisssummer #alpstein
3 days ago
View on Instagram |
2/5
the BEST easy hike in Zermatt 🏔️🥾✨

For spectacular views of the Matterhorn, the enormous Monte Rosa massif, and the Gorner Glacier (as well as 29 peaks over 4,000m!), there’s no better EASY hike than Riffelberg to Gornergrat, accessible via the Gornergrat Railway in Zermatt. 

The hike only takes about 2hrs at a leisurely pace (I did it 7 weeks after knee surgery!), so it’s suitable for families and non-hikers with even a basic level of fitness 🏃🏻‍♀️

🇨🇭 START FROM ZERMATT
- purchase tickets (day-of is fine) from Gornergrat Railway, right across from Zermatt train station

🚞 GORNERGRAT RAILWAY
- tickets from Zermatt to Riffelberg cost 42CHF ($50USD)— there’s no discount for return, so keep it flexible by purchasing one-way
- the train takes the about 25min, sit on the right side for best views!
- when you finish the hike at Gornergrat, buy a one-way ticket back to Zermatt for 66CHF ($80USD)
- save 50% on tickets with the Swiss Half Fare Card— the pass costs 120CHF ($150USD) and lasts for a whole month, it’s almost always worth it!) 

🥾 HIKE DETAILS: RIFFELSEE TO GORNERGRAT
- the route is 5km with 560m elevation gain (entirely uphill)
- the best views of the Matterhorn are around Riffelsee, where several small lakes offer perfect reflections
- near Rotenboden (the train station in between Riffelberg & Gornergrat), there are excellent rocky viewpoints of both Matterhorn and Monta Rosa— it’s easy to find quiet views if you hike around a bit!
- as you get closer to Gornergrat, Monte Rosa and the Gorner Glacier are right in your face
- almost everyone does this hike in reverse (Gornergrat to Riffelberg), I just personally hate hiking downhill— but you can swap if you’d rather descend the entire way!
@brookebeyond_
@brookebeyond_
•
Follow
the BEST easy hike in Zermatt 🏔️🥾✨ For spectacular views of the Matterhorn, the enormous Monte Rosa massif, and the Gorner Glacier (as well as 29 peaks over 4,000m!), there’s no better EASY hike than Riffelberg to Gornergrat, accessible via the Gornergrat Railway in Zermatt. The hike only takes about 2hrs at a leisurely pace (I did it 7 weeks after knee surgery!), so it’s suitable for families and non-hikers with even a basic level of fitness 🏃🏻‍♀️ 🇨🇭 START FROM ZERMATT - purchase tickets (day-of is fine) from Gornergrat Railway, right across from Zermatt train station 🚞 GORNERGRAT RAILWAY - tickets from Zermatt to Riffelberg cost 42CHF ($50USD)— there’s no discount for return, so keep it flexible by purchasing one-way - the train takes the about 25min, sit on the right side for best views! - when you finish the hike at Gornergrat, buy a one-way ticket back to Zermatt for 66CHF ($80USD) - save 50% on tickets with the Swiss Half Fare Card— the pass costs 120CHF ($150USD) and lasts for a whole month, it’s almost always worth it!) 🥾 HIKE DETAILS: RIFFELSEE TO GORNERGRAT - the route is 5km with 560m elevation gain (entirely uphill) - the best views of the Matterhorn are around Riffelsee, where several small lakes offer perfect reflections - near Rotenboden (the train station in between Riffelberg & Gornergrat), there are excellent rocky viewpoints of both Matterhorn and Monta Rosa— it’s easy to find quiet views if you hike around a bit! - as you get closer to Gornergrat, Monte Rosa and the Gorner Glacier are right in your face - almost everyone does this hike in reverse (Gornergrat to Riffelberg), I just personally hate hiking downhill— but you can swap if you’d rather descend the entire way!
1 week ago
View on Instagram |
3/5
2 months after knee surgery and barely a week after I stopped walking with a knee brace and cane, I was honestly so proud to be able to do this (objectively very easy) 5km hike with 250m gain— it may not seem like much, but for me, this was a HUGE step forward 🥹

📍 Saxer Lücke, Switzerland 

it’s been an extremely challenging recovery, both physically and mentally… but the milestone moments always fill me with hope that things are indeed getting better ❤️‍🩹

special shoutout to my fiancé/hiking partner/personal cheering squad @slatojc for slowing down with me on the trail and always offering a hand down slippery rocks before I even have to ask
@brookebeyond_
@brookebeyond_
•
Follow
2 months after knee surgery and barely a week after I stopped walking with a knee brace and cane, I was honestly so proud to be able to do this (objectively very easy) 5km hike with 250m gain— it may not seem like much, but for me, this was a HUGE step forward 🥹 📍 Saxer Lücke, Switzerland it’s been an extremely challenging recovery, both physically and mentally… but the milestone moments always fill me with hope that things are indeed getting better ❤️‍🩹 special shoutout to my fiancé/hiking partner/personal cheering squad @slatojc for slowing down with me on the trail and always offering a hand down slippery rocks before I even have to ask
3 weeks ago
View on Instagram |
4/5
@brookebeyond_
@brookebeyond_
•
Follow
it’s another “if it wasn’t so stupid beautiful, I’d never set foot in this country again because it’s bleeding me dry” kinda summer 🇨🇭🌸☀️🏔️🦋✨ (hands up if you feel personally victimised by Swiss prices but you can’t stay away because MOUNTAINS 😭😭)
3 weeks ago
View on Instagram |
5/5

  • start here
  • about
  • group trips
  • destinations
  • hiking guides
  • outdoor gear
  • custom GPS maps
  • privacy
  • contact

COPYRIGHT © 2025 BROOKE BEYOND. TRAVEL BEYOND THE ORDINARY. Site Powered by Pix & Hue.


Loading Comments...