
Iztaccíhuatl climbing guide: summiting Mexico’s 3rd highest volcano
Last Updated on 9 July 2026
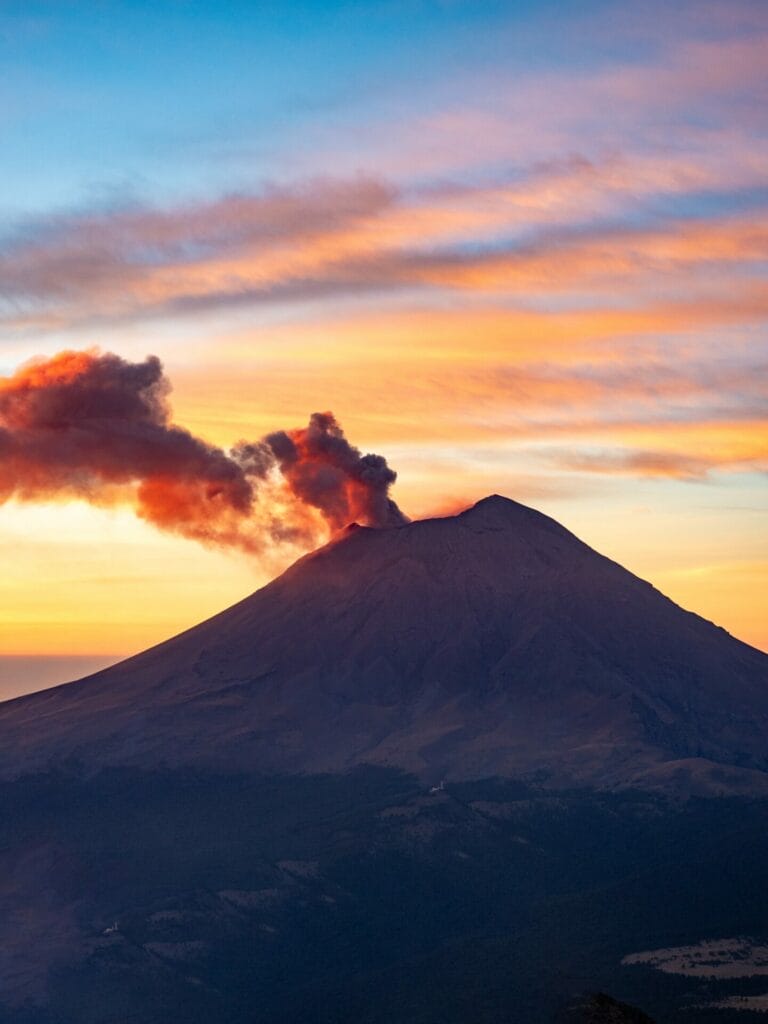
Mexico’s 3rd tallest volcano is a truly epic climb along an impossibly long ridgeline complicated by half a dozen false peaks— it’s a little brutal, but truly so spectacular to spend hours above 5,000m, appreciating the sprawl of Central Mexico beneath you and the constant steaming of active volcano Popocatépetl in the background.
The most straightforward route to climb Iztaccíhuatl ascends an extremely rocky trail through Los 4 Portillos (saddles) up to the Refugio del Grupo de los Cien mountain hut. Here, it transitions to Class 2-3 scrambling up to the Arista del Sol (Ridge of the Sun), a rough and occasionally convoluted run of the ridgeline that brings you over the Sleeping Lady’s rodillas (knees), across the glacier that covers her stomach, and finally up to the summit on her breasts at 5,230m.
This post describes everything you need to know about climbing Iztaccíhuatl without a guide, including difficulty, entrance fees, camping & hut accommodation, a detailed route description, essential gear & more!
For a complete itinerary that includes Pico de Orizaba, Iztaccíhuatl, Nevado de Toluca & La Malinche (Mexico’s 1st, 3rd, 4th & 6th highest mountains), check out this post: 2-week Mexico volcanoes itinerary
The legend of Iztaccíhuatl & Popocatépetl
After Pico de Orizaba (5,636m), Popocatépetl (5,426m) and Iztaccíhuatl (5,230m) are Mexico’s 2nd and 3rd highest volcanos, respectively. According to local legend in Tlaxcala, Popocatépetl and Iztaccíhuatl were two star-crossed lovers— the daughter of the Tlaxcalteca chief, Princess Iztaccíhuatl eagerly awaited the return of Popocatépetl from battle, with the promise that they would be wed following his victory against the Aztecs.
A jealous rival of the young warrior delivered the false news to Princess Iztaccíhuatl that her beloved had died on the battlefield and, consumed by despair, she faded to a slow death before his return.
Popocatépetl, seeking his princess after his triumph, was then met with the news of her death and was overwhelmed by grief himself, piling 10 hills together to form an enormous mountain tomb that would honour her legacy. Carrying the body of the princess in his arms, Popocatépetl climbed to the summit of the mountain and laid her to rest, kneeling beside her with a flaming torch for the rest of his days in a display of eternal devotion.

As time passed, their bodies were covered in snow and they were transformed into 2 immense volcanos, together until the end of time.
It is said that whenever the warrior Popocatépetl thinks of his Princess Iztaccíhuatl, his torch burns with the fire of eternal passion— although Izta is dormant, Popo is a very active volcano and it’s not uncommon to see massive plumes of smoke rising from the caldera, continually honouring the memory of his beloved princess.

Iztaccíhuatl hiking stats
- Summit elevation: 5,230m (17,160ft)
- Estimated climb time: 11hrs
- Distance: 12km (7.5mi)
- Elevation gain: 1,400m (4,593ft)
- Difficulty: very difficult
How hard is Iztaccíhuatl?
To characterise Iztaccíhuatl as “just a hike” would massively undersell how challenging this mountain is; more accurately, Iztaccíhuatl is a difficult scramble with consistently rough terrain, loose scree slopes, ice and glacier, route-finding demands, and many hours of hiking above 5,000m. Helmets are essential to protect against rockfall and, depending on conditions, either microspikes or crampons are required to safely ascend/descend icefields near the summit (see the recommended packing list below for all essential gear).
Hardly more than the first 20min of this 12hr climb is on a clear dirt path— the route ascends on a rough and extremely rocky trail for several hours to reach Refugio del Grupo de los Cien, from which it transitions to Class 2-3 scrambling up to the ridgeline around Iztaccíhuatl’s ‘feet’, and then navigates up and down over the length of her ‘legs’ and ‘torso’ for several hours to reach the summit on her ‘breasts’. The altitude is significant and it is a LONG day that should not be underestimated.
WITH OR WITHOUT A GUIDE?
Iztaccíhuatl is only suitable for those with experience scrambling off trail on rough terrain and with prior acclimatisation. If you’re a strong hiker without the confidence to navigate alone, consider taking a guide. You’ll find several great guided options with local guides on Explore-Share.

Iztaccíhuatl elevation
From the La Joya trailhead at 4,000m to the summit at 5,230m, Iztaccíhuatl is an extremely high-elevation endeavour. And due to the nature of the climb— a steep ascent to the ‘feet’ that condenses most of the vertical gain into a few hours, followed by a long traverse along the ridgeline to reach the ‘breasts’— you’ll easily spend 4-5hrs above 5,000m, which puts you at high risk for altitude-related symptoms.
Regardless of your fitness, age, or previous experience with high-elevation climbing, there is absolutely no substitute for acclimatisation! Camping at La Joya (4,000m) or Refugio del Grupo de los Cien (4,780m) prior to the climb is pretty essential, as are days spent just walking around Mexico City (2,240m) or ascending one of the region’s other volcanoes— La Malinche (4,461m) in Tlaxcala and the slightly more distant Nevado de Toluca (4,680m) in Estado de México are both excellent acclimatisation hikes to get your body ready for Iztaccíhuatl.
I put my PhD to good use by writing a super detailed post about high-altitude mountaineering that will help you understand the difference between normal adaptations to altitude vs altitude sickness, ways you can prevent serious complications, and acclimatisation strategies: A climber’s guide to preventing & treating altitude sickness at high elevations

Practical information
When to climb Iztaccíhuatl
Although somewhat counterintuitive, the main hiking and climbing season in central Mexico is during the winter, specifically November, December, January, or February — this is the dry season and the time of year most likely to have bright, clear days without precipitation.
Due to the terrain on Iztaccíhuatl, you definitely don’t want to climb after rain (which will quickly freeze into ice) or heavy snow. When we were there in December, the park closed for a few days due to hazardous conditions before and again right after our climb, so there’s never a guarantee of good conditions. Be sure to check the weather on the mountain before setting off on your climb.
For a hassle-free experience, some climbers opt for a guided ascent of Iztaccíhuatl that includes transport and logistics. Check out available trips hosted by qualified mountain guides on Explore-Share.

Getting to Iztaccíhuatl
Getting to Paso de Cortés (visitor centre)
Before climbing Iztaccíhuatl, you’ll need to check in at the Visitor Centre at Paso de Cortés, which is located 2hrs from either Mexico City (78km) OR Puebla City (55km) on the border of Puebla and Estado de México. (More about the check-in process below).
From Mexico City, most of this drive is on paved roads in good condition, but from Puebla, it’s on a mess of rough dirt roads through the forest. Both routes are passable in any vehicle (I’ve done the CDMX drive once and the Puebla drive 3x in both a van and a small sedan), but the Puebla drive is not for the faint-hearted and isn’t super fun after a long climb, so keep that in mind when planning.

Getting to La Joya (trailhead)
From Paso de Cortés, it’s a further 30min (9km) drive on a rough dirt road up to the trailhead and campsite at La Joya. You’ll need to check in yet again at the small guard station before driving up— there’s a gate across the road that the guard will lift after checking your details, so it’s impossible to miss this step.
*The road from Paso de Cortés to La Joya is only open from 9am-6pm and access is reservation-only on the weekends (more on this below). If you finish your climb after 5pm, I’d consider staying the night at La Joya instead of risking driving all the way down and finding the road blocked for the night!
Travelling without a car? There are a few public transport options to reach Iztaccíhuatl, the easiest being to catch a bus from either Mexico City or Puebla City to the small town of Amecameca. From here, your best bet is to grab a taxi up to Paso de Cortés and possibly even onwards to La Joya (the other option being to hitchhike or walk the 9km dirt road to the trailhead). Alternatively, a guided climb can simplify logistics and provide transportation from Mexico City or Puebla.

Entry fees for Iztaccíhuatl
As of 2024, entry to Parque Nacional Iztaccíhuatl-Popocatépetl is 58MXN ($3.5USD) per person, payable in cash at the CONANP Visitor Centre located at Paso de Cortés. You do not necessarily need any advance reservations or permits to climb Iztaccíhuatl, BUT you may need a reservation to drive to the trailhead at La Joya (more on that below).
Hiking Iztaccíhuatl in 1 or 2 days?
Most of the (admittedly limited) information online suggests a 2-day climb of Iztaccíhuatl, camping overnight at the Refugio del Grupo de los Cien to split up the ascent into a more manageable 2 days.
Due to the weekend reservation system at La Joya (more on that just below), we ended up with the option to either hike the 9km access road in and out to the trailhead OR to drive to La Joya and complete the climb in a single day— we opted for the latter and, although it was a long day, I actually preferred this 1-day itinerary and it’s what I’d recommend!
Hiking Iztaccíhuatl in 1 day
- day 0: check in at Paso de Cortés, drive to the trailhead & camp at La Joya (4,000m)
- day 1: climb Iztaccíhuatl (12hrs; start by 3am) & camp again at La Joya OR drive out
- ADVANTAGES: better sleep at La Joya vs the hut, allows you to climb Friday without needing a reservation for La Joya
Hiking Iztaccíhuatl in 2 days
- day 1: check in at Paso de Cortés, drive to the trailhead & hike 3.5hrs to camp at Refugio del Grupo de los Cien (4,780m)
- day 2: climb remaining sections of Iztaccíhuatl (9hrs) & drive out
- ADVANTAGES: spreads the climb over 2 easier days, allows for additional acclimatisation sleeping at 4,780m

Camping at La Joya (Iztaccíhuatl trailhead)
The trailhead at La Joya offers very basic FREE camping at 4,000m and I’d highly recommend staying here to get an early start on this massive climb (2/3am) and also some additional time at elevation. Both times I’ve been to La Joya, the toilets were locked, but there are a few small cooking shelters with tables, rubbish bins, and ladies selling hot tortillas at an absolute bargain.
As goes without saying, it is FREEZING at this elevation overnight! It’s also important to note that there is NO water here (or elsewhere on Iztaccíhuatl), so you must bring all the water you need to cook at camp AND drink during the climb!


Through a long conversation in Spanish with the CONANP ranger at Paso de Cortés, I learned an important detail about La Joya that I didn’t read in any of the trip reports online: camping at La Joya is free, BUT road access to the trailhead and campsite is reservation-only on the weekends (including entry on Friday if you’re exiting on Saturday) and these reservations MUST be made online at least 5 days before your desired entry dates.
Without reservations, you can still climb Iztaccíhuatl on the weekend, but you’ll add 9km of hiking EACH WAY from Paso de Cortés to La Joya, so it’s less than desirable.
To make a reservation for La Joya:
- You’ll need to create an account on the CONANP website at least 5 DAYS BEFORE your proposed climb dates
- As soon as you’ve registered, you’ll receive an email asking you to confirmar su cuenta de clic en el siguiente enlace (click to confirm your email account)
- 5 days later, you’ll receive another email advising that su solicitud de registro en la plataforma de Reservaciones para Visitas ha sido aprobada (your registration has been approved and you now have access to the system)
- You can now visit the CONANP Reservations site and click Reserva aquí to login (you’ll have to hit this same button a second time after logging in)

- Even if you don’t speak Spanish, the data page is pretty straightforward:
- Área Natural Protegida = PN Iztaccíhuatl-Popocatépetl
- Tipo de actividad a realizar = Cumbre (summit)
- Número de acompañantes = number of people climbing WITH you (largest number you can enter here is ‘2’ for a maximum group size of 3 on a single reservation)
- Tipo de Vehiculo = type of vehicle
- Placa del Vehiculo = number plates on your car
- Fecha de ingreso = entry date
- Fecha de salida = exit date
- And then enter full names for all visitors under the section Registrar Acompañantes
- You’ll be able to download a PDF that looks like this:

- You’ll ALSO receive an email to download the full Visitor Registration Form. You can fill this out on your own OR bring it to the Visitor Centre and they’ll help you, just be aware that they do not speak any English!

Camping at Refugio del Grupo de los Cien
For those looking to split the climb into 2 days, there’s also camping about 3.5hrs up the trail at the very rustic Refugio del Grupo de los Cien (4,780m)— you can pitch a tent here or grab a spot inside the mountain hut for the night. There are ~15 bunks available for FREE on a first-come basis (no reservations), so you should not rely on this during busy weekends or holiday periods.
A free hut is a free hut, but I was rather unimpressed by Refugio del Grupo de los Cien, which is incredibly cramped, crawling with rats, and subject to constant noise as climbers come in and out at all hours to warm up during the ascent.
Instead, I recommend climbing Iztaccíhuatl in just 1 day. The hut is pretty dismal and there’s always the risk you won’t get a spot, in which case you’ll end up lugging your camping gear all the way up to 4,780m either way. Get a better sleep at La Joya and set off ~2/3am for a big day on the mountain.

*Iztaccíhuatl: route description
The map below (credit to Luis Guerrero Martinez) is among the best visualisations I’ve seen of the climbing route up Iztaccíhuatl! From the trailhead and campsite at La Joya (in the bottom right corner of the map), an increasingly rough trail ascends over 4 portillos (saddles) to the Refugio del Grupo de los Cien mountain hut (marked simply as ‘Refugio’ on the map below).
An even more challenging path leads from the hut up to the Sleeping Lady’s rodillas (knees), running the Arista del Sol (the Ridge of the Sun) across the glacier that covers her torso and up to the summit on her pecho (breast) at 5,230m.


Setting off from La Joya in the dark hours of the morning (I’d recommend a 3am start for this 10-14hrs climb), you’ll walk for a few minutes up a wide trail to the now-defunct carpark of La Joya II to connect with the Los Portillos trail.
From the trailhead, there’s about 20min of comfortable hiking to enjoy on a fairly clear trail before the route ramps up significantly and the path becomes littered with rocks. It’s amazingly easy to get off the trail and lost in the grass and/or rocks in the dark, so I would HIGHLY recommend having a GPS route downloaded to your phone!
This also marks the end of anything that could be considered ‘easy’ on Iztaccíhuatl— the next 3hrs are spent ascending the steep, rocky Los Portillo route (which you’ll invariably lose a dozen different times in the dark) up to the Refugio del Grupo de los Cien mountain hut.


It takes a little over an hour to ascend to the 1st portillo (saddle) and, during this time, you’ll have the sillouette of Iztaccíhuatl on your left (as in the top photo above). Crossing perpendicularly across the 1st saddle, the route then brings you onto the opposite side of the mountain, with Popocatépetl on your right and Iztaccíhuatl no longer in sight as you climb towards the 2nd (as in the photo just above).
This is the easiest spot to lose the trail, so having a GPS track on your phone and also keeping super alert is important if you don’t want to add a bunch of unnecessary time and distance to this already massive scramble!


Each of the 4 saddles is approximately 30min apart and you’ll cross onto the opposite side of the mountain every time, passing under the small peak Amacuilécatl (Iztaccíhuatl’s feet) as you ascend to the 3rd portillo and finally reaching the 4th portillo just before the mountain hut.
There’s some scrambling to be done in the dark, but it’s the route-finding that will consume most of your energy. Assuming you left around 3/3.30am and don’t get lost TOO many times, your arrival to the Refugio del Grupo de los Cien should coincide nicely with the sunrise!

After a small break to warm up in the very rustic (i.e., cramped and mouldy) Refugio del Grupo de los Cien, the route continues steeply towards las rodillas, Iztaccíhuatl’s knees.
As you look out to your right from the hut, there’s a distinct trail cutting vertically up the scree (visible in the far left of the photo below), but I would absolutely NOT recommend ascending this— it’s a great descent shortcut, but a miserable uphill slog that should be avoided.


Instead of the clear-cut route through the loose scree and dirt, scramble the long way over the rocky ridgeline (towards the overwhelming collection of crosses, shown in the right photo below), following some intermittent yellow markers but largely relying on common mountaineering sense to pick the safest line up and through the rocks.
This is the most challenging scrambling on Iztaccíhuatl and will occasionally veer into Class 3 territory, so it’s vital that you are careful in assessing the route before starting upwards to avoid unnecessary risk (mistakenly getting into Class 4).


The terrain as you climb from the mountain hut towards the knees is steep, loose, exposed, and requires frequent use of hands and feet. Helmets should be ON and you may want your poles stowed for some of the more exposed and challenging scrambling.
Once up and over the knees, the route begins its infamous and somewhat infuriating undulation over a number of false peaks, leading you up and down endlessly (gaining very little net elevation) as you run the ridgeline up the thighs and torso.
This section of the route can be a bit demoralising since you’ll think you’re approaching the summit about 12x before you actually arrive to the summit… so just try to enjoy the views and soldier onwards towards the next major obstacle, the Glacier del Vientre that lays across Iztaccíhuatl’s stomach.


An increasing amount of snow along the trail signals your approach to Glacier del Vientre, the steep glacial bowl that you’ll cross as part of Arista del Sol.
At the top of the bowl, stop to put on either crampons or microspikes for the sharp descent on extremely icy terrain— I tentatively started down the hillside in my mountaineering boots, which are great for side-hilling in snow, but there’s no safe way to make it down the thick ice of the glacier in boots alone.
Depending on conditions, cross the flat section of ice and then take crampons off before ascending the opposite dirty hillside up to Peña el Ombligo, the rocky spire that marks Iztaccíhuatl’s bellybutton (the second photo below). This whole glacier crossing takes about 30min.


The summit is now FINALLY in sight, though it will still take about 30min to make your way across the final stretch of ridgeline to reach the breast.
Rather underwhelmingly, there are no markings on the summit and we were left wondering if we had gone far enough (I ran across to the opposite highpoint just in case)— but thankfully some locals arrived shortly after us and confirmed that this was indeed the summit and the other highpoint I’d visited was Iztaccíhuatl’s other breast! We’d made it!!

Much to our delight, the local climbers also brought their 14yo chihuahua Pulga to the summit, who spent a majority of her time at 5,230m settled in my lap. Life is good.


Breathless at 5,230m, it feels SO good to finally be on the summit of Mexico’s 3rd highest volcano, a true mountaineering accomplishment! Including all food breaks and photo stops (of which there were many), our group took 7hrs from trailhead to summit, slowed somewhat by the elevation once on the ridgeline.
As mentioned previously, one of Iztaccíhuatl’s greatest challenges is the fact that you gain a majority of the 1,400m within a few hours and then spend 4-5hrs traversing to and fro across the ridgeline above 5,000m, which is sure to be felt, even if you’ve spent a lot of time acclimatising. For reference, the highest point in the Alps (Mont Blanc) is only 4,808m, so the elevation of this climb should not be underestimated!


After a long relax at the summit, soaking in the incredible views and all the excitment of standing on one of Mexico’s most significant volcanoes, the descent follows the same route as the ascent, with the exception of the shortcut above Refugio del Grupo de los Cien that I mentioned previously.

Excluding the lengthy summit break, our group spent 3.5hrs returning to La Joya, though it felt like an absolute eternity to descend all the rough terrain we’d ascended in the dark.
But what an absolute FEELING! Iztaccíhuatl has all the trappings of a true mountaineering summit— an alpine start, challenging scrambling, route-finding demands, high elevation, harsh conditions, sweeping views, incredible fatigue, intense satisfaction on completion. What started as an acclimatisation climb for Pico de Orizaba truly grew into an incredible adventure in its own right, and this is a summit we won’t soon forget.

Complete Mexico volcanoes itinerary
I recommend climbing Iztaccíhuatl as part of a larger itinerary through central Mexico that includes gradual acclimatisation on Nevado de Toluca and La Malinche and an epic finale on the tallest volcano in North America, Pico de Orizaba.
🌋 Check out my complete 2-week Mexico volcanoes itinerary for trip logistics, driving direction, camping information, and other essential planning tips for climbing 4 of Mexico’s 6 tallest mountains!
Iztaccíhuatl packing list
I wrote a detailed packing list for ALL the climbing gear, warm layers, safety essentials, and camping equipment you need to summit Iztaccíhuatl: Complete Iztaccíhuatl packing list: what to pack for climbing Mexico’s 3rd highest volcano
Read more about climbing Mexico’s volcanoes
2-week Mexico volcanoes itinerary: climbing Pico de Orizaba, Izta, Malinche & Toluca
Mexico City: the perfect 5-day itinerary for CDMX
High-altitude: a climber’s guide to preventing & treating altitude sickness
The Comments
RICHARD COWAN
Can you recommend a guide / company for Iztaccihuatl
I summitted Mount Toluca in July and Mount Fuji in Japan in August will they be sufficient training to attempt this climb. I climb in NY monthly but only up to 4,000′?
brooke beyond
RICHARD COWANHi Richard,
Absolutely! I’m very excited to be partnering with Explore-Share, an amazing platform that connects local mountain guides with adventurers from around the world! Reach out and they can help you find the perfect guide for Izta 🙂 https://exploreshare.typeform.com/brookebeyond
As for preparation, Izta is 5,230m (over 17,000ft), so you are DEFINITELY going to need to acclimatise properly before attempting. I wrote a whole Mexico volcanoes itinerary that includes acclimatisation, which would be a great place to start.
Hope that helps!
xx bb
Janel
Did you leave your tent and other things you wouldn’t need at the La Joya campsite?
brooke brisbine
JanelHi Janel,
We did leave tents at La Joya and everything was fine, but I’d recommend locking any valuables in the car or taking them with you, just to be safe.
Happy trails!
xx bb