
Solo climbing Aconcagua: complete independent expedition guide
Last Updated on 12 April 2026
The Queen of the Andes and highest point in the Americas at 6,962m (22,838ft), Aconcagua has long-since captivated climbers from around the world with her broad, marbled face, towering penitentes (ice spires), and dramatic glaciers. Despite being a non-technical ascent, Aconcagua poses an incredible challenge and you’ll lose blood, sweat, and possibly tears en route to her windy summit.
Following the “normal route” through the Horcones Valley, Aconcagua is also one of the few high-elevation peaks that is readily solo-able— with sufficient climbing experience and extensive expedition prep, it’s entirely possible to reach the summit without a guide or group, just you and the mountain over 10-20 days.
This post contains absolutely everything you need to know to plan a solo expedition on Aconcagua, based on my successful 8-day summit in early February 2024, including mountain conditions, logistics services, how to obtain a park permit, base camp and high camp facilities, acclimatisation recommendations, a detailed day-by-day itinerary, and more!
🏔️ also check out my super-detailed Aconcagua packing list for all the gear I used on my expedition and my custom Aconcagua GPS map for expert navigation
All about Aconcagua
Located in northern Argentina, Aconcagua is the tallest mountain in the Americas— and, excluding the Himalayas, the highest point in the world! At 6,962m (22,838ft), Aconcagua towers over the central Andes and attracts climbers from all over the world, keen to stand atop the 2nd highest of the Seven Summits.
The nearest city to Aconcagua is Mendoza, Argentina, a fabulous destination best known for plentiful Malbec vineyards and a world-class culinary scene— the Parque Provincial Aconcagua is about 3hrs to the northwest, a stone’s throw from the Chilean border.
How hard is it to climb Aconcagua?
Aconcagua (via the “normal route” through the Horcones Valley) is not a technical climb— and, as a result, it is often mistaken by hikers and climbers to be an easy summit.
Let me be perfectly clear: Aconcagua is a very challenging mountain, not because of technical mountaineering demands, but because of the incredibly high elevation and the rapidly shifting, extreme weather conditions you’ll encounter in the Andes.
Even with approximately 1,000 summits per year, Aconcagua has a success rate below 30%— a direct illustration of how many people underestimate the demands required to reach 6,962m. You need to be in excellent physical condition, steady on your feet, and possessed of incredible will-power to summit Aconcagua, but perhaps the most important determinant of all is acclimatisation.

Aconcagua elevation
Aconcagua rises to an incredible height of 6,962m above sea level, and for many climbers, this is by FAR the highest elevation they have ever experienced, making it difficult to comprehend just how extreme the effects of limited oxygen can be on the system.

At sea level, the oxygen concentration of air is 20.9%, but at 7,000m, effective oxygen concentration falls to just 8.7%. This marked decrease in available oxygen takes an immediate toll on the body— some of the “symptoms” experienced at elevation are actually positive adaptations that help maintain normal functioning (like rapid breathing and increased heart rate), while others are maladaptations that contribute to various forms of altitude sickness and, at the extreme, fatalities.
According to recent research, about 34% of travellers who ascend above 5,000m will develop some form of altitude sickness, including common symptoms like headache, nausea, and general fatigue. In most cases, minor symptoms will resolve themselves with rest and/0r a temporary decrease in altitude (dropping back to Base Camp for 1 night before ascending again), but as a solo climber, it is even more vital that you be aware of what altitude sickness looks like and assess your own condition realistically— you are responsible for your own wellbeing out here and making risky calls in pursuit of the summit has the absolute highest consequence.
I put my PhD to good use by writing a super detailed post about high-altitude mountaineering that will help you understand the difference between normal adaptations to altitude vs altitude sickness, ways you can prevent serious complications, acclimatisation strategies & more: High-elevation climbing: preventing & treating altitude sickness above 4,000m
Prior to this expedition, my highest summit was Pico de Orizaba, a violently cold 5,636m glacier climb roughly equivalent in elevation to the 2nd high camp on Aconcagua. For many other climbers tackling Aconcagua, their highest previous summit was Kilimanjaro at 5,895m, just below the 3rd high camp. While both are excellent preparation, the difference in even 1,000m at this elevation is EXTREME, and good performance below 6,000m is very little indication of good performance at 7,000m.
All this to say: don’t underestimate 6,962m, nor the challenges of ascending even with extensive preparation! There is NO substitute for acclimatisation and you’ll fall short of the summit or risk serious illness/injury if you don’t adequately prepare your body to handle the elevation (I met more people during my solo expedition who turned around ~6,700m than those who actually reached the summit).

Acclimatising for Aconcagua
The importance of proper acclimatisation for a mountain like Aconcagua truly cannot be overstated. This includes high summits and time at elevation in the weeks or even months preceding your expedition, as well as a carefully crafted itinerary that builds altitude gradually over consecutive days.
Any expedition itinerary will be highly variable and extremely personal— what works well for one climber may not work for you, EVEN with an identical acclimatisation program, so a solo expedition on Aconcagua requires a lot of careful planning AND personal accountability.
My Aconcagua acclimatisation: I spent 2 months living at 2,300m in San Cris, Mexico from October to December, then climbed 4 of Mexico’s 6 highest volcanoes around the holidays (4,461-5,636m), and spent January at 2,240m in Mexico City before flying into Mendoza to start my approach to Aconcagua on the 1st of February. I had a great deal of acclimatisation under my belt when I arrived in the Provincial Park, which is how I was able to successfully summit Aconcagua solo in 8 days.
Please take note of this: your performance at altitude has absolutely nothing to do with your physical fitness, so if you’re coming from sea level, it’s simply not reasonable to expect to summit within this time (even if you are an elite athlete)! I present my exact itinerary in this post, but modify it accordingly and with your own safety in mind— see specific recommendations below.

When to climb Aconcagua
The Aconcagua climbing season stretches from November – March, with the final climbing permits issued for the last day of February (meaning you MUST enter the park by 28 February, but your expedition can extend 20 days beyond this).
The best weather on Aconcagua is typically considered to be December and January, but it’s highly variable and depends entirely on the year. I summitted Aconcagua on 8 February 2024 and the route was entirely melted out— just 3 days later, it was covered in snow. You should be prepared for all possibilities with appropriate gear and training.

Aconcagua conditions & weather
A local climbing guide told me that 7,000m on Aconcagua is equivalent to 8,000m in the Himalayas— the brutal winds, notoriously obstructive snow-storms, violent cold, and otherwise wild conditions here are far more severe than what you might expect at a comparable elevation in Asia.
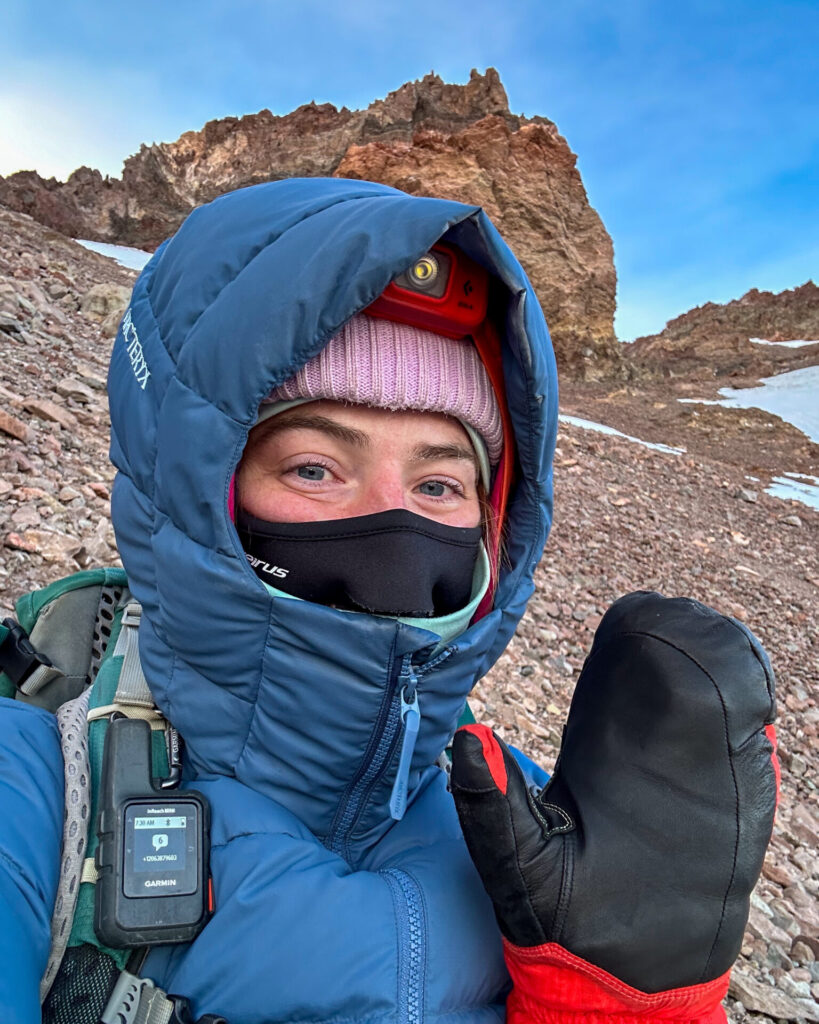
Conditions on Aconcagua can change rapidly and as many climbers are turned around by vicious weather as by the elevation. It’s not uncommon to encounter -30°C wind chill on the summit and these are climbable conditions (I summited with -28°C and 25km/hr winds).
The two best ways to deal with the wild weather on Aconcagua:
- check the radar compulsively: the best sources (most widely used by guides on the mountain) are mountain-forecast and snow-forecast, which each offer a detailed weather prediction at 5 different elevations. Allow extra days in your itinerary to push for weather based on these results! A local guide advised me that 50km/hr winds should be a cut-off, but I personally don’t think I could have handled much above 30km/hr given the associated wind chill and my sensitivity to the cold. For solo climbers, a satellite device is non-negotiable— you MUST be able to get accurate weather reports at the high camps to avoid ascending into a storm.
- pack sufficient cold-weather gear: even in “perfect” conditions, Aconcagua is unbelievably cold and your gear will make or break your ability to continue upwards (or even survive the night at camp). I put together a super-detailed Aconcagua packing list, but double boots, a high-elevation mountaineering tent, multiple down layers, a thick balaclava, mountaineering mittens, and ski goggles are just a few essentials. Your sleeping bag should be rated to -20°C or better and you may want to bring 2 sleeping pads for added insulation. The importance of high-quality gear on this expedition cannot be understated! Read my complete Aconcagua expedition packing list.

Climbing Aconcagua solo
Guided vs solo expeditions
During my time in Parque Provincial Aconcagua, I did not meet even ONE other solo climber, and in fact met many people who thought it was not even permissible to solo Aconcagua. This is obviously incorrect— you can easily get a solo permit for Aconcagua, but perhaps the more relevant commentary here is that not many people embark on this expedition without a guide or group.
The reason is fairly obvious: guided groups enjoy far more amenities at camp, including hot food and bunk rooms, and benefit from the expertise of local guides, who design their acclimatisation program, keep close watch on the weather, and handle all necessary logistics, freeing up the client to climb without too much responsibility.
- If your only goal is to reach the summit of Aconcagua as safely and enjoyably as possible, then join a guided group. You can expect to pay about $6,000-8,000USD for a 12-18 day expedition with a guide; check out group expeditions on Explore-Share.
- If, however, you are drawn to summit the highest peak in the Americas with minimal assistance and total control over your own expedition, it is an unbelievable adventure and worth all of the effort to climb solo! Note that this should ONLY be undertaken by experienced climbers with a proven track record of solo ascents who are proficient in route-finding and capable of making challenging expedition decisions without support.
Solo safety on Aconcagua
There were SO many moments on Aconcagua where I delighted in being solo— departing at my own late hour and hiking at my own quick pace, modifying my itinerary at my own discretion, eating and sleeping and journaling in the tent on my own schedule, stopping only in the moments I needed to and waiting for no one on the summit push…
But it’s also worth noting that there was a pretty significant moment where I was concerned about being alone— bonking on the descent from the summit because I wasn’t diligent enough about eating.
Soloing Aconcagua means that you are alone for the good times as well as the bad, and you need to be prepared to take care of yourself, make tough decisions, and call for help if needed. There is absolutely no one to do it for you, and if you question your ability to turn yourself around when needed OR navigate safely in the dark for hours across rough terrain OR interpret the weather radar OR take care of yourself at your least functional, then a solo ascent probably isn’t for you.
If you read all that and thought WOW, I can’t wait, then welcome to one of the grandest adventures of your entire life!
Soloing Aconcagua was, to date, the hardest thing I’ve ever done, but I am so incredibly proud AND humbled to have been able to tackle this mountain entirely on my own— especially as a small woman who got a lot of discouraging remarks around camp (and who secretly delights in exceeding people’s expectations). This guide contains absolutely everything I learned and all of the advice I’d pass onto other climbers planning a solo ascent!

Cost of a solo Aconcagua expedition
Due to substantial changes in the way that local companies are providing logistics services to solo climbers AND routine increases in climbing permits from the government, the cost of a solo expedition has significantly increased since my climb in 2024. Permit and logistics package costs have been updated to reflect current 2025/2026 season prices:
- park permit:
$800$1170 - mandatory helicopter rescue insurance: $175
- mule from Penitentes to Base Camp:
$680$1295 *companies have recently stopped offering mule-only logistics services; more detail in the next section - bus from Mendoza to Penitentes & return: $5
- gear rental: $360 (double boots & high-alt mountaineering tent)
- fuel (3x canisters): $15
- 12 days of food: $300 (1 dehydrated meal per day, plus soup, hot choc, nut bars, candy, Gatorade powder, etc)
- MY TOTAL EXPEDITION COSTS = $2,335USD
- 2026/2027 EXPEDITION COSTS = $3,320USD
All of these expenditures, including park permit, mule transport, the bus from Mendoza & gear rental, are discussed in more detail in the following sections.

Expedition prep for Aconcagua
Aconcagua climbing permit
The Argentinian government and Provincial Park control access to Aconcagua through hiking and climbing permits that can be organised via their official website or third-party providers. Note that the assisted permit must be obtained on your behalf by a local company. Visit the park website for more information or to obtain an unassisted permit.
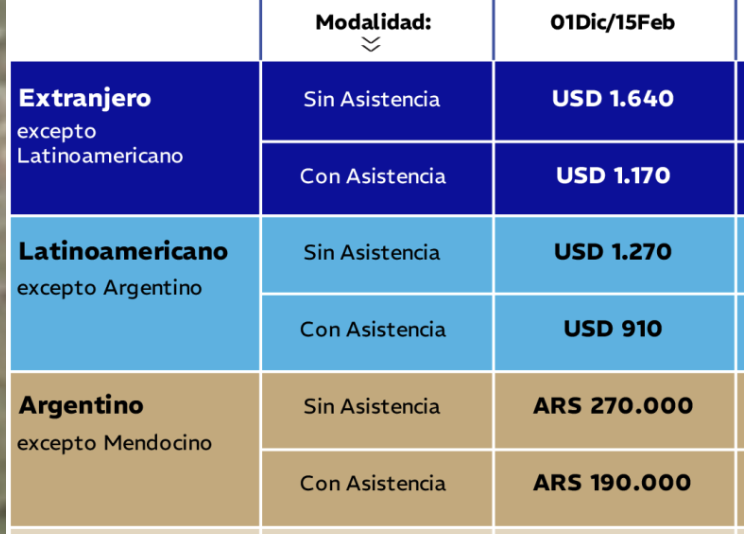
As of the 2026/2027 season, international (non-Latin American) climbing permits for Aconcagua via the Horcones route allow up to 20 days within the park and cost:
- $1640USD unassisted (zero services from a local company)
- $1170USD assisted (even minimum logistics like mule services qualify you for this discounted permit, which can sometimes pay for itself)
You’ll do quite a few things with this permit throughout your expedition, so keep it handy!
- you must have your permit signed off at the ranger station (just before the park entrance) prior to starting the hike in— Inka Expediciones provides transport from their office in Penitentes to the park and will walk you inside the ranger station to make sure all your paperwork is in order
- you must ALSO have the permit signed by park rangers at Confluencia and Plaza de Mulas when you arrive into each camp
- you are required to visit the camp doctor at both Confluencia and Plaza de Mulas for a vitals check and signature prior to ascending; without their approval, you are NOT allowed to climb higher
- at the ranger station, you’ll be given a white rubbish bag and orange poo bag, each noted with the specific number of your permit; you are required to return these to the ranger station upon exit and they will sign off your permit (but another fabulous perk of Inka’s logistic services is that you can get a signature from their staff at Base Camp and throw both bags away before hiking out)

Mandatory insurance for Aconcagua
In order to obtain a climbing permit, you are required to hold valid emergency insurance that includes evacuation by helicopter. Frequent readers will know that I LOVE my alpine club membership for its worldwide rescue insurance, but unfortunately, as with most travel insurance policies, it is void above 6,000m.
Indeed, it can be a little bit of a challenge to source rescue insurance that covers you up to 7,000m, as required for Aconcagua. World Nomads is the cheapest provider I was able to find ($175USD for 12 days on the Explorer Plan), but it seems that only the US version of the site allows the upgrade up to 7,000m. Another option I looked into was the Tin Leg Adventure plan offered by SquareMouth— under “Trip-Specific Coverage”, make sure to select “Trekking Above 7,000m” and this should be acceptable.
You will be required to send proof of insurance to your logistics company prior to picking up your permit in Mendoza, so unfortunately this is a non-negotiable expense! 2026 update: the Argentinian government now requires all visitors to have valid travel insurance for the duration of their time in Argentina.
Logistics services for Aconcagua
All of the Aconcagua providers offer a range of “logistics services” for solo climbers that include, at the upper end, organising your itinerary, hot food at base camp, and even pre-erected tents or bunk rooms. I think this removes a lot of the “solo” element from the expedition, but at the very bottom end, you can contract one of these providers to organise only your permit and mule transport, both of which are extremely valuable.
By comparison, if you opt for absolutely zero services, you’ll pay about 1.5x the price for an ‘unassisted’ permit + a mandatory fee for toilet access at Base Camp that works out to be nearly the SAME price. I like this scheme because it keeps money with local companies AND offers climbers a lot of value!
In 2024, I used Inka Expediciones for these bare-minimum logistics, and they:
- handled all the paperwork for my permit
- organised my mule from Penitentes to Base Camp & back
- transported me from Penitentes to the ranger station for check-in & onwards to the park entrance
- provided select amenities at Confluencia and Plaza de Mulas, including:
- drinking water (no need to filter below the high camps!)
- toilets (no need to bag out poo below the high camps!)*note that if you don’t pay for ANY logistics services, the park requires you to pay a toilet access fee at Base Camp, hence why this is a better deal
- access to their base camp computer to check the weather radar
- unlimited device charging
- waste facilities (dispose of rubbish and poo from the high camps at Base Camp so you don’t have to carry it all the way out to the ranger station to have your permit signed off)

2026/2027 update: logistics pricing
In an effort to provide updated pricing to this post, I personally reached out to all the local companies that provide logistics services on Aconcagua, and I am disappointed to report that costs have increased considerably for the 2026/2027 season.
For the first time, ALL companies operating on Aconcagua have removed minimum options from their logistics package offerings— meaning the package I purchased for my climb in 2024 (described above) no longer exists. Instead, the “basic” package with Inka now includes ~7 days of full board at base camp and even a few nights of accommodation (with no option to exclude). I’ll also add that I was told by Inka that these prices are being trialled for 2026, so there is a CHANCE companies will revert to the old pricing model in the future 🤞🏼
Here are the “basic” package quotes I received for the 2026/2027 season:
- Inka Expediciones $3190USD: transfer from Penitentes to the Horcones Park Entrance; mule service (35kg); camp services (water, toilets, rubbish) + storage; 7 days of full-board at Base Camp; 2x nights of accommodation in Confluencia
- Grajales $3310USD: transfer from Penitentes to the Horcones Park Entrance; mule service (35kg); camp services (water, toilets, rubbish) + storage; 7 days of full-board at Base Camp
- Andesport $1295USD: 1x night in Penitentes with half-board; transfer from Penitentes to the Horcones Park Entrance; mule service (60kg); camp services + storage *this is the closest to what I purchased, and even though it’s doubled in price, it’s currently the cheapest and best option
CHEAPEST ACONCAGUA LOGISTICS PACKAGE IN 2026
With prices fluctuating wildly since my expedition and a lot of climbers still reaching out for advice, I’m super excited to be partnering with Explore-Share (an awesome mountain services directory) who’ve negotiated deals with all 3 major companies operating on Aconcagua.
If you’re looking for the BEST logistics package for a solo climb or small unguided group, enter your email in this form and Explore-Share will get back to you with a detailed, objective, up-to-date price comparison AND an exclusive $100 discount (code: explorewithbrooke)!

Mule transport on Aconcagua
Essentially every climber, whether solo or part of a guided group, contracts the services of a mule to transport some of their gear from Penitentes (just before the park entrance) to Plaza de Mulas (main Base Camp). And despite the initial belief that mule transport would somehow be “cheating” on a solo expedition, I can now tell you that it’s practically impossible to do this trip without it— because it would mean hauling ~40kg (90lbs) in your backpack over 24km and 1600m of gain… at high elevation… in extreme heat… before one of the most taxing climbs of your life.
Unless you are superhuman, this simply isn’t practical (and I still carried 18kg of my own gear to Base Camp and 25kg of gear to High Camp 2, so it’s no walk in the park, even with mule help).
When packing for Aconcagua, you’ll want to separate:
- gear that can go straight to Base Camp on the mules: most of your food, cold weather clothes, double boots, summit gear
- gear that you need to keep with you for the ~2.5 days before you arrive to Base Camp: tent, sleeping bag, 3 days of food, limited clothes, camera
INBOUND
After everything was separated, I still carried 18kg in my pack to Base Camp, while the remainder was packed into a duffel and 2x plastic crates at the Inka office in Penitentes for mule transport. When I arrived into Base Camp, I took my paper receipt to the gear tent and the staff helped me find my crates and duffel— super easy!
OUTBOUND
Return mule transport from Base Camp to Penitentes requires a little waiting around. You’ll need to drop off gear by 9.30/10am (and you can send almost EVERYTHING on the mules— just carry water, snacks, sunscreen, and some extra layers), but the mules won’t arrive in Penitentes until around 7pm, several hours after you’re likely to have finished your hike. Collecting your gear is super easy, but be aware that you will have to catch the LAST bus of the day (8.15pm) back to Mendoza.
For a detailed comparison of current solo expedition and logistics package options from the 3 major companies operating on Aconcagua, leave your email in this form and we’ll send you all the pricing info AND an exclusive $100 discount (code: explorewithbrooke)!

Essential gear for Aconcagua
I’ve written a full Aconcagua packing list as a separate post, including all necessary climbing and hiking gear, specific clothing recommendations for the conditions, and a detailed look at my Base Camp setup!
👉🏼 Complete Aconcagua expedition packing list: what I packed for a successful solo climb
Gear rental for Aconcagua
In all likelihood, there will be some high-elevation gear that you’ll need to hire for Aconcagua— for me, this was double boots and a more robust mountaineering tent.
There are several mountain shops in Mendoza where you can find everything from tents and boots to mittens and jackets. The most popular of these shops is El Refugio, but since it’s always packed with large international groups, don’t expect the most personal service; I prefer the smaller Piré Aconcagua, which has excellent gear at a comparable price but with much more dedicated assistance fitting the boots, setting up the tent, etc— if you pay in cash, you can also finagle a 10-15% discount, so be sure to bring Argentinian Pesos (see below)!
Gear rental for Aconcagua comes at a set price for up to 20 days and is not cheap, so it’s worth weighing up the cost of buying vs renting if you’re likely to use any of the gear again. As I mentioned, I hired only La Sportiva G2 Evo Double Boots ($210 to rent; $1100 to buy) and a Doite Professional Himalaya 2 tent ($150 to rent; $550 to buy), and either already owned or bought all my other gear for Aconcagua.

Buying fuel in Mendoza
Aside from any personal items that you’ll need to pick up in Mendoza prior to your expedition, every climber will need to buy fuel for their stove (since you can’t fly with this, you’ll need to wait until Mendoza). All of the mountain shops in town sell fuel, so you can grab this when hiring gear. Expect to pay around $5 for a canister.
A conservative estimate for fuel is one 230g canister per 3 days per person— based on this, I bought 3 canisters of fuel for myself, but only ended up using 1 canister for the entire expedition. This under-consumption is partially because I stayed at Camp 2 (the only high camp with pond access, so you don’t have to melt snow) and it wasn’t cold enough that I needed a hot water bottle at night. Better to have more fuel than not enough, though, so I’d still recommend at least 2x per person!

Getting Argentinian Pesos in Mendoza
Due to Argentina’s unstable economy, there is a widespread and easily accessible black market for currency, pinned to the US Dollar. The so-called Blue Dolar rate can be anywhere from 1.5-3x the official currency exchange, so plan to handle cash for the absolute best rate.
Visa/MasterCard now gives a pseudo-Blue Dolar rate called the MEP (Mercado Electrónico de Pagos) which is pretty good, but many establishments still prefer cash— as mentioned above, I saved 15% off my gear rental by paying in cash AND my black market conversion was super favourable: for gear rental quoted as $430USD, I paid just 441,000ARS, which was equivalent to $360USD!
Upon arriving in Mendoza, be sure to check the current Blue Dolar rate, as it fluctuates wildly in response to the official rate and untethered national inflation. There are 2 good ways to get Argentinian Pesos around town:
- bring crisp USD bills (preferably hundreds) and change them at any of the hundreds of shops, hotels, or restaurants advertising CAMBIO. Expect to get a rate marginally worse than listed online for the Blue Dolar (ex. they may convert at 110,000 when the official is 120,000 per $100USD); shop around to find something you’re happy with.
- download the Western Union app and send money instantly from your bank to be retrieved at any of the dozens of WU locations around Mendoza (or throughout Argentina). This is the BEST rate and new customers pay NO transfer fees, which makes it an even better deal. I prefer this method, not only for the better rate, but also because it does not require you to source USD before arriving in Argentina, which can be difficult if you’re travelling from anywhere other than the US!


Aconcagua camps: what to expect
Base Camps: Confluencia & Plaza de Mulas
There are 2 Base Camps on Aconcagua:
- Confluencia (Lower Base Camp) at 3,400m
- Plaza de Mulas (Base Camp) at 4,300m
These base camps are amenity-rich and very comfortable, and even with minimum services from Inka Expediciones, you can still access many of the facilities around Base Camp as a solo climber.
GEAR TRANSPORT
As recommended previously, mule transport from Penitentes (before the park entrance) to Plaza de Mulas (main Base Camp) is incredibly helpful and pretty much vital for every expedition. I carried 18kg in my pack and sent another 18kg of gear with the mules to be collected several days later.


STORAGE
When you ascend to the higher camps, you can securely store a duffel of gear in the storage tent at Base Camp— this ensures that you can bring extra food, clothes, and even books to Base Camp that you don’t necessarily have to climb with! A big part of this expedition is acclimatising at camp, so some luxuries are sure to improve the experience.
MEDICAL
As a condition of your climbing permit, you will be required to visit camp doctors at each of the Base Camps to have your vitals checked and receive signed permission to ascend further (usually the evening before you plan to move to a higher camp). Unless you are experiencing specific complications, the doctor will just quickly take your heart rate and oxygen saturation (with a pulse oximeter), blood pressure, and listen to your lungs.
It can be a good idea to have your own small pulse oximeter if you want to monitor your vitals in the tent, particularly in the High Camps where you are entirely on your own as a solo climber! These are a cheap and easy way to keep tabs on yourself.

WATER
Free and unlimited filtered drinking water is available in large drums at both base camps.


FOOD
A small camp cafe at both Confluencia and Plaza de Mulas sells pastries, hot sandwiches, coffee, and cold drinks at an exorbitant price. My parents sent me money for a treat after my summit— $25 for 1 beer and a hot cheese & avocado toasted sandwich.
Theoretically, you can also buy hot meals through the Inka kitchen that services all the guided groups. Dinners are $40 and need to be organised in advance, so it’s not very practical for a solo climber— better stick to backpacker food and maybe splurge on one of those hot sandwiches, which I swear was the most delicious thing I’d ever eaten after coming back from 6,962m.
TOILETS
Enjoy flushing toilets at Confluencia, drop toilets at Plaza de Mulas, and running water at both! For a fee, you can also access showers at both camps, but this was $15 so I just let myself go.

RUBBISH
No need to haul around rubbish from your entire expedition, there are large rubbish bins available in both base camps!
CHARGING
The Inka cafe at both Confluencia and Plaza de Mulas allows charging— make sure you have a USB cable that plugs into your devices or, even better, into a power bank you can leave charging overnight.

COMMUNICATION
There’s no mobile signal past the park entrance, but both Confluencia and Plaza de Mulas provide wifi networks that you can access in camp.
As a consolation for some permit delays, Inka staff gave me several wifi tickets to access internet at both base camps— I really don’t like having service when in the mountains, since this is my opportunity to disconnect entirely, but it proved very helpful in keeping an eye on the ever-changing weather with more detail than my Garmin inReach provided.
Without wifi tickets, you can STILL view the weather in both base camps, using the computer set up in the Inka office. Staff will let you use this computer whenever you like and will even chat through the radar with you to help make the best plan for your climb, which is fantastic peace of mind for a solo climber having to make all the expedition calls on their own.

High camps: Canadá, Nido de Cóndores, Cólera/Berlin
Above Base Camp, there are 3 high camps (well, sort of 4):
- Canadá (High Camp 1) at 5,050m
- Nido de Cóndores (High Camp 2) at 5,560m
- Cólera & Berlin (High Camp 3, located about 10min apart) at 5,970m
There are not really any amenities to speak of at these high camps; guided groups may still enjoy some facilities, but as a solo climber, you are entirely on your own above Base Camp.
TRANSPORT
You can technically hire the services of a porter to carry gear to the higher camps, but there’s no reason a strong climber can’t manage this on their own, either by coordinating gear drops to the higher camps or by carrying a heavy pack up the mountain with only the essentials (I got my pack down to 25kg and did it in one push).
Some friends I met at camp paid about $365USD for a porter to carry 20kg of their shared gear between each of the high camps on consecutive days (Base Camp to Camp 1 + Camp 1 to 2 + Camp 2 to 3). This could be helpful if you have a tight itinerary, but if you’re not feeling well enough to carry gear up at all (even in a 10-15kg drop), then I’d seriously consider whether you’re well enough to ascend in the first place. Unfortunately in the case of these friends from camp, they were not.
STORAGE
Anything you don’t want to carry to the summit, you can simply leave behind in your tent at whichever high camp you happen to be staying in. I found this to be perfectly safe!
MEDICAL
Above Base Camp, there are no required health checks and only limited medical services available. There’s a small ranger station at High Camp 2 and they can assist you in an emergency, but it’s also worth noting that this is the highest place on the mountain a helicopter can actually land— meaning you MUST get yourself down as far as Nido de Cóndores at 5,560m to receive emergency services.
WATER
High Camp 2 (Nido de Cóndores) is the only high camp that has water access, in the form of several small but clear ponds. You should still plan to filter or boil this water before drinking, but it’s far more convenient than melting snow, which is what you’ll have to do at High Camp 1 or 3.
In warmer conditions, however, you may even struggle to find snow at these camps, meaning you’ll actually need to carry water up the mountain from Base Camp. This, among other reasons described below, is why I chose to stay only at High Camp 2 (skipping 1 and 3) and summit from there.

FOOD
BYO!
👉🏼 Check out this post for a breakdown on how I pack backcountry food for alpine expeditions
RUBBISH & POO
When you ascend above Plaza de Mulas to the high camps, you’ll need to retain all rubbish in the white numbered bag given to you by the ranger station when you checked in, as well as all of your poo in the orange numbered bag.
Ordinarily, these would need to be carried all the way out to the ranger station near the park entrance to have your permit signed off (the fine is $300!), but among the best perks of basic logistics services through Inka Expediciones is the fact that you can drop both of these bags on your way back down the mountain at Plaza de Mulas and staff will sign off your permit. No need to carry poo further!
For a detailed comparison of current solo expedition and logistics package options from the 3 major companies operating on Aconcagua, leave your email in this form and we’ll send you all the pricing info AND an exclusive $100 discount (code: explorewithbrooke)!
CHARGING
None, bring your own powerbank and/or solar charger!

COMMUNICATION
Also none— a satellite device like the Garmin InReach Mini 2 is absolutely vital! This is how I kept an eye on the weather above Base Camp and made sure I was safe to ascend. See more recommended safety gear in my packing list post.

Getting to Aconcagua
Getting to Mendoza, Argentina
Nearly all climbers will fly into Mendoza, which has a small but well-serviced international airport about 20min outside of the city centre. An Uber into town costs a mere $5!
I’d recommend staying a minimum of 2 days in Mendoza to organise expedition logistics:
- pick up your park permit
- pay any outstanding fees for services to Inka Expediciones
- buy fuel for your stove
- rent gear from a local shop
- last-minute food shopping
- final packing into backpack and duffels (for the mules)
I stayed in a private room at the Open House Hostel for just $11USD per night, and although a bit of a walk into town, this was a perfect space to get organised for my expedition and SUCH a bargain!

Getting to Penitentes
Three Andesmar buses run from Mendoza to Penitentes each day and the early schedule (although painful) is more convenient. Bus tickets can be pre-booked online; the current price is just $3.
This bus departs from the Mendoza Ómnibus Terminal at 5.55am and arrives to Penitentes at 9.19am— tell the driver that you’d like to be dropped off at Hotel Ayelén, which is immediately across the road from the Inka Expediciones office where you will deposit your gear with the mules for transport into Base Camp.

Getting to Horcones (Aconcagua Provincial Park entrance)
Private transport between Penitentes and the park entrance is INCLUDED in even the most basic of logistics services from Inka Expediciones.
After dropping off your gear at the Inka office in Penitentes, one of the staff will drive you about 10km up the road to the ranger station to complete your check-in process. You’ll have your permit and passport checked and receive the white and orange bags that must be used to collect rubbish and poo, respectively, from the high camps. From the ranger station, you’ll be driven a further 2km to the park entrance and dropped off to begin your hike in to Confluencia, the lower base camp!
Upon finishing your expedition, stop into the Inka office at Confluencia and they will call ahead to ensure a driver is waiting to return you to the ranger station for check-out and onwards to Penitentes, where you can collect your things from the mules and catch a bus back to Mendoza.


*Aconcagua expedition itinerary
Below is a super-detailed description of my exact 10-day Aconcagua expedition itinerary, but please keep in mind that ascending too quickly to 7,000m has the potential to be deadly if you aren’t adequately acclimatised or otherwise in good health. It is vital to critically assess your OWN readiness before moving to each camp, particularly when climbing solo— the margin for error on a mountain of this size is VERY SMALL.
These are some of the most important variables to consider when planning your own climb itinerary:
REMAIN FLEXIBLE
Conditions on Aconcagua can change rapidly and will have a massive impact on your ability to ascend, so while it’s very important to arrive with a well-thought-out itinerary, it’s equally important to allow extra days on the back end in case you need to push for weather (or for additional acclimatisation).
Climbing permits allow you up to 20 days in the park; I’d recommend building at least 15 days in your itinerary so you can be flexible with the best weather window— it’s a lot of time, energy, and money to get here only to miss out on the summit by 1 or 2 days!
🗺️ I built a custom Aconcagua GPS map with daily tracks based on my summit itinerary, dozens of waypoints, and other essential navigational information to help you stay on track. For solo expeditions, this is essential!
CONSIDER ACCLIMATISATION
Many guided groups take 12-15 days to summit Aconcagua, but I was able to summit in a condensed 8-day itinerary ONLY because I had a large head start on acclimatisation (see what I did in the months prior to Aconcagua).
If you’re coming from sea level, don’t expect to be able to ascend to 6,962m in a week, it’s simply not safe— your experience at elevation has nothing to do with your fitness and everything to do with your body’s adjustment to lower levels of oxygen.
ACCLIMATISATION HIKES
With elevation in mind, it’s essential to build a few acclimatisation hikes into your itinerary. I’ve included these at Confluencia with a +900m hike up to Plaza Francia (which also offers the best views of Aconcagua that you’ll get on this entire climb!) and a breathless +400m jaunt from High Camp 2 to Camp 3 the day before the summit push.
If you aren’t as acclimatised when arriving to the park, you should definitely include ADDITIONAL day hikes from Plaza de Mulas or between the high camps.
SLEEPING HIGH
Most itineraries also follow a recommended pattern of hiking high and sleeping low— this means ascending to higher camps each day and returning to a lower camp to sleep, or sometimes even sleeping at a higher camp one night and dropping back to sleep at Base Camp the following night for a better rest.
This is an excellent acclimatisation protocol that will help your body adjust slowly to the elevation, but you’ll notice that it’s not really how I structured my itinerary, which starts with 2 nights at 3,400m (Confluencia), followed by 2 nights at 4,300m (Base Camp), and then 3 nights at 5,560m (High Camp 2) prior to the summit push— no High Camp 1, no High Camp 3, and no backtracking.
Sleeping this high can be an energy suck and many people experience sleep disturbances, but if you have a good baseline acclimatisation, it can be a great way to fast-track your adjustment to extreme elevation. And with the 2 acclimatisation hikes I mentioned previously, hiking high and sleeping low even on a micro scale can help.
SKIPPING CAMPS
You’ll notice in my itinerary that I skip both High Camp 1 (Canadá at 5050m) and High Camp 3 (Cólera at 5970m), opting instead to spend 3 nights at High Camp 2 (Nido de Cóndores at 5,560m) prior to the summit push.
Some itineraries stop at all 3 camps, some ascend to High Camp 2 and then return back to Base Camp to rest, some summit from High Camp 3… but I designed my itinerary to minimise gear transport (which is incredibly tiring when you are hauling 100% of your own weight) while maximising time at elevation. My rationale:
- High Camp 1 is just 2hrs and 600m above Base Camp, so it’s perfectly comfortable to push higher to Camp 2 in a day
- High Camp 3 is only 1.5hrs and 400m above Camp 2, so it’s entirely possible to summit from High Camp 2 to avoid ever moving your gear higher AND you’ll get a better sleep overall because of the slightly lower elevation and warmer weather
- High Camp 2 is also the only high camp on the mountain that has reliable water access (vs melting snow at High Camp 1 or 3, which is only possible IF there is snow to melt)
- This also allows you to carry gear just once from Base Camp to High Camp 2; do your acclimatisation hike to High Camp 3 and your eventual summit push with a lighter pack
REST DAYS
There’s a delicate balance to be struck between acclimatisation hikes and rest days— BOTH are essential in preparing for the summit. I’ve built 2 full rest days into my itinerary, 1 at Base Camp and 1 at High Camp 2 (Nido de Cóndores), and I’d strongly recommend these as a minimum.
Though it can be tempting to push higher every single day, the energy drain will eventually outweigh the acclimatisation benefits and you’ll be worse off. Sleep as late as possible, read a book, enjoy an afternoon nap, take a small walk around camp, and prioritise eating a lot of calories and drinking at least 4L of water. Think of your rest days as an opportunity to stockpile energy!
Without further ado, here is my 10-day Aconcagua expedition itinerary ↯

Day 1: Horcones (park entrance) to Confluencia
- distance: 7km
- elevation gain: 600m
- bb time: 2hrs
- max elevation: 3,400m
From the park entrance, a dusty, rock-littered trail winds through the Horcones Valley towards Confluencia. In good conditions, you’ll get glimpses of the top of Aconcagua within the first 30min, so this is a popular day hike for visitors to the park, most of whom turn around at Laguna Horcones.
The elevation gain is very modest, only steepening in the penultimate kilometre to climb above the river, so expect to arrive into Lower Base Camp in around 2hrs. There are a LOT of creature comforts at Confluencia, so enjoy a relaxed and comfortable start to the expedition!
🗺️ I built a custom Aconcagua GPS map with daily tracks based on my summit itinerary, dozens of waypoints, and other essential navigational information to help you stay on track. For solo expeditions, this is essential!


Day 2: acclimatisation hike to Plaza Francia
- distance: 22km
- elevation gain: 900m
- bb time: 3.5hrs out + 2.5hrs back
- max elevation: 4,200m
Continuing along same dry river bed that Confluencia lies in, walk less than 10min before dropping down to the muddy river and reaching a signed junction; a wooden bridge leads across the river towards Plaza de Mulas, while the route to Plaza Francia follows the right shore of the river for a distance.

The trail is easy to follow through the glacial rubble as you skirt the side of a large moraine and eventually the length of the Lower Horcones Glacier (Glaciar Horcones Inferior). For most of the hike, the snowy summit of Aconcagua is visible over the top of nearby marbled peaks, which are also pretty spectacular!

Many guided groups stop short of Plaza Francia at a designated photo spot, which is also about 15min shy of the signed Mirador de la Pared Sur, but I’d recommend going the whole way— the view doesn’t necessarily improve, but you’ll have the landscape all to yourself and it’s great acclimatisation just to be out here a little longer.
Plaza Francia (also signed) is about 40min beyond Mirador de la Pared Sur and indeed the view of Aconcagua’s south face is spectacular! The return to Confluencia follows an identical route and should take about an hour less than the walk out.


Day 3: Confluencia to Plaza de Mulas (Base Camp)
- distance: 17km
- elevation gain: 1,000m
- bb time: 6.5hrs
- max elevation: 4,300m
Following yesterday’s route towards the junction with Plaza Francia, cross the river on a wooden bridge and then begin a steep, dusty ascent into the valley. The first section of this hike is a little breathless, but things level out within an hour and the grade is so mild that it doesn’t even feel like you’re gaining elevation.
The middle section of this hike ascends gently through a dry wash and eventually over/around hundreds of rivulets— the easiest route forward is usually to hug the right side of the valley to avoid constant stream crossings (when the water level is low, you can walk straight up the centre of the wash).

Despite the almost imperceptible elevation gain, the ill-defined path through the rocks and extreme sun exposure make for an incredibly tiring day. No matter the temperature (which can feel like an OVEN in the valley), try to keep as covered as possible and apply copious amounts of sunscreen. A burn at this elevation can be pretty serious and it will not help you with temperature regulation when you get into colder conditions!
Base Camp comes into distant view towards the end of the valley, where the final 1.5-2hrs climbs steeply up and down a rocky trail— the constant loss of elevation when you’re trying to ascend is a little demoralising, so it will be with great relief that you crest over the final hill and see Base Camp situated below Aconcagua, glaciers hanging overhead and lesser peaks in every direction.
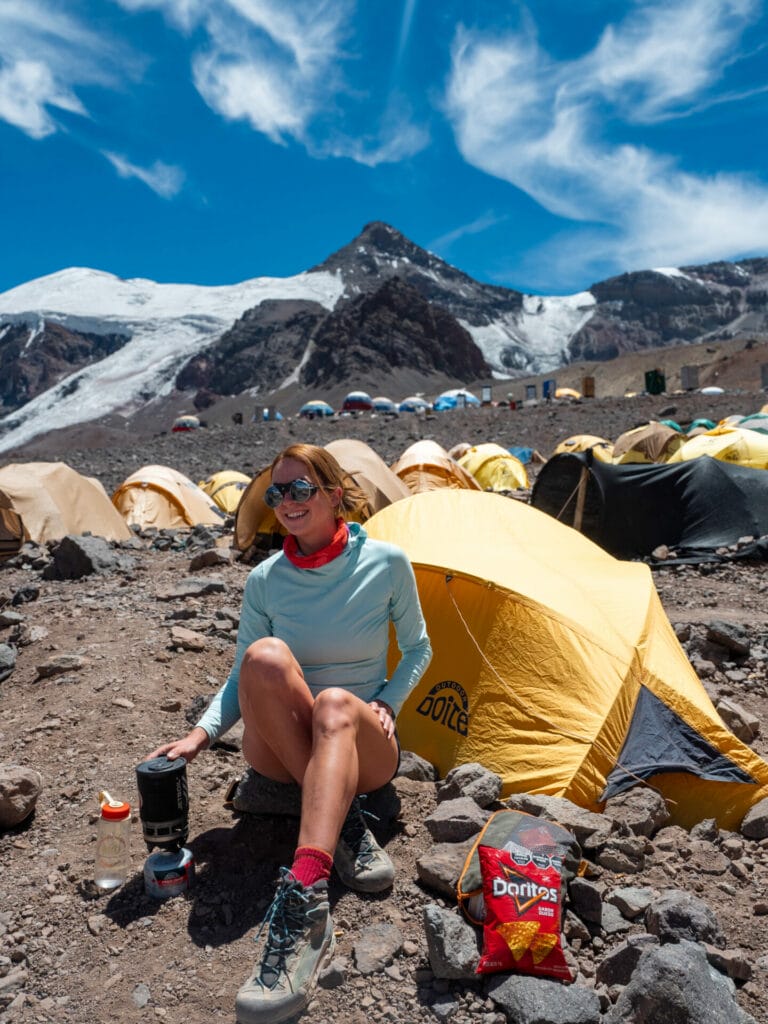
Plaza de Mulas is impossibly scenic and packed with amenities, many of which are still accessible to solo climbers. This is also where you’ll pick up any gear that mules hauled in— you’re on your own now!


Day 4: rest day at Base Camp
- max elevation: 4,300m
After yesterday’s brutal sun exposure and ahead of tomorrow’s ascent, I’d recommend a simple rest day at Plaza de Mulas— sleep as late as possible, shovel in the calories, stay out of the sun, check the weather radar, visit the camp doctor to get cleared for ascent, and organise your gear for the climb!
EXTRA DAYS AT BASE CAMP: Depending on how acclimatised you are and what the weather looks like, you might opt for a 2nd or even 3rd day at Plaza de Mulas, in which case you could do an acclimatisation hike up to Canadá (High Camp 1) or across the valley to any number of lesser peaks. Ask Inka Expediciones staff or any of the local guides around camp for a recommendation if you’re short on ideas.


GEAR CARRY: I had originally planned to do a gear drop up to Nido de Cóndores (High Camp 2) on day 5, return to Base Camp to sleep, then ascend with the remainder of my gear the following day to camp at Nido, but circumstances compelled me to change plans.
Firstly, I had a good weather window approaching, so I wanted to get up high and accelerate my acclimatisation (only advisable because I had done a lot of pre-acclimatisation and my vitals were really strong). Secondly, I spoke to several guides who reported that there was no snow on the route and therefore no need for crampons or an axe; this was moments after my camera broke, so suddenly the amount of climbing and photography gear I needed to haul had diminished enough that I could get my pack down to a carry-able 25kg. Rather than do a 2-part ascent to Nido de Cóndores with a gear drop, it was feasible for me to haul all my gear at once. In other circumstances, a gear drop will be unavoidable and would occupy a day of your itinerary.

Day 5: Plaza de Mulas to Nido de Cóndores (hauling full gear)
- distance: 5km
- elevation gain: 1,300m
- bb time: 2hrs to Canadá + 2hrs to Nido
- max elevation: 5,560m
Despite being short in time and distance, the ascent from Base Camp to Nido de Cóndores is breathless, gaining 1,300m on winding slopes of loose scree and dirt in full sun. Hauling all of your gear adds to the challenge, but the scenery is an excellent distraction!
The first section of this climb from Plaza de Mulas (4300m) to Canadá (5050m; High Camp 1) takes about 2hrs and racks up a sizeable elevation gain over just a few kilometres. There’s a great rock spire at exactly halfway that makes for a nice water and snack break. Once at Canadá, hang out for a while and eat lunch to recoup energy for the second half of the ascent.
🗺️ I built a custom Aconcagua GPS map with daily tracks based on my summit itinerary, dozens of waypoints, and other essential navigational information to help you stay on track. For solo expeditions, this is essential!

The climb from Canadá to Nido de Cóndores (High Camp 2) is even shorter and gains just 500m, but I found that it took me almost the same amount of time just because I was starting to get tired with my full pack (25kg, since I opted not to do a gear drop). Once again, there’s a rocky outcrop that marks almost the perfect midpoint, so plan to rest here before the final push to 5,560m!

CONDITIONS: this section of the trail is often covered by snow, but was completely bare during my climb. As a soloist, make sure to chat with staff and local guides around Base Camp to ascertain current conditions so you can prepare accordingly. Because of recent reports, I was able to leave my crampons and ice axe at Base Camp!

Day 6: rest day at Nido de Cóndores
- max elevation: 5,560m
At this elevation, 1,300m is a sizeable gain in one day (you’ll probably feel yesterday’s ascent a bit!), so it’s nice to allow an entire rest day just to get comfortable at 5,560m before pushing higher. I spent this day walking around camp, shovelling in calories, drinking 4L of water (more than twice what I’d usually drink), reading in my tent, and just generally stockpiling energy for the coming days.
If the weather is good enough (and you feel well enough), you could certainly tackle the short acclimatisation hike up to Cólera at 5,970m today— I personally had a bit of a headache on the night of day 5, so I decided to prioritise rest at Nido and save my hike for the following day.

Day 7: acclimatisation hike to Cólera
- distance: 2km
- elevation gain: 410m
- bb time: 1.5hrs up + 45min down
- max elevation: 5,970m
Whether you managed any activity yesterday or just lay in your tent, at least one acclimatisation hike up to 6,000m is ESSENTIAL before the summit push. From Nido de Cóndores, follow one of several well-beaten paths up the mountain for just 1.5hrs to reach High Camp 3. In dry conditions, this is a long scree slope cut by gentle switchbacks that are still likely to leave you a little breathless at this elevation.
The 2x High Camp 3 are located about 10min apart at roughly the same elevation, so even if you end up leaning right and top out at Berlin, it’s easy to cut across on a relatively flat path to reach Cólera, which is situated just above a rocky section protected by metal cables (pictured below on the right).


This is the route I took up to the summit (via Cólera), so I wanted to have a look at the trail and familiarise myself— the next time you pass through the area will be pitch black, freezing cold, and around 3am, so think of this as a dress rehearsal for your summit day.
🗺️ I built a custom Aconcagua GPS map with daily tracks based on my summit itinerary, dozens of waypoints, and other essential navigational information to help you stay on track. For solo expeditions, this is essential!
Plan to hang out for lunch, soaking in as much time at 5,970m as possible. You’re still 1,000m shy of the summit here, but every little bit helps. Cutting some of the switchbacks on the descent and dropping quickly through the scree, you can return to Nido de Cóndores in 30-45min.
Get to sleep early in anticipation of an extremely early start tomorrow— the summit push!


Day 8: Nido de Cóndores to summit (& return)
- distance: 5km
- elevation gain & loss: 1,500m
- bb time: 9hrs up + 3hrs down
- max elevation: 6,962m
DEPARTURE TIME: When deciding on a start time for summit day, you’ll need to take two main things into account: the weather and your speed.
* Check the hourly mountain forecast the night before departing and try to avoid the worst wind chill/wind speeds or precipitation.
* There’s a 3pm cut-off for the summit (theoretically enforced by rangers), and I met a guided group who left camp at 1am and still ended up having to turn around at 6,700m because they ran out of time— don’t put yourself in a situation to miss out on summiting only because of time! If you’re a slow hiker, start EARLY.
I’m a relatively fast hiker (and it’s always quicker solo, since you only have to stop and rest when YOU want to), but with high winds and snow forecasted to start around midday, I left camp at 1.15am. I was on the summit by 10.15am, off by 10.45am, and back to camp by 1.45pm.


Even having “rehearsed” the first bit of the ascent to Cólera on yesterday’s acclimatisation hike, it can be difficult to find the path in the dark— a gps track is essential!
Due to the added route-finding challenges, the extreme cold, and cumbersome double boots (which I did not wear on any previous days), it took me about 1h45m to reach Cólera, a bit longer than yesterday. This is a good spot for a short water and candy break, and even if you don’t feel like it, force yourself to have a little.

From Cólera, now entirely on new terrain, the route snakes upwards and eventually follows a long series of switchbacks. Often covered by snow, the trail was melted out during my February ascent and punctuatd very rarely by ice and penitentes; there are challenges with either condition, but it can be hard to find purchase in the loose dirt and scree on steeper sections, so take it slow and use your poles.

At 6400m, you’ll come to the abandoned La Independencia Hut, a now-collapsed wooden emergency shelter on a narrow saddle. Continue upwards a short distance to Portezuelo del Viento before beginning a long, sweeping long traverse across the mountain known as La Travesia (or simply “the traverse”).
Again, this section is very prone to ice, so in more extreme conditions, careful crampon work and ice axe handling are essential; the mountain was completely melted out on my summit day, but just 3 days later, friends ascended through considerable snow. You never know what conditions you’ll find on Aconcagua!


Now with the burgeoning light of sunrise, the traverse brings you across the backside of the mountain and up to The Cave, a rocky overhang that provides shelter against the potentially harsh elements around 6650m, still 300m below the summit.
This is a popular spot to take a rest before the final push upwards through the most challenging section of the entire climb, La Canaleta— a steep 35º to 40º ascent on loose dirt, scree, talus, snow, and ice (depending on the weather) that sends you two steps backwards for every step forward. It is a brutal, breathless struggle to gain any elevation and can be a little disheartening. But carry on!


It’s another 2hrs+ of scrambling in a wide left-leaning arc to top out at 6,962m. This is not only the most physically demanding section, but also the most mentally challenging part of the ascent— you’ll swear you’re “almost there” for the entire 2hrs, making minuscule progress on the gps despite feeling like you’re covering solid ground on the mountain.
The final moments involve a scramble up to the summit over a large boulder field, and when you crest over the rocks and see the summit marker shining proudly in the morning light, it’s hard not to burst into tears— or at least it was for me. Even without technical mountaineering demands, this was the most mentally and physically taxing climb I’ve ever done, a constant battle against the elevation that robs you of breath, impairs your vision, badly hampers coordination, and just generally zaps you of energy.


Of all the 7 Summits, Aconcagua (the 2nd highest after Everest) has the lowest success rate— just 30% of those who attempt to summit actually make it to 6962m. Because of its classification as a non-technical ascent, it is woefully underestimated, but the altitude and changing conditions make this a challenging mountain even if you never pick up an ice axe (which I didn’t during my February climb).
Pushing hard to reach the summit and exhausting all my energy stores, I bonked extremely hard on the descent. It was my first experience with hitting the wall like this— slipping in and out of consciousness while hiking, barely able to hold my eyes open. And it was pretty scary.
For those who don’t know, bonking is a state of extreme energy deficit that occurs when you exhaust all of your glucose & glycogen stores (the body’s preferred fuel source and also the easiest to process at elevation) to the point that your body cannot continue moving. Along with the typical manifestations of hypoglycaemia, like weakness, fatigue, lightheadedness, and minor cognitive impairment, the lack of glucose in your system also impacts your muscles in terms of coordination, strength, and overall energy— if you’ve ever seen videos of a cyclist collapsing after a long ride and not being able to stand up on their own, they were probably bonking.
This phenomenon is well-known among endurance athletes who are pushing their body to extremes over a sustained period of hours— and when you’re climbing at elevation for an entire day, expending a massive amount of energy (an estimate 10,000kcal on summit day) while not being able to ingest hardly any calories due to the cold, nausea at elevation, or simply the physical demands of that kind of exercise preventing you from wanting to eat… it can be very easy to slide into an energy deficit.
I’m sharing all this to say that I was NOT diligent enough about my sugar consumption on the final stages of the ascent. As a solo climber, it was extremely dangerous and a valuable learning experience (for me and hopefully also for you) about the importance of monitoring your caloric intake while climbing. Especially if you’re alone, you HAVE to be your own caretaker on the mountain, and if it means setting an alarm to eat a handful of gummies or a package of Gu on the hour, then absolutely DO IT.
👉🏼 Check out this post for a breakdown on how I pack backcountry food for alpine expeditions
Even with my frequent trail naps, it took me just 3hrs to drop back to my tent at Nido de Cóndores, so in better shape you could easily cut that return time down to 2-2.5hrs. Cut the switchbacks and descend directly down the mountain where possible.
If energy allows, you could pack up camp and drop all the way to Base Camp this afternoon, but there was no way I was moving anywhere in my state— I crawled into my tent at Nido and slept for 18hrs.

Day 9: Nido de Cóndores to Base Camp
- distance: 5km
- elevation loss: 1,300m
- bb time: 1.25hrs
- min elevation: 4,300m
The descent from Nido de Cóndores to Base Camp is a delightfully easy one— cutting switchbacks in favour of a more direct drop down the scree and dirt (staying to the far right of Canadá) will shoot you out into Plaza de Mulas in just over an hour.
Logistically, you’ll probably need to spend a night at Base Camp before hiking out to the park entrance at Horcones:
- Bring your numbered white rubbish bag and orange poo bag to the Inka office, where they’ll sign off your permit to save you from carrying these out to the park entrance (without a signature or presentation of these bags, you will be fined upwards of $300 upon exiting the park!!)
- Pick up any gear you left in the storage tent— I left behind crampons, ice axe, additional food, extra fuel, chargers, etc when I ascended to Nido
- Organise gear that you will drop off with the mules by 9.30am tomorrow for transport out to Penitentes. Although largely downhill, the hike out to Horcones is still a long one and you’ll enjoy a light pack!
- Relax and CELEBRATE!

Day 10: Base camp to Horcones (park entrance)
- distance: 24km
- elevation gain: 150m
- elevation loss: 1,600m
- bb time: 5.5hrs
- min elevation: 2,900m
As previously mentioned, if you organised mule transport for a duffel into Base Camp, you’ll also have mule transport back out to Penitentes— and since you won’t be camping along the route this time, you can effectively send all of your weight ahead of you and just carry a few extra layers, water, snacks, and sunscreen in your pack today.
Gear needs to be dropped off with the mules at Base Camp by 9.30/10am and will meet you in Penitentes by 7pm, which annoyingly limits you to the 8.15pm bus back to Mendoza (arriving at 11.20pm).
The return hike begins with that pesky section of up and down that you’re sure to recall from the journey into Plaza de Mulas a week ago, but flattens after about an hour into the wide riverbed that occupies the middle section of the hike (and will feel like an eternity in the direct sun). After hopping over all the rivulets and then cutting directly up the middle of the long stretch of dry wash, it’s barely another hour of dropping steeply along a dusty trail to arrive at Lower Base Camp.
When passing Confluencia, stop to speak to the Inka staff, who will ensure that a transfer is waiting for you at Horcones to drive you to the ranger station about 2km down the road for your check-out procedures and then onwards a further 10km to the office at Penitentes, where you will meet your gear from the mules, repack, and eventually catch the 8.15pm Andesmar bus back to Mendoza.
What an unbelievable adventure!

Read more about Aconcagua & other high-elevation climbs
Complete Aconcagua expedition packing list: what I packed for a successful solo climb
Aconcagua expedition GPS map for download + offline navigation
High-altitude: a climber’s guide to preventing & treating altitude sickness
Solo climbing Mont Blanc via the Goûter Route
Pico de Orizaba climbing guide: summiting Mexico’s highest peak
The Comments
Manaslu circuit trek visit view nepal price
This is such an incredibly detailed and inspiring guide to solo climbing Aconcagua! I really appreciate how you balanced practical logistics with honest insights about the physical and mental challenges of such a demanding expedition. It truly highlights how rewarding—but serious—this adventure can be for experienced climbers.
franc
Hello Brooke,
top vos aventures, et je trouve ça hyper intéressant de s’acclimater 2 semaines sur les volcans au Mexique avant de gravir l’Aconcagua. Vous vendez les traces GPX de l’Aconcagua (super! je serais intéressé), mais avez-vous également les traces GPX des 4 volcans?
Cordialement,
Franc
brooke beyond
francHi Franc, I don’t have GPX files for the volcanoes yet, but it’s an excellent suggestion!
I will work on those and hopefully release shortly 🙂
Atonu Das
Hi Brooke
Thank you..this is excellent information..you are truly inspiring! One question. 12 days insurance is allowed even though the permit is for 20 days and can the permit or insurance dates be changed by a day or two if plans have to change for genuine issues?
Thanks and take care on your travels…
Atonu
brooke beyond
Atonu DasHi Atonu, it worked for me to show the 12-day insurance plan for my 20-day permit from a government requirement standpoint, but for actual INSURANCE purposes, you’d want to get a longer policy to make sure you’re covered if your itinerary ends up extending a few days.
Katie
Hey Brooke, Thanks so much for this information. I am really considering a solo unguided (logistics only) hike with Inka or similar company Jan 2026. Did you ever wish you had hired a guide?
Also, I know you didn’t end up doing any gear caches to higher camps, but do you know, if you were to drop gear off one of the high camps, then go back down to sleep, where do you cache gear and what do you cache it in? Like a big dry bag?
Another question, If you were to cache your tent at a high camp, then go back down to base camp, is there tents you can sleep in if you are unguided with Inca? Or can you not cache a tent because you need it to sleep?
brooke beyond
KatieHi Katie,
Personally, I LOVED the experience of doing this solo and actually feel like I had a way better experience than the guided groups, since I was free to set my own schedule and adjust quickly based on weather/fatigue/altitude. It’s a lot of logistics and responsibility to do this alone, but if you’re someone who enjoys solo adventures, this is truly a great one. And one of the few high-altitude peaks where it’s even possible to tackle solo!
If you cache gear at the upper camps, yes just drop a duffel or a large dry bag, this is what most people seemed to do. If you did want to cache a tent, you’d need a SECOND tent… or you can pay to sleep in the Inka bunkroom, maybe? You’d have to check on that.
Hope that helps!
xx bb
Tony Zhen
Hi Brooke
This is the ultimate guide for Aconcagua – thank you so much for spending the time to write something so detailed and comprehensive!
I never entertained the idea of climbing Aconcagua without a guide – until now.
Looking to do Aconcagua solo next year 🙂
Love your content!
Tony
brooke beyond
Tony ZhenWishing you all the best on your climb, Tony! And I’m so happy to hear you found the info helpful 🙂
Brooke
Felipe
Brooke,
This post is fantastic. Thanks for sharing your experience on this amazing place.
Question, do you remember when and which has been your first solo in South America?
brooke brisbine
FelipeHi Felipe, thanks for reading!
This was my first solo summit in South America, most of my other solo climbing has been in the Alps (Mont Blanc, Aiguille du Tour, etc).
Happy climbing to you 🙂
xx bb
Testut jean paul.
Merci. Et bravo. Votre documentaire est vraiement précis et précieux. La monté en solo renforce l idée d aventure.
En diminuant certainement le coût ?
Jean Paul. from France.
Je vais tenter l aventure je l espère en février 2025.
Mon expérience :sportif régulier
+ mont blanc
+kilimandjaro + pic lenine
brooke brisbine
Testut jean paul.Wishing you a successful summit in February, Jean Paul!
It is truly the adventure of a lifetime and there’s nothing quite like 7000m.
xx bb
Bhavesh
Congratulation Brooke. You are amazing and always inspiring testing your limits. This was the article I was looking for as i too want to try Aconcagua Solo.
Did you purchased dehydrated food packs in Mendoza? Can you let me know the shop name and prices of it in Mendoza? How much was night temperature on Camp 2?
Regards
Bhavesh
brooke brisbine
BhaveshHi Bhavesh, I’m so happy you found this post helpful!
I purchased all the dehydrated food in North America and only supplemented with some supermarket food in Mendoza, but there are a few mountain shops in town where I’d expect you can purchase food.
I don’t know the exact nighttime temp at Camp 2, but I’d estimate -5 to -10C. Approaching the summit, it dropped down to about -28C at the lowest, with windchill, so be prepared for COLD!
Hope that helps, wishing you a successful summit!
xx bb
Flyway better
Hello, Climbing aconcagua is also my dream, you are very lucky to be climbing up Aconcagua. Your blog is full of information and photography fascinated me.
brooke brisbine
Flyway betterthank you so much 🙂
Flywaybetter
Hello Brooke,
You don’t know how lucky you are to be climbing, for me climbing is like a dream because I never got time for myself, there is nothing in life except the hustle and bustle of the city and taking care of the family. I also want to live a humble life like you. I liked your photography so much that I can’t express it in words.